Fisher & Paykel DishDrawer DD603 PREFINISHED Скачать руководство пользователя страница 13

11

DETERGENT

 &
 RINSE

 A
GENT 

DISPENSERS

How Much Rinse Agent to Use

The regulator may need adjusting to suit your water 

conditions. The lowest  setting is ‘1’ and the highest 

is ‘5’. Refer to Option Adjustment Mode section to 

adjust the rinse agent setting. If there is excessive 

foam at the end of the wash, reduce the setting. If 

dishes are wet or streaky after drying, increase the 

setting.

Rinse Agent Indicator Light

If the rinse agent indicator light is red, refi ll the 

dispenser.  If the rinse agent indicator light is black, 

there is enough rinse agent for the wash.

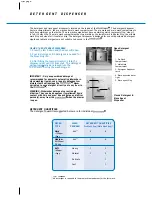
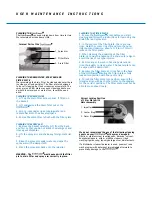
FILLING THE RINSE AGENT DISPENSER

1. Turn the plug counter-clockwise and 

remove.

2. Pour the rinse agent into the circular 

opening.

3. Take care to avoid spilling rinse agent 

into the 

.  Any spillages 

must be wiped up to prevent excess 

foaming.  Failure to wipe rinse agent 

spillages may result in a service call 

which will not be covered by warranty.

4. Fit the plug back into the original 

position.

We highly recommend the regular use of liquid rinse agent to give the best drying results. Rinse agent gives a 

streak free, sparkling clean look to glass and chinaware, in addition prevents metal from tarnishing. The rinse 

agent dispenser is on the inside of the drawer, located underneath the detergent dispenser. The dispenser holds 

approximately 1.7 fl .oz of rinse agent.

R I N S E   A G E N T

trim p

H A R D   W A T E R   S I T U A T I O N S

If you live in a hard water situation, we recommend the installation of a water softener to improve the water 

quality, detergent effectiveness and prevent the build up of calcium deposits on dishes and in the 

.

Certain brands of dishwasher detergent contain varying quantities of phosphates, which help soften water. We 

suggest you use a detergent with high phosphate content to improve the wash. The detergent compartments need 

to be completely FULL and rinse agent is used with its setting fi xed at 5.

We recommend the use of a dishwasher cleaner/descaler whenever you notice a build up of calcium deposits 

in your 

.

After you have used the dishwasher cleaner/descaler you must run another wash program with detergent 

to prevent damage to the 

.

S O F T   W A T E R   S I T U A T I O N S

It is very important that if you are in a natural soft water supply or your water is softened you do not use too 

much detergent in your 

, as it may cause irreversible etching.  In a dishwasher, softened water is more 

aggressive on glassware than natural soft water so care needs to be taken with quantities of detergent used.

Etching is a chemical deterioration that occurs on the surface of glassware when it is subjected to high 

temperatures, too much detergent and/or soft water situations.  Etching is caused by a combination of very hot 

water, which causes the detergent to be come very aggressive, but because the water is soft, there are no water 

hardness mineral ions for the detergent to bind to, so it extracts mineral ions directly from the glass.

Etching initially looks like rainbow coloured fi lm, as the glass is subjected to further washing the surface will 

eventually appear opaque.  This type of etching is irreversible.

To prevent etching from occurring on glassware use less detergent (follow the recommended detergent quantities 

in the User Guide for soft water situations), and ensure the dishwasher is not overloaded, so water can reach 

all the dishes during the wash.

Содержание DishDrawer DD603 PREFINISHED

Страница 1: ...U S E R G U I D E ...

Страница 2: ...erware Care pg 13 Caring for your dinnerware Option Adjustment Mode pg 14 15 How to enter Option Adjustment Mode How to change the Rinse aid setting Auto Power Option End of Wash Program Beeps Closed Drawer Option and the Clean Dish Indicator Option User Maintenance Instructions pg 16 Cleaning the Cleaning the drain filter spray arm and filter plate Fault Codes pg 17 How to recognize a fault code ...

Страница 3: ...U S E R G U I D E P R E F I N I S H E D I N T E G R A T E D M O D E L 1 PREFINISHED DD603 White Stainless and Black INTEGRATED DS603I ...

Страница 4: ...r can The utilizes the efficiency and easy access of the everyday kitchen drawer and turns it into the most advanced dishwasher in the world This booklet will guide you through the operating instructions and features of your We recommend reading the User Guide thoroughly before you start using your for the sake of safety as well as success ...

Страница 5: ... in diameter The minimizes water and energy consumption each drawer using half the water of a conventional dishwasher Combining this with the precise markings inside the detergent dispenser you will never use too much or too little detergent for each program allowing you to be guilt free when washing even the smallest load The double can even provide extra kitchen storage use dishes from one drawe...

Страница 6: ...ut 3 Load Dishes Remove all food scraps and load the dishes 1 Add Detergent Rinse Agent 2 Select Wash Program Press the PROGRAM button to select the desired wash The will remember the last program used 4 ECO button Optional Press the ECO button if you would like the wash program to use less energy and time The red Eco light will indicate the feature is on If your dishes are heavily soiled or you r...

Страница 7: ...TART PAUSE button and wait for three beeps before opening Restart by pressing the START PAUSE button Forcing the drawer open while in mid cycle may cause damage or injury 7 Finish The will beep six times to indicate the end of the wash program At the end of the wash program the drying fan will continue to run for a set time or until the drawer is opened The fan assists with drying and uses negligi...

Страница 8: ...sh Program Press the PROGRAM button to select the desired wash The will remember the last program used 4 ECO button Optional Press the ECO button if you would like the wash program to use less energy and time The red Eco light will indicate the feature is on If your dishes are heavily soiled or you require enhanced dry performance we do not recommend ECO programs 5 Check Ensure the drain filter is...

Страница 9: ... to indicate the end of the wash program At the end of the wash program the drying fan will continue to run for a set time or until the drawer is opened The fan assists with drying and uses negligible amounts of energy It is normal for some water to remain in the drain filter area after the wash program is complete 8 DELAY START MODE optional The start of the wash program can be delayed from 1 to ...

Страница 10: ... install the Mega Rack To install the Mega rack place the outer legs of the rack on top of the basket and clip the Mega rack to the side of the basket When the Mega rack is correctly installed it should not feel loose in the basket Cup Racks Cups glasses and kitchen utensils can be placed on the left and right hand side of the cup racks For best performance ensure there are no large items below bl...

Страница 11: ...ether and wash water may not get through Ensure cutlery has not fallen through and stopped the spray arm from rotating Ensure cutlery are not nesting or stuck together They need to be evenly spread out Check the bottom of the cutlery basket to ensure sharp or pointed items have not come through as they may stop spray arm rotation Please note that the basket and its inserts are not designed to be l...

Страница 12: ...ed into the during the wash program 3 4 5 2 1 Open Detergent Dispenser Closed Detergent Rinse Agent Dispenser IMPORTANT Only use powdered detergent recommended for domestic automatic dishwashers Hand washing liquids soap laundry detergents or disinfectants will damage the Never sprinkle or pour detergent directly onto any item in the WARNING Dishwasher detergents are strongly alkaline They can be ...

Страница 13: ...lcium deposits on dishes and in the Certain brands of dishwasher detergent contain varying quantities of phosphates which help soften water We suggest you use a detergent with high phosphate content to improve the wash The detergent compartments need to be completely FULL and rinse agent is used with its setting fixed at 5 We recommend the use of a dishwasher cleaner descaler whenever you notice a...

Страница 14: ...Post Rinse Post Rinse Post Rinse Post Rinse 2 Final Rinse 165 F Final Rinse 150 F Final Rinse 115 F Final Rinse 130 F Drying Phase Drying Phase Drying Phase ECO PROGRAM HEAVY NORMAL FAST DELICATE When to Use Heavily soiled Normal soiled Lightly soiled Non greasy lightly everyday dishes for optimum non greasy soiled heat dishes energy use dishes sensitive crockery Program Pre Wash 1 Pre Wash Descri...

Страница 15: ...HER METALS Iron and cast iron objects can rust and stain other items Copper pewter and brass tend to stain WOODWARE Wooden items are generally sensitive to heat and water Regular use in the Dishwasher may cause deterioration over time If in doubt wash by hand PLASTIC Some plastic may change shape or color with hot water Check manufacturer s instructions about washing plastic items Washable plastic...

Страница 16: ...ps Closed Drawer and Clean Dish Indicator options can be changed HOW TO REMOVE THE AUTO POWER MODE SABBATH OPTION When the leaves the factory it is programmed to automatically turn itself on whenever the drawer is opened The will not start washing until the drawer is closed and the START PAUSE button has been pressed If you do not want the to turn itself on automatically this feature can be turned...

Страница 17: ... Option Adjustment Mode as explained previously 2 Press the START PAUSE button twice The light above the START PAUSE button will be green and the light above the LOCK button will be red If it is not press the POWER button and start again 3 Press the LOCK button to turn the End of Wash Program Beeps on or off If all the red lights on the wash program indicator are off then the End of Wash Program B...

Страница 18: ...nd rinse agent dispenser 2 Lift the spray arm and shake any foreign material out 3 Rinse the spray arm under water and wipe the spray arm with a damp cloth 4 Place the spray arm back onto the impeller WARNING The must be used with the filter plate drain filter and spray arm correctly in place U S E R M A I N T E N A N C E I N S T R U C T I O N S CLEANING THE FILTER PLATE 1 Ensure the is cool befor...

Страница 19: ...water and power supply off to the 6 When calling your Fisher Paykel Authorized Service Center advise them of the fault code that has appeared on the This information will help the Authorized Service Center respond better to your request If you then have any questions about operating the product please contact our Fisher and Paykel Customer Care Center F A U L T C O D E S FAULT CODES PREFINISHED IN...

Страница 20: ...ware Use recommended brands of dishwasher detergent Refer to Wash Programs section or the detergent manufacturer s instruction Clean the spray arm Clean filter plate and drain filter Refer to Accessories section for correct installation We recommend the installation of a water softener Use detergents with a high phosphate content and increase the dosage PROBLEM will not start Excess water in Water...

Страница 21: ...ol Prefinished or green light Integrated disappears and or press the POWER button to open the Close the and press the START PAUSE button Refer to Fault Codes section WHAT TO DO inside stained Dishes did not dry Foaming No detergent dispensed Excessive motor noise Water leaking will not open Intermittent beeping Continuous beeping POSSIBLE CAUSE Some foods like tomato based products may stain the i...

Страница 22: ...O N S This appliance must be grounded In the event of a malfunction or breakdown grounding will reduce the risk of electric shock by providing a path of least resistance for electric current This appliance is equipped with a cord having an equipment grounding conducter and a grounding plug The plug must be plugged into an appropriate outlet that is installed and grounded in accordance with all loc...

Страница 23: ...s that are contaminated by gasoline paint steel or iron debris corrosive acidic or alkaline chemicals are not to be washed in the If the is not being used for long periods of time turn the electricity and water supply to the off It is important that the User Guide should be retained with the appliance for future reference Should the appliance be sold or transferred to another owner always ensure t...

Страница 24: ...ies B Replacement of house fuses or resetting of circuit breakers C Defects caused by factors other than 1 Normal domestic use or 2 Use in accordance with the Product s User Guide 3 or used commercially D Defects to the Product caused by accident neglect misuse fire floods or Act of God F The cost of repairs carried out by non authorized repairers or the cost of correcting such unauthorized repair...

Страница 25: ...or service or assistance Check the things you can do yourself Refer to your User Guide and check 1 Your product is correctly installed 2 You are familiar with its normal operation If after checking these points you still need assistance please refer to the following In the USA if you need assistance For your local Fisher Paykel Authorized Service Agent please call TOLL FREE 1 888 9 FNP USA 1 888 9...

Страница 26: ...connected and switched on The inlet water hose is connected and turned on There should be no leaks The drain hoses are connected and there are no leaks The spray arm is in the center and can freely rotate The rinse program has been run There must be no kinks or obstructions in the drain hose s The water level will be below the stainless steel filter plate at the end of the wash program It is norma...

Страница 27: ...cribed at the date of issue Under our policy of continuous product improvement these specifications may change at any time You should therefore check with your Dealer to ensure this booklet correctly describes the product currently available USA www fisherpaykel com Date of issue July 2001 Part No 526625 B www fisherpaykel com ...

Отзывы: