4
Sicherheitshinweise
Veiligheidsrichtlijnen
Informazioni per la sicurezza
Safety Information
Indicaciones de seguridad
Óêàçàíèÿ ïî òåõíèêå áåçîïàñíîñòè
Consignes de sécurité
Observações sobre segurança
安全指南
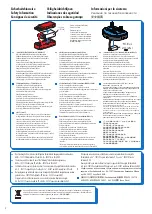
■
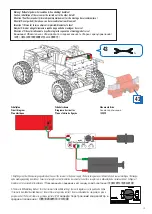
1 Batterie 9Volt-Block Alkaline oder 1 NiMH-Akku 9V
·
Nicht wiederaufladbare Batterien dürfen nicht geladen werden
·
Aufladbare Batterien dürfen nur von Erwachsenen geladen werden
·
Aufladbare Batterien sind aus dem Batteriehalter herauszunehmen,
bevor sie geladen werden.
·
Batterien müssen mit der richtigen Polarität eingelegt werden.
·
Leere Batterien müssen aus dem Spielzeug herausgenommen werden
·
Die Anschlussklemmen dürfen nicht kurzgeschlossen werden.
·
Verbrauchte Batterien dem Sondermüll zuführen.
·
Drähte nicht in Steckdose einführen!
·
Ladegerät regelmäßig auf Schäden überprüfen.Bei einen Schaden darf das
·
Ladegerät bis zur vollständigen Reparatur nicht mehr verwendet werden.
·
Alle elektrischen Bauteile (Motoren, Lampen) dürfen ausschließlich an
Stromversorgungen von fischertechnik angeschlossen werden.
■
9V rechargeable battery or 9 V alkaline dry cell
·
Do not attempt to charge NON-rechargeable batteries.
·
Rechargeable batteries are only to be charged by adults.
·
Take rechargeable batteries out of the battery tray before charging them.
·
Insert batteries with the correct polarity.
·
Remove dead batteries from the toy.
·
Do not short circuit the connecting terminals!
·
Discard spent dry cells at special waste disposal centre.
·
Do not insert the wires into an outlet!
·
Regularly inspect battery charger for damage.If the battery charger has been
damaged, it should not be used further until fully repaired.
·
No electrical components (motors, lamps) are to be connected to any other
power supply than that provided by fischertechnik.
■
pile 9V où accu 9V
·
Il est interdit de recharger des piles qui ne sont pas des accumulateurs
·
Le chargement des accumulateurs doit toujours se faire par des adultes
·
Retirer les accumulateurs du support de pile avant de les recharger.
·
Veiller à la polarité correcte lors de la mise en place des piles.
·
Retirer impérativement les piles ou accumulateurs vides du jouet.
·
Il est interdit de court-circuiter les bornes de raccordement.
·
Jeter les piles usagées dans un conteneur spécial réservé à cet effet.
·
Ne pas introduire les fils dans une prise !
·
Contrôlez régulièrement le chargeur en vue d‘éventuelles détériorations
·
En cas de détérioration, il est interdit d‘utiliser le chargeur jusqu‘à ce qu‘il ait
été intégralement réparé
·
Tous les composants électriques (moteurs, lampes) ne doivent être branchés
aux alimentations électriques uniquement que par la société Fischertechnik.
■
alkaline batterije of oplaadbare batterije (9Volt)
·
Niet-oplaadbare batterijen mogen niet worden opgeladen.
·
Oplaadbare batterijen mogen uitsluitend door volwassenen worden opgeladen.
·
Oplaadbare batterijen moeten uit de batterijhouder worden verwijderd, voordat
deze worden opgeladen.
·
De batterijen moeten met de juiste polariteit worden geplaatst.
·
Lege batterijen moeten uit het speelgoed worden verwijderd.
·
De aansluitklemmen mogen niet worden kortgesloten.
·
Afleveren gebruikte batterijen bij het klein chemisch afval (KCA).
·
Geen draden in de contactdoos steken!
·
Laadtoestel regelmatig controleren op schade.Bij schade mag het laadtoestel
niet meer gebruikt worden tot het volledig hersteld is.
·
Alle elektrische componenten (motoren, lampen) mogen uitsluitend op
stroomvoorzieningen van fischertechnik worden aangesloten.
■
pila alcalina bloque de 9 Voltios o acumulador NiMH- de 9 Voltios
·
Las pilas no recargables no pueden ser cargadas
·
Las pilas recargables sólo pueden ser cargadas por un adulto
·
Las pilas recargables deben ser extraídas del compartimiento de pilas antes de
que sean cargadas.
·
Las pilas deben ser colocadas con la polaridad correcta.
·
Las pilas descargadas deben ser extraídas del juguete
·
Los bornes de conexión no pueden ser puestos en cortocircuito.
·
Retirar las baterias viejas, desechándolas en un depósito de basuras especiales.
·
No introducir hilos en la toma de corriente!
·
Comprobar con regularidad si el cargador presenta daños.En caso de
presentar daños, el cargador no debe volver a ser utilizado hasta que esté
completamente reparado.
·
Todos los componentes eléctricos (motores, luces) deben conectarse a la
alimentación de corriente de la técnica Fischer exclusivamente.
■
Bateria alcalina de bloco de 9 V ou acumulador NiMH- de 9 V
·
Pilhas não recarregáveis não devem ser novamente carregadas.
·
Pilhas recarregáveis somente devem ser recarregadas por adultos.
·
Pilhas recarregáveis devem ser retiradas do compartimento de pilhas antes
de serem carregadas.
·
As pilhas devem ser colocadas com a polaridade correta.
·
As pilhas descarregadas devem ser retiradas do brinquedo.
·
Os terminais de conexão não devem ser curto-circuitados.
·
Eliminar as baterias esgotadas como desperdício perigoso
·
Nunca introduzir fios na tomada!
·
Verificar regularmente se o carregador apresenta danos.Em caso de dano,
o carregador não deverá ser utilizado enquanto não estiver plenamente
consertado.
·
Todas as peças componentes elétricas (motores, lâmpadas) só podem ser
exclusivamente conectadas em abastecimentos de corrente da Fischertechnik.
■
1 batteria alcalina da 9 V o 1 batteria NiMH- ricaricabile da 9V
·
Le batterie non ricaricabili non devono essere ricaricate
·
Le batterie ricaricabili devono essere ricaricate da persone adulte
·
Le batterie ricaricabili si devono estrarre dal supporto prima di ricaricarle.
·
Le batterie si devono inserire rispettando la polarità.
·
Togliere le batterie dal giocattolo quando sono scariche
·
I morsetti di allacciamento non devono essere cortocircuitati.
·
Smaltire le batterie usate negli appositi contenitori per la raccolta
differenziata.
·
Non inserire i fili nella presa elettrica.
·
Controllare periodicamente se il caricabatterie presenta dei danni.In caso
di danni, il caricabatterie non deve più essere utilizzato fino alla riparazione.
·
Tutti i componenti elettrici (motori, lampadine) devono essere collegati
esclusivamente ad alimentatori fischertechnik.
■
1 алкалиновая батарейка на 9 В или 1 никель-
кадмиевый аккумулятор, 9 В
·
Не пытайтесь заряжать неперезаряжаемые батарейки.
·
Зарядку перезаряжаемых аккумуляторов разрешается
выполнять только взрослым.
·
Перед зарядкой перезаряжаемых аккумуляторов
извлеките их из аккумуляторного отсека.
·
При установке аккумуляторов на место соблюдайте
полярность.
·
Разряженные батарейки необходимо извлечь из игрушки.
·
Не замыкайте накоротко соединительные клеммы.
·
Использованные батареи утилизовать как спецотходы.
·
Íå âñòàâëÿéòå â ðîçåòêó ïðîâîäà!
·
Ðåãóëÿðíî ïðîâåðÿéòå çàðÿäíîå óñòðîéñòâî íà îòñóòñòâèå
ïîâðåæäåíèé.Ïðè íàëèPèè ïîâðåæäåíèé èñïîëüçîâàòü
çàðÿäíîå óñòðîéñòâî äî âûïîëíåíèÿ åãî ïîëíîãî ðåìîíòà
íå ðàçðåøàåòñÿ.
·
Все электрические детали (электромоторы, лампочки.)
можно подключать только к источникам
электропитания от fischertechnik.
■
1 个 9V 的碱性方电池或 1 个 9V 的 NiMH- 蓄电池
·
不得给非充电电池充电
·
只允许由成年人给充电电池充电
·
在充电前必须将充电电池从电池夹中取出。
·
必须按照正负极正确放入电池。
·
必须从玩具中取出没有电的电池
·
接线柱不允许被短路。
·
用完了的电池应作为特种垃圾处理。
·
禁止将金属丝插入插座!
·
经常检查充电器是否有损坏情况。如果充电器有损,
直到完全修好为止不 可以再使用。
·
只允许将所有电气部件 (传感器,电机,灯泡) 与慧鱼技术
产品的电源装置相连接
Batterie ist nicht Inhalt der Packung
Battery not included
Batterie non comprise
De batterij wordt niet meegeleverd
La bateria no está incluida en el suministro
A bateria não é o conteúdo da embalagem
La batteria non è inclusa nella confezione
Батарея в комплект не входит
包装中不含电池
9V E-Block
6F22 /6R61
■
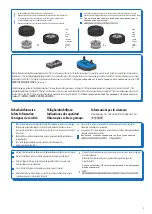
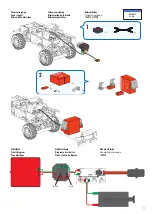
Das Spielzeug darf nur mit einer der folgenden fischertechnik Energiequellen benutzt werden:
Art-Nr.: 135719 Batteriehalter 9V oder Art.-Nr.: 35537 Accu Pack 8,4V.
■
The toy may only be used with one of the following fischertechnik energy sources:
Art No.: 135719 battery tray 9V or Art No.: 35537 Accu Pack 8.4V.
■
L‘utilisation de ce jouet n‘est permis qu‘avec l‘une des sources d‘énergie fischertechnik suivantes :
Art. n° : 135719 support de pile 9 volts ou Art. n° : 35537 pack d‘accumulateurs 8,4 volts.
■
Het speelgoed mag uitsluitend met een van de volgende fischertechnik energiebronnen worden
gebruikt: art.nr.: 135719 batterijhouder 9V of art.nr.: 35537 accupack 8,4V
.
■
El juguete se debe utilizar únicamente con una de las siguientes fuentes de energía:
Art. No. 135719 soporte de pila de 9V o Art. No. 35537 paquete acumulador de 8,4V.
■
O brinquedo somente pode ser utilizado com uma das seguintes fontes de energia da
fischertechnik: art. nº: 135719 Suporte de bateria de 9 V ou art. nº: 35537 Bloco de
bateria de 8,4V.
■
Questo giocattolo può essere utilizzato solo con le seguenti fonti di energia fischertechnik:
cod. prod.: 135719 portabatteria da 9V oppure cod. prod.: 35537 confezione batterie da 8,4V.
■
Игрушку можно использовать только с одним из следующих источников
энергии от fischertechnik: арт. №: 135719 держатель батарейки 9В или
арт. №: 35537 Accu Pack 8,4В
.
■
该玩具只允许使用如下的慧鱼 (fischertechnik) 能量源:商品号:135719
,
9V 电池夹,或者商品号:35537,8.4V 电池套件 (Accu Pack)
Hinweise zum Umweltschutz / Instructions for Environmental Protection / Remarques de protection de l‘environnement / Bescherming van
het milieu / Notas con respecto a la protección del medio ambiente / Instruções para a proteção do meio ambiente / Indicazioni sulla tutela
ambientale /
Указания по охране окружающей среды
/ I
有关环保的提示 :
www.fischertechnik.de/environment
9V E-Block
6F22 / 6R61
Содержание Advanced BT Racing set
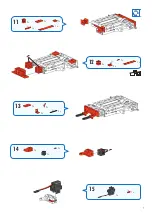
Страница 8: ...6 6 7 60 1 x 1 x 1 x 60 mm 60 1 x 1 x 1 x 60 mm 9 2 x 4 x 7 2 x 2 x 10 2 x 2 x 2 x 8 ...
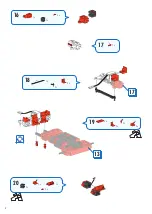
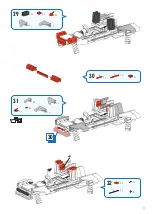
Страница 10: ...8 30 17 19 2 x 4 2 x 2 x 30 2 x 20 30 30 2 x 2 x 1 x 2 x 13 17 15 1 x 16 1 x 1 x 2 x 18 60 1 x 2 x 2 x ...
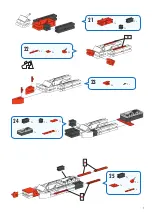
Страница 11: ...9 21 22 1 x 2 x 4 x 30 45 2 x 4 x 2 x 2 x 2 x 24 2 x 2 x 1 x 1 x 1 x 25 45 2 x 4 x 2 x 1 x 60 23 30 ...
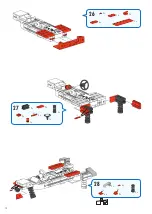
Страница 12: ...10 26 2 x 6 x 2 x 1 x 1 x 27 2 x 2 x 1 x 1 x 30 4 x 4 x 2 x 28 2 x 6 x 2 x 2 x 7 5 60 6 x 7 5 30 ...
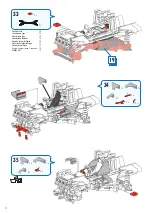
Страница 13: ...11 29 2 x 1 x 1 x 4 x 2 x 60 30 45 1 x 4 x 2 x 30 31 2 x 1 x 1 x 4 x 30 7 5 2 x 7 5 32 45 4 x 1 x 1 x 2 x ...
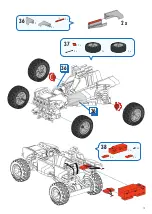
Страница 15: ...13 36 2 x 2 2 x 45 2 x 37 2 x 36 36 38 2 x 1 x 4 x 2 x 2 x 2 x 2 x ...
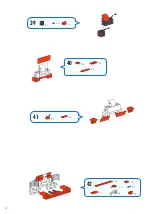
Страница 16: ...14 39 3 x 3 x 1 x 40 2 x 2 x 1 x 41 60 2 x 4 x 42 1 x 2 x 2 x 2 x 2 x 2 x 2 x ...
Страница 22: ...20 6 7 60 1 x 1 x 1 x 60 mm 60 1 x 1 x 1 x 60 mm 9 7 2 x 10 2 x 2 x 2 x 2 x 4 x 2 x 8 ...
Страница 23: ...21 14 11 1 x 2 x 2 x 1 x 16 60 1 x 2 x 2 x 15 13 15 1 x 1 x 1 x 1 x 2 x 15 15 1 x 12 1 x 1 x 2 x ...
Страница 26: ...24 1 x 26 2 x 2 x 27 2 x 2 x 2 x 7 5 60 2 x 2 x 2 x 2 x 2 x 7 5 2 x 2 x 4 x 45 2 x 2 x 28 1 x 1 x 2 x 2 x 27 ...
Страница 33: ...31 500 880 Sound Lights Sound Lights 2 x 2 x 2 x 2 x 1 x 1 ...
Страница 35: ...33 6 7 60 1 x 1 x 1 x 60 mm 60 1 x 1 x 1 x 60 mm 9 2 x 2 x 7 2 x 2 x 10 2 x 2 x 2 x 45 2 x 30 8 ...
Страница 36: ...34 12 2 x 2 x 11 2 x 2 x 1 x 2 x 2 x 30 2 x 13 2 x 2 x 4 x 12 12 30 2 x 14 30 2 x 45 2 x 2 x 2 x 2 x 4 x 45 ...
Страница 37: ...35 15 15 2 x 2 x 4 x 1 x 16 2 x 2 x 1 x 17 1 x 45 2 x 2 x 1 x 17 18 2 x 2 x 1 x ...
Страница 38: ...36 19 1 x 45 2 x 2 x 1 x 20 60 1 x 19 60 4 x 2 x 1 x 21 2 x 45 8 x 2 x 2 x 21 22 60 2 x 2 x 2 x 2 x 2 x ...
Страница 40: ...38 26 1 x 2 x 1 x 2 x 21 2 x 27 2 x 2 x 2 x 2 x 2 x 15 7 5 30 4 x 2 x 30 7 5 15 15 7 5 ...
Страница 41: ...39 28 2 x 2 x 1 x 2 x 4 1 x 60 1 x 29 4 x 2 x 1 x 29 30 2 x 2 x 1 x 60 4 x 2 x 7 5 2 x ...
Страница 44: ...42 34 2 x 33 2 x 1 x 45 1 x 1 x 2 x 2 x 33 2 x 1 x 1 x 2 x 1 x 1 x ...
Страница 47: ......

