First Degree Fitness Titan Rower Скачать руководство пользователя страница 9

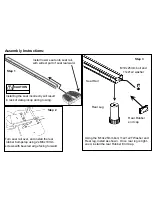
Tank filling and water treatment procedures

.  

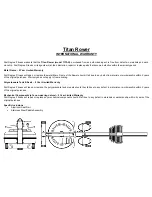
Note:  17 liters of water is required for maximum filling.  


1. Remove rubber fill plug from the top of the tank.           

     
2. Place a large bucket of water next to the Titan rower 

and position siphon with the rigid hose in the bucket 
and the flexible hose into the tank as shown. Note:  
Make sure small breather valve on the top of the si-
phon is closed before filling.  

 
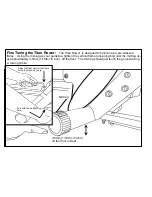
3. Begin filling tank by squeezing siphon. Use Level 

Gauge decal on side of tank to measure volume of 
water in tank.  Note:  The amount of resistance is dic-
tated by the amount of water in the tank; for example, 
9 liters of water provides light resistance, 17 liters of 
water provides heaviest resistance. Important: Do not 
overfill tank!  

 
4. After filling tank to the desired water level, open the 

valve on the top of the siphon to allow excess water 
to escape.  

 
5. Ensure that tank plug is replaced once filling and wa-

ter treatment procedures are complete.  


Tips on Siphon use

: Putting the fill bucket higher  

than the tank will allow the siphon to "self-pump"  
when adding water to the tank. 

Water  Treatment  Proce-
dures: 


Add Chlorine tablet.  


Add very small amount of blue 
dye and check for desired hue. 

Important!

 Do not add blue 

dye for at least 72 hours follow-
ing Chlorine treatment. The 
blue dye adds visual appeal as 
well as cutting down the 
amount of light reaching the 
tank water, thus extending the 
amount of time between water 
treatments. 


Blue dye 

Tank Plug 

Tank filling and water treatment: 


In areas where tap water quality is known 
to be poor, FDF recommends the use of 
distilled water. 


Tank plug 

Siphon 


Содержание Titan Rower

Страница 1: ...Owners Manual www firstdegreefitness com...

Страница 2: ...any piece of fitness equipment consult a phy sician before beginning your Titan Rower exercise pro gram 2 Follow instructions provided in this manual for correct foot position and basic rowing techni...

Страница 3: ...8mm footplate shaft 1 12 Nylon footplate spacer 2 13 17mmx1 5Tx110 Internal spacer 1 14 M8x15mm bolt 2 15 M8 Washer 2 16 Footstrap 2 17 Rear Leg 1 18 75x50 Rubber end cap 1 19 M10x25 Rear leg bolt 1 2...

Страница 4: ...pickup during rowing Step 1 Turn seat rail over and install the rear rubber bumpstop using 2x M6x10mm screws with beveled edge facing forward Step 2 Step 3 Using the M10x25mm bolt 11x21x2T Washer and...

Страница 5: ...ce rear leg is tight ened install the rear Rubber End Cap Step 4 Install the seat rail onto the mainframe Attach sensor lead from seat rail to main frame then align the front seat rail holes with main...

Страница 6: ...he top of the seat rail and secure from under neath with M10 Washer and Nylock Nut M10 Washer and Nylock Nut Note Do not tighten the Vertical seat rail bolt See the Fine tuning your rower page for det...

Страница 7: ...y onto the rower it is only necessary to remove one side and leave the other intact as shown here Note 2 Allen keys of the same size are provided for this portion of the assembly Footplate assembly le...

Страница 8: ...e tighten the vertical frame tensioning bolt until the mid leg ris es approximately 3 5mm 1 10th 1 4 inch off the floor The mid leg should just touch the ground during a rowing stroke Mid leg 3 5mm 1...

Страница 9: ...Important Do not overfill tank 4 After filling tank to the desired water level open the valve on the top of the siphon to allow excess water to escape 5 Ensure that tank plug is replaced once filling...

Страница 10: ...ss when digits are flashing to set values upward Can be applied for all settings with the exception of Total Count and SPM Once values are set press Enter to move into the following mode Reset Press t...

Страница 11: ...ing continuously between strokes Progress a few minutes more each day until you are comfortable with 30 45 minutes training time 3 or 4 times a week This will provide aerobic endurance benefits muscle...

Страница 12: ...oint pull the cord through all three pulleys and leave excess on top of the tank for now Reattaching the rower belt 1 Begin reattaching the rower belt by threading around the rower belt pulley with th...

Страница 13: ...mainframe under bungee tension alone then simply tie off at previous position If the return is too slack experiment by tightening the tension in small increments and testing until the correct tension...

Страница 14: ...ame then cut the plastic end tie and follow the drawing above for bungee removal Next remove the upper frame plug to allow the bungee shock cord to be threaded through the top of the frame Note You wi...

Страница 15: ...off with plastic tie wrap to correct tension Replace frame plug Tip Correct bungee tension is achieved when enough recoil is present for the rowing handle to easily reach the front of the rower pulley...

Страница 16: ...ightly too loose Tighten bolt 1 2 turn and try again Tighten as needed until problem stops Note Over tightening this bolt can damage the seat rail Only tighten bolt until mid leg begins to lift slight...

Страница 17: ...1 90801 Rail 43 1 60615 Bungee Cord 8mmx1250 with Clip 60617 Tie 61008 15 2 60803 Rubber Bump Stop Seat 44 1 90101 Welding Component 16 4 60807 Rubber Bump Stop Screw M6x10 45 1 60102 Upper Mid Frame...

Страница 18: ...Welding Component 71 1 60119 Idle wheel inc 2x60112 Bearing 99 1 60103 Welding Component 72 1 60120 Roll Pin 6mm 100 2 60205 Welding Component 73 1 60121 Bolt M10x90 101 2 90206 Lower Main Frame Mount...

Страница 19: ......

Страница 20: ...defect in materials or workmanship within 5 years of the original purchase Warranty does not apply to frame coating Polycarbonate Tank Seals 2 Year Limited Warranty First Degree Fitness will repair o...

Страница 21: ...g transport of any kind Any labor cost associated with a warranty claim General Conditions The serial number of the machine must be correctly registered with First Degree Fitness or one of its appoint...

Отзывы: