background image


Copyright Notice


This document is copyrighted, 

© 

2014. All rights are reserved. Firich Enterprises Co., Ltd reserves 

the right to make improvements of the product described in this manual at any time without notice. 


No part of this manual may be reproduced, copied, translated, or transmitted in any form or by 

any means without the prior written permission from Firich Enterprise Co., Ltd. Information 

provided in this manual is intended to be accurate and reliable. However, Firich Enterprise Co., 

Ltd assumes no responsibility for its use, nor for any infringements upon the rights of third parties, 

which may result from its use. 


The material in this document is for product information only and is subject to change without 

notice. While reasonable efforts have been made in the preparation of this document to assure its 

accuracy, Firich Enterprise Co., Ltd, assumes no liabilities resulting from errors or omissions in 

this document, or from the use of the information contained herein.  


Revision Record 


Date 

Version 

Description 

Note 

2014/10/1 

0.1 

Draft 

Vince Peng 

2014/11/21 

0.2 


Sabrina Chu 


Содержание AerPPC PP-9635

Страница 1: ...1 PP 9635 Aer PPC U Us se er r M Ma an nu ua al l ver 0 2...

Страница 2: ...rate and reliable However Firich Enterprise Co Ltd assumes no responsibility for its use nor for any infringements upon the rights of third parties which may result from its use The material in this d...

Страница 3: ...he equipment should be noted 7 When the equipment is not in use disconnect it from the power source to avoid damage by transient over voltage 8 Liquid into the equipment may cause fire or electrical s...

Страница 4: ...ted VFD LCM 10 LED Backlight Brightness 11 2nd Monitor 15 Pole Type 12 Cash Drawer 13 C Ch ha ap pt te er r 3 3 1 14 4 Software Installation and Setup 14 Installation Sequence 14 Intel J1900 Chipset U...

Страница 5: ...C Ch ha ap pt te er r 5 5 3 32 2 Troubleshooting 32 Touch Panel does not work 32 OSD Buttons do not work 32 HDD SSD is not detected 32 MSR does not function properly 32 LAN does not function properly...

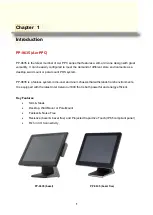
Страница 6: ...store environments as a desktop wall mount or pole mount POS system PP 9635 is a fanless system in die cast aluminum chassis that withstands harsh environments It is equipped with the latest Intel Cel...

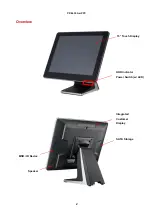
Страница 7: ...PP 9635 Aer PPC 2 Overview 15 Touch Display HDD Indicator Power Switch w LED Integrated Customer Display SATA Storage Speaker MSR ID Device...

Страница 8: ...PP 9635 Aer PPC 3 Dimension D W 190mm H 360mm W 366mm...

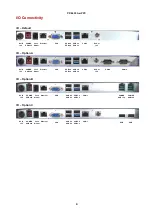
Страница 9: ...SB 2 0 USB 3 0 COM 1 DC Out 12V COM 2 COM 4 DC IN 12V POWER USB 24V Cash Drawer Ethernet VGA USB 2 0 USB 2 0 USB 2 0 USB 3 0 COM 1 DC Out 12V DC IN 12V POWER USB 24V Cash Drawer Ethernet VGA USB 2 0 U...

Страница 10: ...5v 12v select in BIOS 5v Green 12v Orange 12v DC out DC Jack 2nd LCD or others Option A COM 2 D Sub 9 RI 5V 12V select in BIOS COM 4 D Sub 9 RI 5V 12V select in BIOS Option B 12v USB 2 0 12v USB 12v U...

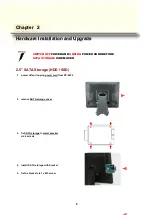
Страница 11: ...Up pg gr ra ad de e 2 5 SATA Storage HDD SSD 1 power off and unplug power cord from PP 9635 2 remove SATA storage cover 3 fix SATA storage to metal bracket via 4 screws 4 install SATA storage with bra...

Страница 12: ...PP 9635 Aer PPC 7 6 replace SATA storage cover 7 plug in power cord and power on MSR iButton RFID FingerPrint ID Device 1 remove plastic cover 2 plug in ID device USB and fix it via 1 x M3 screw...

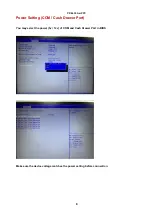
Страница 13: ...PP 9635 Aer PPC 8 Power Setting COM Cash Drawer Port You may select the power 5v 12v of COM and Cash Drawer Port in BIOS Make sure the device voltage matches the power setting before connection...

Страница 14: ...PP 9635 Aer PPC 9 Cable Cover and Cabling 1 connect the adapter to 12v DC in 2 connect all devices 3 install cable cover 4 tighten 2 x M3 screw...

Страница 15: ...ble and tighten 3 x M3 screw 3 customer display integrated type is connected to COM6 5mm LCM Module AP 2025 is 5v 9mm VFD AP 2029 9mm LCM 20x2 AP 2024 LCM 240x64 AP 240G are 12v make sure the power se...

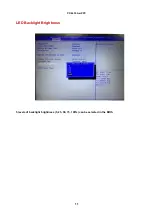
Страница 16: ...PP 9635 Aer PPC 11 LED Backlight Brightness 5 levels of backlight brightness 5 25 50 75 100 can be selected in the BIOS...

Страница 17: ...PP 9635 Aer PPC 12 2nd Monitor 15 Pole Type 1 Fasten PP 9635 and 2nd monitor together with 2 x M5 screw 2 connect VGA and 12v DC cables...

Страница 18: ...nual Please refer to trouble shooting if the cash drawer cannot be detected by PP 9635 To open drawer 1 the default port openaddr open1 wait sleep ms port openaddr close To open drawer 2 port openaddr...

Страница 19: ...al ll la at ti io on n a an nd d S Se et tu up p Please download drivers and utilities from www fecpos com en global ams Download Installation Sequence 1 Chipset Driver 2 Audio Driver 3 LAN Driver 4...

Страница 20: ...r PPC 15 Intel J1900 Chipset Utilities for Windows 7 1 download drivers from www fecpos com en global ams Download setupChipset_10 0 13PC Win7 32 bit setupChipset_10 0 13PC64 Win 7 64 bit 2 run SetupC...

Страница 21: ...PP 9635 Aer PPC 16 Audio Driver for Windows 7 1 download drivers from www fecpos com en global ams Download 2 run Steup exe 3 restart PP 9635 to complete installation...

Страница 22: ...PP 9635 Aer PPC 17 Realtek LAN Driver for Windows 7 1 download drivers from www fecpos com en global ams Download 2 run Steup exe...

Страница 23: ...PP 9635 Aer PPC 18 Intel Graphic Driver for Windows 7 1 download drivers from www fecpos com en global ams Download 2 run Steup exe 3 restart PP 9635 to complete installation...

Страница 24: ...PP 9635 Aer PPC 19 Intel TXE Driver for Windows 7 1 download drivers from www fecpos com en global ams Download 2 run Steup exe 3 restart PP 9635 to complete installation...

Страница 25: ...PP 9635 Aer PPC 20 Intel TXE Update for Windows 7 1 download drivers from www fecpos com en global ams Download 2 run kmdf1 11 win 6 1 x64 exe 3 restart PP 9635 to complete installation...

Страница 26: ...PP 9635 Aer PPC 21 USB 3 0 Driver for Windows 7 1 download drivers from www fecpos com en global ams Download 2 run Steup exe 3 restart PP 9635 to complete installation...

Страница 27: ...Aer PPC 22 ELO TouchKit Tools Installation ELO TouchKit Installation for Windows 7 1 ELO Touch SW602211_ELOMouseTouch_5 5 3 exe 2 Run as administrator 3 Unzip file and start to Install USB Touch Scree...

Страница 28: ...r PPC 23 4 Start installation and choose Calibrate ELO ToucScreen as finished 5 Four Corners Calibration 6 ELO Touchscreen Control Panel General Page can choose calibration mode for Normal Mode or Enh...

Страница 29: ...PPC 24 7 Mode Page Mouse Button emulation mode Click on touch Click on release Mouse emulation Double Click Area Options Hide arrow mouse pointer left hand mouse show tool tray utility Drag delay Unto...

Страница 30: ...PP 9635 Aer PPC 25 8 Sound Page Beep options without Beep Beep on touch Beep on untouch Beep from External Speaker Motherboard Beeper Motherboard Beep settings Tone and Duration...

Страница 31: ...PP 9635 Aer PPC 26 9 Properties 1 Screen Information Align touch calibration Identify Monitor identification of 1st screen touch or 2nd screen touch Advanced...

Страница 32: ...TI TouchKit for Windows 7 1 download drivers from www fecpos com en global ams Download 2 run Steup exe 3 do NOT check Install PS 2 interface driver and continue 4 do NOT check Install RS232 interface...

Страница 33: ...PP 9635 Aer PPC 28 5 confirm USB touch device is in use 6 check Support Multi Monitor System and continue 7 restart PP 9635 to complete installation...

Страница 34: ...PP 9635 Aer PPC 29 EETI TouchKit Control Panel Tools allows the user to calibrate the touch panel via 4 Points Calibration...

Страница 35: ...PP 9635 Aer PPC 30 Wireless LAN Driver for Windows 1 download drivers from www fecpos com en global ams Download 2 run Steup exe...

Страница 36: ...rs 2w x 2 Display Display 15 4 3 Touch Projected Capacitive Resistive bezel free Resistive bezel Backlight LED Brightness 350 nits Backlight MTBF 50 000 hours Peripherals MSR Track 1 2 3 USB Finger Pr...

Страница 37: ...ibration reboot the system and P Cap touch will calibrate automatically OSD Buttons do not work A press each OSD button for more than two seconds to trigger its function B make sure one button is touc...

Страница 38: ...tion properly A check the I O ports in CMOS B check IRQ conflict C check mainboard and I O cable Cash Drawer Port does not function properly A pin assignment of cash drawer matches that of RJ11 cash d...

Отзывы: