Firetide Instant Mesh Networks
9
September 2010
Mounting the Universal Bracket
You can mount the node to a wall, a light pole, or an irregularly
shaped pole. The universal mounting bracket has been designed
with multiple holes and slots to allow mounting with bolts, straps,
or other methods. Extra nuts and bolts are provided for this pur-
pose; don’t be alarmed if you have leftover fasteners when instal-
lation is complete.
Wall Mounting
The Universal Mounting Bracket contains holes and slots to allow
it to be mounted via U-bolts or straps. Use four screws (not sup-
plied) to attach the universal mounting bracket securely to the
wall using the four holes near the top and bottom of the universal
mounting bracket. Use appropriate anchors when attaching to ma-
sonry or other materials.
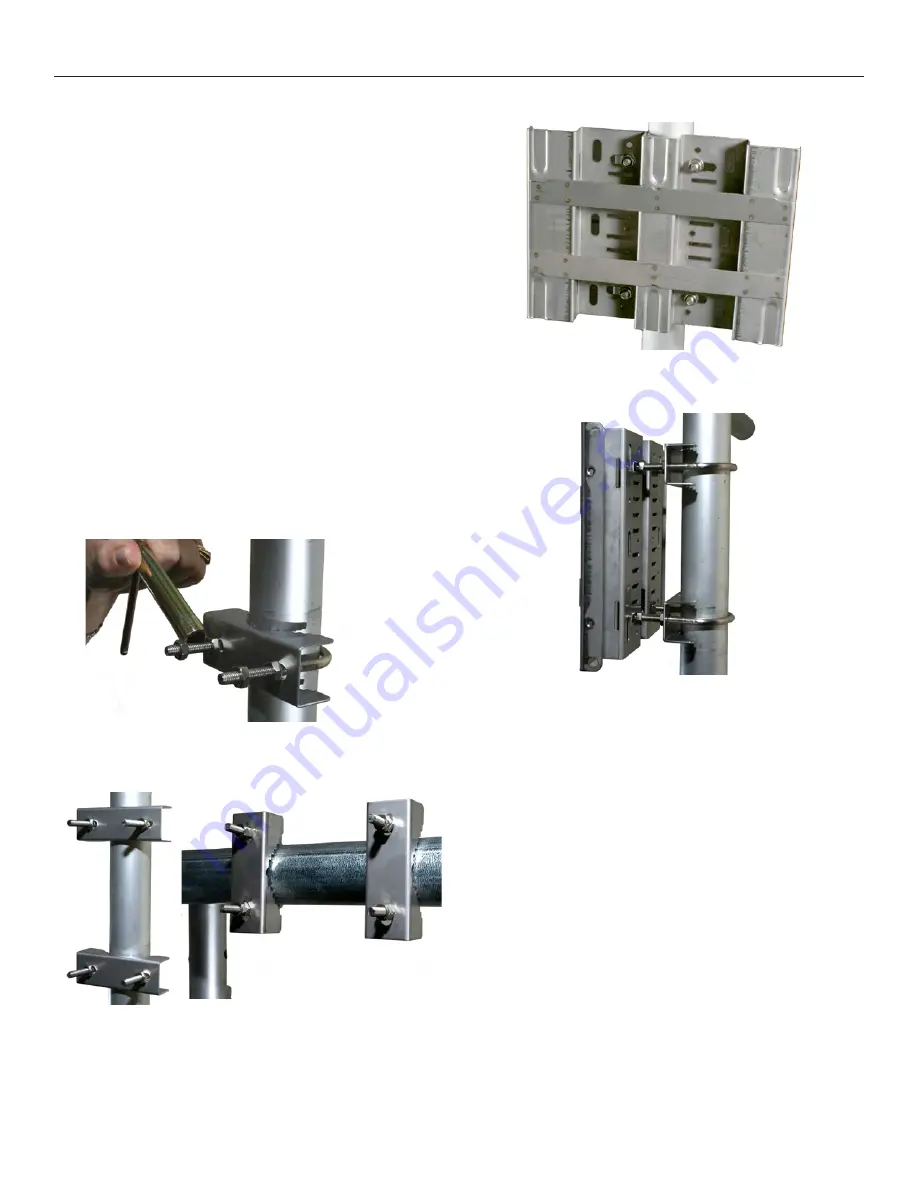
Pole Mounting
1. Insert the two U-bolts through the holes in the claw-toothed
pole-gripper piece.
2. On each U-bolt, place a washer, a lock washer, and a nut.
Smaller pole diameters usually require a second nut as a spac-
er to hold the bracket away from the U-bolt clamp. Finger-
tighten the nuts. There should be about 12-15 mm (1/2-5/8”)
of U-bolt sticking past the second nut.
Mount the second U-bolt. Use the mounting bracket as a guide to
correctly space the two U-bolts, then tighten the nuts. A horizon-
tal pole-mount is also shown for reference.
Use lock washers and nuts to secure the bracket to the U-bolts.
Installation on a horizontal pole is the same, you just use differ-
ent holes in the mounting plate.
This shows the use of spacer nuts when mounting to smaller poles.
You may find an open-end wrench useful for tightening the inner
nuts in these applications.
Using Mounting Straps
For poles with diameters larger than 50 mm (2”), irregularly
shaped poles, or light poles, you can use mounting straps (not
supplied) to mount the HotPort enclosure.
1. Position the universal mounting bracket against the pole.
2. Thread two mounting straps around the pole and through the
slots located near the top and bottom of the universal mount-
ing bracket. Secure the mounting straps.
3. Attach the enclosure to the universal mounting bracket by
sliding the metal clips on the back of the enclosure into the
metal straps on the universal mounting bracket.
Secure the enclosure to the universal mounting bracket using the
four captive screws on the sides of the universal mounting bracket.
Mounting Antennas
Now that you’ve attached the Universal Mounting Plate, you are
ready to proceed to the next steps. Most outdoor applications use
separately-mounted antennas, if so, mount your antennas now. If
you are using the temporary staging antennas, the next step is to
attach the HotPort node itself.
U-bolt Mounted
on Pole
U-bolts, Vertical and
Horizontal Mounting
Universal Mounting Bracket
Attached to Pole
Mounting Bracket
Showing Use of
Spacer Nuts


