OPERATION
FIREPOWER 160 S
Manual 0-5371
4-7
Operation
12. The tungsten must be ground to a blunt point in or-
der to achieve optimum welding results. It is critical
to grind the tungsten electrode in the direction the
grinding wheel is turning.
NOTE
About tungsten selection for this power
supply, a 2% Thoriated tungsten is generally
used for DC straight polarity welding. Point
the tungsten by grinding a taper on it about
2½ times the diameter of the tungsten used
and grind a slight flat on the end, this will
help stabilize the arc.
13. Install the tungsten with approximately 1/8” to ¼”
sticking out from the gas cup, ensuring you have
correct sized collet.
14. Tighten the back cap then open the valve on the
torch.
15. You are now ready to begin TIG Welding.
4.07 Firepower Regulator (US Version
Only)
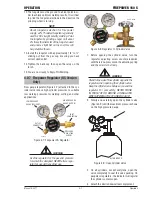
Flow gauge regulator (Figure 4-7) attached to the cyl-
inder valve reduce high cylinder pressures to suitable
low working pressures for welding, cutting, and other
applications.
LOW PRESSURE
GAUGE (DELIVERY)
HIGH PRESSURE
GAUGE (SUPPLY)
INLET
CONNECTION
OUTLET
CONNECTION
PRESSURE
ADJUSTING
SCREW
A-12435
Figure 4-7: Firepower CS Regulator
!
WARNING
Use the regulator for the gas and pressure
for which it is designed. NEVER alter a regu-
lator for use with any other gas.
Art # A-12436
Figure 4-8: Regulator to Cylinder Valve
1. Before opening the cylinder valve, turn the
regulator adjusting screw counter-clockwise
until there is no pressure on the adjusting spring
and the screw turns freely.
!
WARNING
Stand to the side of the cylinder opposite the
regulator when opening the cylinder valve.
Keep the cylinder valve between you and the
regulator. For your safety, NEVER STAND
IN FRONT OF OR BEHIND A REGULATOR
WHEN OPENING THE CYLINDER VALVE!
2. Slowly and carefully open the cylinder valve
(Figure 4-9) until the maximum pressure shows
on the high pressure gauge.
Art # A-09828
Figure 4-9: Open Cylinder Valve
3. On all cylinders, except acetylene, open the
valve completely to seal the valve packing. On
gaugeless regulators, the indicator will register
the cylinder contents open.
4. Attach the desired downstream equipment.
Содержание TIG 160S
Страница 6: ...This Page Intentionally Blank ...
Страница 15: ...SAFETY INSTRUCTIONS AND WARNINGS FIREPOWER 160 S Manual 0 5371 1 9 Safety Instructions and Warnings Notes ...
Страница 18: ...FIREPOWER 160 S INTRODUCTION Introduction 2 2 Manual 0 5371 Notes ...
Страница 30: ...FIREPOWER 160 S SAFETY AND INSTALLATION Safety and Installation 3 12 Manual 0 5371 Notes ...
Страница 40: ...FIREPOWER 160 S THEORY OF OPERATION Theory of Operation 5 2 Manual 0 5371 Notes ...
Страница 54: ...FIREPOWER 160 S TROUBLESHOOTING Troubleshooting 6 14 Manual 0 5371 Notes ...
Страница 59: ...DISASSEMBLY PROCEDURE FIREPOWER 160 S Manual 0 5371 7 5 Disassembly Procedure 4 Art A 09866 ...
Страница 61: ...DISASSEMBLY PROCEDURE FIREPOWER 160 S Manual 0 5371 7 7 Disassembly Procedure Art A 09868 4 5 Art A 09870 ...
Страница 63: ...DISASSEMBLY PROCEDURE FIREPOWER 160 S Manual 0 5371 7 9 Disassembly Procedure 4 Art A 09873 5 Art A 09876 ...
Страница 66: ...FIREPOWER 160 S DISASSEMBLY PROCEDURE Disassembly Procedur 7 12 Manual 0 5371 Notes ...
Страница 69: ...ASSEMBLY PROCEDURES FIREPOWER 160 S Manual 0 5371 8 3 Assembly Procedures 8 Art A 09883 ...
Страница 74: ...FIREPOWER 160 S ASSEMBLY PROCEDURES Assembly Procedures 8 8 Manual 0 5371 Notes ...
Страница 78: ...FIREPOWER 160 S REPLACEMENT PARTS Replacement Parts 9 4 Manual 0 5371 Notes ...
Страница 80: ...FIREPOWER 160 S ACCESSORIES Accessories 10 2 Manual 0 5371 Notes ...
Страница 83: ......


