FIREPOWER FP 125,135,165
Manual 0-5123 4-1 OPERATION
SECTION 4:
OPERATION
4.01 General Safety Precautions
Read and understand the safety instructions at the beginning of this manual prior to operating this machine.
!
WARNING
Be sure to put on proper protective clothing and eye safeguards (welding coat, apron, gloves, and welding
helmet, with proper lenses installed). See Safety Instructions and Warnings chapter included in this manual.
Neglect of these precautions may result in personal injury.
!
WARNING
Make all connections to the power source including electrode and work cables, as well as remote control
cables, with the power source turned off. These connections could be electrically live with the power switch
ON.
WARNING
ELECTRIC SHOCK CAN KILL! Do not operate the machine with the door open.
!
CAUTION
Do not pull the machine with the gun. Damage can occur to the gun, gun liner and machine. Avoid bending
the gun cable with a sharp radius. Damage can occur to the gun liner.
4.02 Firepower Controls
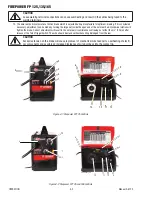
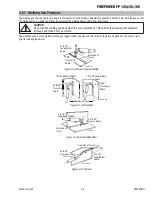
Refer to Figure 4-1 and 4-2.
1. Power ON / OFF switch turns the power on and off. It also lights when the power supply has gone into overtemp.
2. The Wire Speed Control knob controls the welding current via the electrode wire feed rate (i.e. the speed of the wire feed mo-
tor).
3. The Voltage Control Switch(s) sets the voltage level to the welding terminals. There are 4 positions available.
!
CAUTION
The Voltage Control Switch MUST NOT BE SWITCHED during the welding process. Some internal electrical
components are at Mains voltage potential with this switch in the OFF position.
!
CAUTION
The Voltage Control Switch MUST NOT BE SWITCHED during the welding process. Some internal electrical
components are at Mains voltage potential with this switch in the OFF position.
4. MIG Gun cable end and Gun Switch Leads are routed through this opening.
5. The Work Cable & Clamp connects to the item being welded (not shown).
6. The gas inlet nipple is used to connect the gas hose to the gas regulator for GMAW. Use the hose clamp to secure the hose to
the gas nipple.
7. The moveable tension knob applies pressure to the grooved roller via screw-adjustable spring pressure. The adjustable spring
screw should be adjusted to a minimum pressure that will provide satisfactory wire feed without slippage. If slipping occurs,
and inspection of the wire contact tip reveals no wear, distortion or burn-back jam, the conduit liner should be checked for
kinks and clogging by metal flakes and slag. If this is not the cause of slipping, the feedroll pressure can be increased by rotat-
ing the adjustable spring screw clockwise. The use of excessive pressure may cause rapid wear of the feed roller, motor shaft
and motor bearings.
8. The Gun Adaptor connects the MIG Gun to the feedhead assembly.
9. The Gun Switch Connector is provided for connection of the Gun Switch Leads.
10. Negative (-) Welding Terminal.
11. Positive (+) Welding Terminal.
Содержание FP 95 FC
Страница 26: ...FIREPOWER FP 125 135 165 INSTALLATION 3 10 Manual 0 5123 This Page Intentionally Blank...
Страница 42: ...ESAB FIREPOWER FP 125 135 165 SERVICE 5 4 Manual 0 5123 This Page Intentionally Blank...
Страница 46: ...FIREPOWER FP 125 135 165 APPENDIX A 4 Manual 0 5123 APPENDIX 3 FIREPOWER 125 SYSTEM SCHEMATIC Art A 09022...
Страница 47: ...FIREPOWER FP 125 135 165 Manual 0 5123 A 5 APPENDIX APPENDIX 4 FIREPOWER 135 SYSTEM SCHEMATIC Art A 09023...
Страница 48: ...FIREPOWER FP 125 135 165 APPENDIX A 6 Manual 0 5123 APPENDIX 5 FIREPOWER 165 SYSTEM SCHEMATIC Art A 09024...
Страница 49: ...FIREPOWER FP 125 135 165 Manual 0 5123 A 7 APPENDIX This Page Intentiolnally Blank...
Страница 51: ......

