background image

Indicator light: 

Steady blue light indicates the power 

is on and the monitor runs normally. 

Red light indicates no horizontal or 

vertical synchronous signal detected 

or no video input signal, and that the 

monitor is in standby status. Please 

make sure your computer is turned 

on and operates normally and check 

that all video cables are fully plugged 

in and/or connected to the monitor.

4

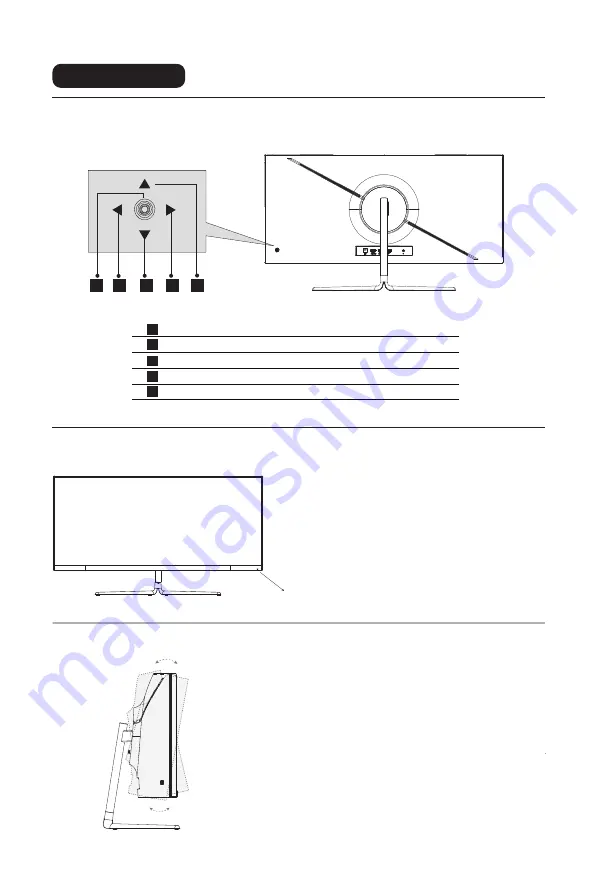
Explanation of indicators

Indicator Light

Adjusting the monitor

Tilting angle

-5.0°(±2.0°)- +20°(±2.0°)

Instructions for use

Description of buttons

 3

 2

 4

 5

1

1
2

3
4
5

Power button: Turn on/of the monitor.
Exit/Left button: Exit or return and shortcut keys.
Down button: Move down in the menu/game crosshair.
Menu button: Enter sub-menus.
Up button: Move up in the menu/pattern of situations.

Содержание AF11F

Страница 1: ...User Manual 29 in Computer Monitor Model AF11F ...

Страница 2: ......

Страница 3: ...10 Product introduction Packing list Instructions for use Description of buttons Explanation of indicators Installation of base Cable connection Adjusting the monitor OSD menu Menu description 6 Installation of mount Basic parameters ...

Страница 4: ...he after sales service directly Do not pull or twist the power cable forcedly may be damaged and the warranty will be invalid Make sure the monitor is placed on a flat surface lf the monitor falls down it may cause human injury or device damage lf the monitor will not be used for a long period please cut off the power supply to avoid electric shock in rainy days and damage due to abnormal supply v...

Страница 5: ...d operates normally and check that all video cables are fully plugged in and or connected to the monitor 4 Explanation of indicators Indicator Light Adjusting the monitor Tilting angle 5 0 2 0 20 2 0 Instructions for use Description of buttons 3 2 4 5 1 1 2 3 4 5 Power button Turn on of the monitor Exit Left button Exit or return and shortcut keys Down button Move down in the menu game crosshair M...

Страница 6: ...ase 2 Take out the support and rotating shaft assembly and lock it with two screws 3 Lock the bracket and base with a screw 4 Put the assembled base into the corresponding slot of the back shell gently press the bracket to lock it into the lock then hold the middle of the bracket gently lift the body twice do not loosen make sure it can be locked screws screws ...

Страница 7: ...ount 2 Take out the wall mount assembly and lock the wall mount assembly with two screws 3 Note Hang the assembled product on a hard wall Do not pinch the screen with your hands during the hanging process to avoid damaging the screen Mount not supplied Note In order to prevent the monitor from falling when it is used on the wall please install it properly and do safety protection Do not place or h...

Страница 8: ...owing sections 1 Rocker key Right to enter the OSD main menu or enter sub menus 2 Rocker key Up to pattern of situations or move up in the menu 3 Rocker key Down to enter the GamePlus or move down in the menu 4 Rocker key Left to enter the Input Signal or exit the current screen Cable connection Note If the power cable or signal cable is damaged you must replace it with special soft cables or spec...

Страница 9: ...00 45 00 60 00 Position Top Right Top Left Bottom Right Bottom Left Off Crosshair 1 Crosshair 2 Crosshair 3 Crosshair 4 Crosshair 5 Crosshair 6 Game Settings Standard Mode RTS RPG Mode FPS Arena Mode MOBA Arena Mode Response Time Refresh Rate Game Crosshair Game Time Dynamic Brightness MPRT Ambient Lighting Warm Cool Natural Color Settings Brightness 0 100 0 100 0 100 0 100 0 100 1 8 2 0 2 2 2 4 2...

Страница 10: ...t Top Left Bottom Right Bottom Left Small Medium Large OSD H Position 0 100 0 100 OSD V Position 0 100 0 100 0 100 Volume OSD Transparency OSD Lock Off On Hotkey1 Setting Brightness Contrast Volume Mute Shadow Balance Game Crosshair Refresh Rate Game Time Contextual Model PIP PBP Mode Input Signal Dynamic Brightness Hotkey2 Setting Hotkey3 Setting Off On Off On Off On Yes No Input Source Resolutio...

Страница 11: ...umidity 10 90 RH non condensing Temperature 20 60 4 F 140 F Humidity 5 95 RH non condensing The standard voltage and current may vary with countries please refer to the label at the back of the product Maximum refresh rate Power specifications 100Hz Product Name Liquid Crystal Display 178 H 178 V DC 12V 4 0A registered trademarks of HDMI Licensing Administrator Inc in the United States and other c...

Страница 12: ......

Страница 13: ...潘巧纳 140 210mm V01 备注 如不够页数 可以在封面封底的内面插入空白页 30A3L 说明书 Fiodio AF11F 2022 4 12 封面封底120G铜版纸过光膜 内页80G铜版纸 单色印刷 胶装 所有文字 数字 英文字母 字符清晰可视 易读 且不易造成文字混淆 需提供使用材料的SGS和ROHS报告 提供过的供应商不需要再次提供 ...

Отзывы: