


Wartung
Grundsätzlich bedarf das Gerät keiner Wartung
Kontrollieren Sie regelmäßig alle Geräteteile und den
festen Sitz aller Schrauben und Verbindungen
Tauschen Sie defekte Teile über unseren Kunden-
service sofort aus. Das Gerät darf dann bis zur
Instandsetzung nicht verwendet werden.
Pflege
Zur Reinigung verwenden Sie bitte nur ein feuchtes
Tuch ohne scharfe Reinigungsmittel.
Bauteile, welche mit Schweiß in Kontakt kommen,
brauchen nur mit einem feuchten Tuch gereinigt wer-
den.
Maintenance
In principle, the equipment does not require
maintenance.
Regularly inspect all parts of the equipment and the
secure seating of all screws and connections.
Promptly replace any defective parts through our
customer service. Until it is repaired, the equipment
must not be used.
Care
When cleaning, use only a moist cloth and avoid harsh
cleaning agents.
Components that come into contact with perspiration,
need cleaning only with a damp cloth.
4. Pflege und Wartung
4. Care and Maintenance
08
Position 1:
Lösen Sie die Griffschraube, ziehen diese heraus. Verstellen Sie
die Beinfixierung bis diese hörbar in der gewünschten Position
wieder einrastet. Drehen Sie die Griffschraube wieder fest.
Position 2:
Lösen Sie die Griffschraube, ziehen diese heraus. Verstellen
Sie das Arm Curl Polster bis diese hörbar in der gewünschten
Position wieder einrastet. Drehen Sie die Griffschraube wieder
fest.
Position 3:
Ziehen Sie den Steckstift heraus um Ihren Ab & back Trainer
platzsparend zusammen zu klappen. Ein Training ist nur mit
eingestecktem Steckstift erlaubt!
Position 1:
Open the starscrew and pull it out. Move the legfixation to the
desired position. the starcrew need to go in with a click sound.
Tighten the starscrew.
Position 2:
Open the starscrew and pull it out. Move the arm curl cushion
to the desired position. the starcrew need to go in with a click
sound. Tighten the starscrew.
Position 3:
Pull out the pin to fold the Ab & Backt Trainer. You are allowed to
use the Ab & Back Trainer, only if the pin is in its position!
5. Verstellungen
5. Adjustments
Содержание 3869
Страница 1: ......
Страница 6: ...05 Schritt Step 2...
Страница 7: ...06 Schritt Step 3...
Страница 8: ...07 Schritt Step 4 Schritt Step 5...
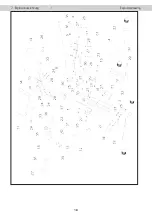
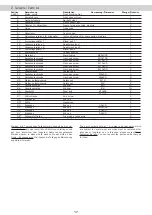
Страница 17: ...7 Explosionszeichnung Explosiondrawing 16...