Finlux 55F9076-T Скачать руководство пользователя страница 16

English

   - 15 -

• 

3D feature enables you to view 3D content using 

the supplied 3D glasses. 

• 

To enable and customize 3D mode on the TV, 

perform the following:

• 

Press 

MENU

 button on the remote control and select 

Picture by using “ ” or “  ”  button. Press 

OK

 button 

to view 

Picture Settings


Select 

3D Settings

 option 

by using “

” or “

” button and press 

OK

3D Settings
Mode

You can customize the 3D mode settings to provide 

the best viewing experience.
Select one of these modes to experience 3D image 

viewing:

Auto:

 Automatically switches to 3D mode if 3D 

information is detected from a digital broadcast or a 

HDMI source.

Side by Side:

 Displays 3D content which is originally 

in a form of side by side.

Top bottom:

 Displays 3D content which is originally 

in a form of top and bottom.

Off

: 3D function mode is turned off.

2D Only

If content is 3D but you want to watch it in 2D, you can 

switch to 2D only mode. There are 2 options (LEFT 

and RIGHT) to select which side of the content you 

want to watch in 2D.

Virtual 3D

Conversion from 2D to 3D. You can adjust the field of 

depth to various settings or turn it off.

Left/Right Swap

You can use this setting to shift the phase of the 3D 

left/right broadcast.

3D Depth Sense (optional)

This setting enables the control of 3D depth.

3D Viewing Information

Refer to the size / distance guidelines below to 

experience 3D in the best possible way. 

Viewing Distance 

Size

(inch)

22

26

32

37

40

Viewing 

distance 

(m)

1,30

1,50

1,90

2,20

2,40

Size

(inch)

42

46

47

55

Viewing 

distance 

(m)

2,50

2,75

2,80

3,25

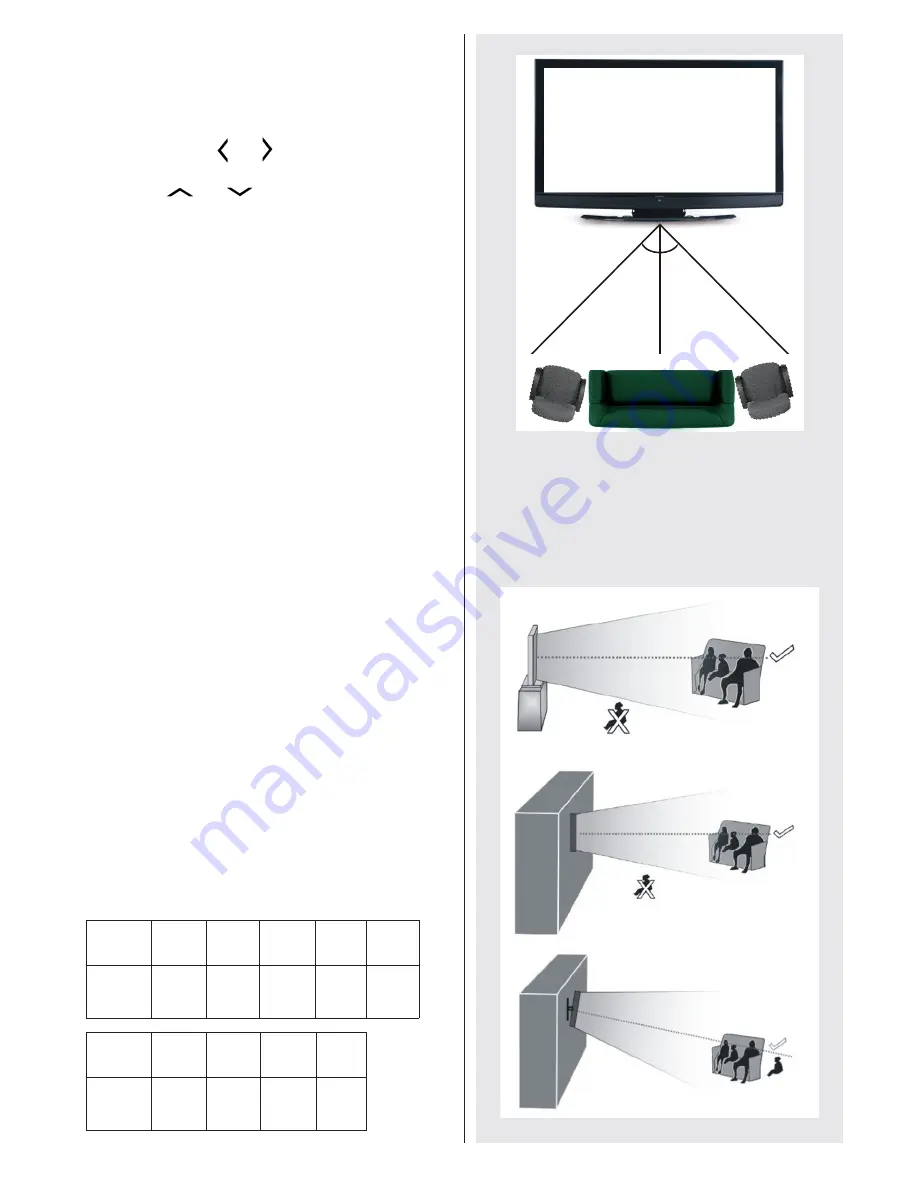
Horizontal Viewing Angle

45 45

Vertical Viewing Angle

It is strongly recommended that the TV is placed at 

a height as same as the eye level of the viewer. In 

case that is not possible, tilt the TV accordingly in its 

stand or wall mount.

Содержание 55F9076-T

Страница 1: ......

Страница 2: ...active pixels may appear on the screen as a blue green or red point Please note that this does not affect the performance of your product Take care not to scratch the screen with or other hard objects...

Страница 3: ...e following message will be displayed TV switched to stand by mode automatically because no operation was made for a long time Press OK to continue Features 3D Viewing This product supports the viewin...

Страница 4: ...mperature before you connect the set to the mains Plug the power cable to the mains socket outlet Antenna Cable Connection Connect the aerial or cable TV plug toAERIAL INPUT ANT TV or satellite lead t...

Страница 5: ...isplayed on the digital teletext screen When the TXT button is pressed again the TV returns to television broadcast Specification TV Broadcasting PAL B G D K K Receiving Channels VHF BAND I III UHF BA...

Страница 6: ...ia browser mode Timeshift recording 35 Media browser 36 Picture mode selection Changes picture mode in media browser video mode 37 Standby button 38 Function LED Getting Started Remote Control 1 NOTE...

Страница 7: ...Insert or remove the CI module only when the TV is SWITCHED OFF You should refer to the module instruction manual for details of the settings Each USB input of your TV supports devices up to 500mA Con...

Страница 8: ...u can select frequency ranges from this screen Enter the frequency range manually by using the numeric buttons Note Searching duration will change depending on the selected search step Media Playback...

Страница 9: ...Note You can not switch broadcasts or view the Media Browser during the recording mode While recording a programme or during the timeshifting a warning message appears on the screen if your USB device...

Страница 10: ...ollowing chapters for details of the listed features FollowMe TV With your tablet you can stream the current broadcast from your smart TV using the FollowMe TV feature Install the appropriate applicat...

Страница 11: ...he Noise Reduction setting to reduce the amount of noise Advanced Settings Dyanmic Contrast You can change the Dynamic Contrast ratio to desired value Colour Temp Sets the desired colour tone Picture...

Страница 12: ...al amplifier to your TV using the headphone jack you can select this option as Lineout If you have connected headphones to the TV set this option as Headphone Surround Sound optional Surround sound mo...

Страница 13: ...smartphone or tablet pc If you have a DLNA compatible smartphone or tablet pc and the appropriate software is installed you can share play photos on your TV See instructions of your sharing software f...

Страница 14: ...e Channel List Record Delete Record Timer After you have selected a programme in the EPG menu press the OK button Select the Record option and press the OK button After this operation a recording will...

Страница 15: ...possible that some viewers may experience a seizure or epilepsy when exposed to certain conditions including flashing lights or images in TV or video games Sometimes certain symptoms can occur in uns...

Страница 16: ...on mode is turned off 2D Only If content is 3D but you want to watch it in 2D you can switch to 2D only mode There are 2 options LEFT and RIGHT to select which side of the content you want to watch in...

Страница 17: ...connection Ensure that Nero Media Home software is installed to your PC for DLNA function See Nero Media Home Installation section Connect your PC to your modem router This can be a wired or wireless...

Страница 18: ...environment The WirelessLANadaptorshouldbeconnecteddirectly to the TV s USB port USB hubs are not supported You can plug your wifi dongle into the supplied dock In cases where network quality is poor...

Страница 19: ...your modem Distruption during playback or slow reactions You could try the following in such a case Keep at least three meters distance from microwave ovens mobile telephones bluetooth devices or any...

Страница 20: ...ge channels using P P buttons Current HDMI content will be displayed on the PIP window if you switch to portal mode while watching HDMI source Use the or or to navigate between the items on Portal scr...

Страница 21: ...earch keywords by clicking the search button in the address dialog box or another way to navigate to pages is by clicking on links on web pages and these will take you to the appropriate pages When yo...

Страница 22: ...en is displayed Software Upgrade YourTV is capable of finding and updating automatically via the Aerial Cable Satellite signal or over the Internet Software upgrade search via user interface Simply na...

Страница 23: ...progress bar informs you of the progress of the installation process 10 Installation finishes The Help us to Enhance Nero Software screen is displayed In order to offer a better service Nero is collec...

Страница 24: ...splay Modes The following table is an illustration of some of the typical video display modes Your TV may not support all resolutions Your TV supports up to 1920x1200 Index Resolution Frequency 1 640x...

Страница 25: ...MPEG1 2 Layer 3 AAC HEAAC AC3 EAC3 LPCM ADPCM H 264 1080Px2 25fps 1080P 50fpsOther 1080P 30fps50Mbit sec avi MPEG1 2 4 Xvid H 264 VC1 WMV3 Sorenson H 263 Motion JPEG MPEG1 2 Layer 1 2 3 AAC HEAAC AC3...

Страница 26: ...reen or green and yellow The wire which is coloured blue or black must be connected to the terminal which is marked with the letter N or coloured Black The wire which is coloured brown or red must be...

Страница 27: ...76 T E Energy efficiency class A F Visible screen size diagonal approx inch cm 55 inches 140 cm G On mode average power consumption Watt 112 H Annual energy consumption kWh annum 163 I Standby power c...

Страница 28: ......

Отзывы: