Finlux 42S9100-T Скачать руководство пользователя страница 20

English

   - 19 -

DTV

ATV

OTHER

1080p@24 

FP

Not 

Supported

Not Supported

Not Supported

720p@50 

FP

Not 

Supported

Not Supported

Not Supported

720p@60 

FP

Not 

Supported

Not Supported

Not Supported

1080p FC

SBS, TB

Not Supported

SBS, TB

720p FC

SBS, TB

Not Supported

SBS, TB

1080i FC

SBS

Not Supported

SBS

OTHER

(*)

Not Supported

Not Supported

Please note that if you apply 720p FC TB input; the picture 

will be scaled smaller than the original size in the middle 

of the screen.
SBS: 

Side By Side

TB: 

Top Bottom

MBP: 

Media Browser Picture

MBV: 

Media Browser Video

FC: 

Frame Compatible

FP: 

Frame Pack

in MBP: Supported only when,

 the image’s height is 

multiples of 2 and the image’s width is multiples of 16 and if 

the image width is equal to the panel width or wider. 

in DTV: Supported only when, 

the image’s height is between 

1700 and 1900 and the image’s width is equal to 1280 or 720.

(*): Not supported 

if the image provides 1080i resolution.

3D Glasses

Frame Material

: ABS 

Frame Type

: Foldable

Weights

: 21g 

Polarization Film Type

: Circular 

Light Penetration Rate:

 40%

Polarization Efficiency: 

99.9%

Lens Thickness:

 0.28mm 

Lens Treatment:

 Hard-coated

Wired Connectivity

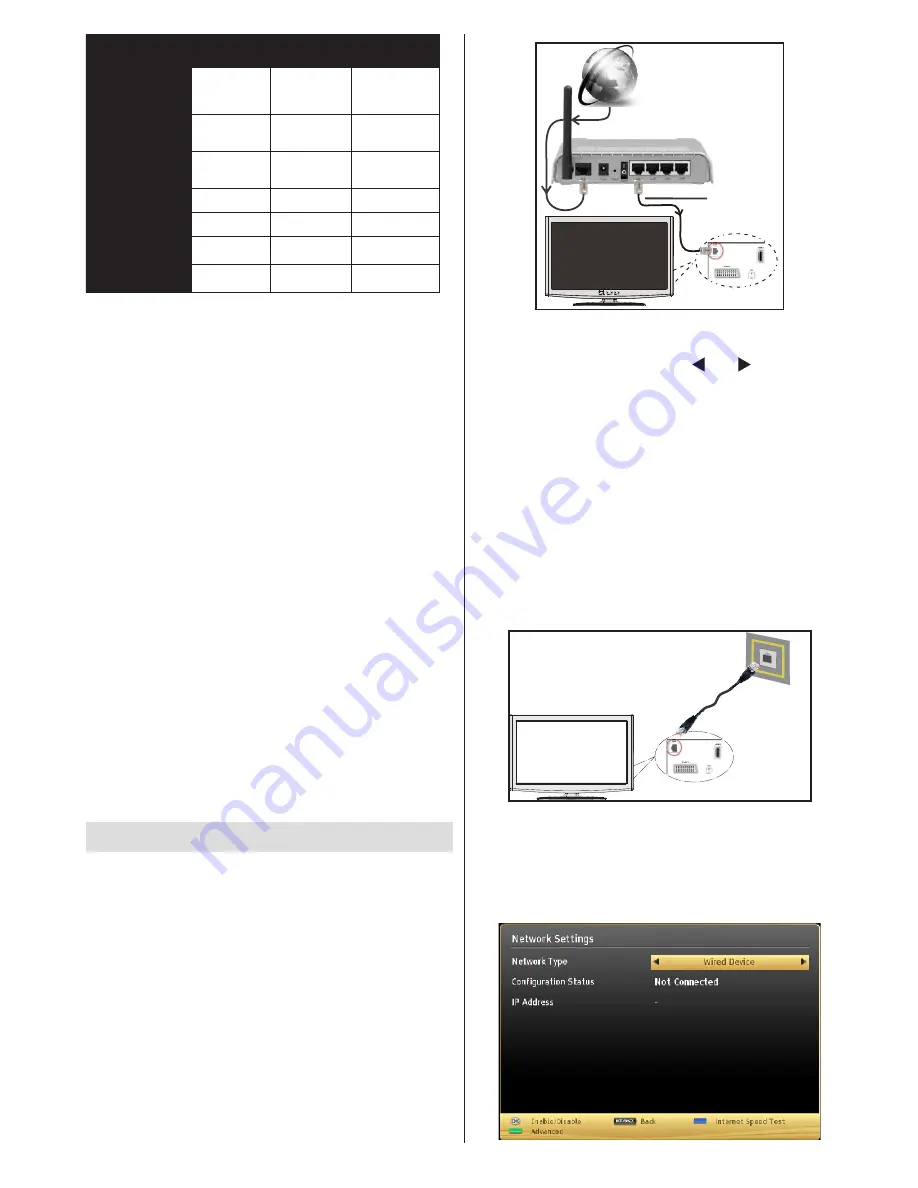
To Connect to a Wired Network

For connecting to a wired LAN, you should 

perform the following steps:

• 

You must have a modem/router connected to an 

active broadband connection.

• 

Ensure that Nero Media Home software is installed 

to your PC (for DLNA function). See Appendix A for 

more information on the installation process.

• 

Connect your PC to your modem/router. This can 

be a wired or wireless connection.

• 

Connect your TV to your modem/router via an 

ethernet cable. There is a LAN port at the rear 

(back) of your TV.

Lan(Ethernet  cable) 

Broadband  ISP
Connection

Rear  of  TV

• To access and play shared files, you must select the 

Media Browser. Press the Menu button and select 

Media Browser by using the “ ” or “ ” buttons and 

press OK

 to continue. Select the desired file type and 

press OK. You must always use the Media Browser 

screen to access and play shared network files.

• 

PC/HDD/Media Player or any other devices that are 

DLNA 1.5 compatible should be used with a wired 

connection for higher playback quality.

To  configure  wired  settings  please  refer  to  the 

Network Settings section in the Settings menu.

• 

You might be able to connect your TV to your LAN 

depending on your network’s configuration. In such 

a case, use an ethernet cable to connect your TV 

directly to the network wall outlet.

The  modem  port 
on  the  wall

Rear  of  TV

Configuring Wired Device Settings

The Network type can be selected as Wired or 

Wireless, in accordance with the active connection to 

the TV set. Select this as “Wired” if you are connecting 

via an ethernet.

Содержание 42S9100-T

Страница 1: ......

Страница 2: ...Timeshift Recording 15 Instant Recording 15 Watching Recorded Programmes 15 Recording Configuration 15 Product Safety 15 Health Warning 3D Mode 16 Using the 3D Mode 16 Setting up 3D Mode for PS3 17 Se...

Страница 3: ...securely attached to the wall in accordance with the installation instructions Screen Occasionally a few non active pixels may appear on the screen as a fixed blue green or red point Please note that...

Страница 4: ...e set Use this device in moderate climates Operation temperature and operation humidity 5 C up to 45 C 85 humidity max Note Don t block ventilation holes Intended Use This device is used to receive an...

Страница 5: ...al Press the TV AV button in the control panel on the TV to switch betweenAV modes Note Function indications of the buttons will be displayed on the screen when pressed Operation with the Remote Contr...

Страница 6: ...T mode 27 Programme up down 28 Mute 29 Previous programme Now in EPG mode 30 Numeric buttons 31 AV Source TV NOTE The Remote Control range is approximately 7m 23ft Using My button 1 Thisbutton smainfu...

Страница 7: ...English 6 1 Standby On 2 Volume up down 3 Source selection 4 Info 5 Mute 6 Programme up down 7 Image size 8 Mono Stereo Dual II Audio Subtitle language Remote Control...

Страница 8: ...the scart socket When using the wall mounting kit optional we recommend that you plug all your cables into the back of the TV before mounting on the wall Insert or remove the CI module only when the...

Страница 9: ...mode To power down the TV completely unplug the power cord from the mains socket Note When the TV is switched to standby mode the standby LED can blink to indicate that features such as Standby Searc...

Страница 10: ...V by using the USB inputs of the TV This feature allows you to play files stored in a USB drive 2 5 and 3 5 inch hdd with external power supply external hard disk drives are supported IMPORTANT You sh...

Страница 11: ...ts Programmescanbe watchedin differentpicture formats depending on the transmission received You can changetheaspectratio imagesize oftheTVforviewing the picture in different zoom modes Press the SCRE...

Страница 12: ...om Sets the picture size to Auto 16 9 Subtitle 14 9 14 9 Zoom 4 3 or Cinema Movie Sense Movie Sense Press Use Left Right to set Movie Sense Low Med High or Off While Movie Sense is active it will opti...

Страница 13: ...nel supports that mode AVL Automatic Volume Limiting AVL function sets the sound to obtain a fixed output level between programmes For instance volume level of advertisements tend to be louder than pr...

Страница 14: ...r supports the additional narration track Auto TV Off You can set the timeout value of the auto off feature After the timeout value is reached and the TV has not been operated for a selected time the...

Страница 15: ...mer option The timer will be cancelled Note It is not possible to record two channels at the same time Recording a Programme IMPORTANT When using a new USB hard disk drive it is recommended that you f...

Страница 16: ...s Library Slow Forward If you press PAUSE button while watching recorded programmes the slow forward feature will be available You can use button to slow forward Pressing button consecutively will cha...

Страница 17: ...g when watching 3D images in poor light conditions you should turn the lamp off or dim the light You must use 3D glasses parallel to your TV The picture may not be visible or may look dark if you do n...

Страница 18: ...utton and select the Picture icon using the or buttons and press OK Use or to select the 3D side by side setting and press OK to view Once selected the 3D channel can now be watched Note You will need...

Страница 19: ...should adjust the volume so as to avoid excessive levels since this may cause hearing damage Vertical Viewing Angle It is recommended to place the TV at the correct seated eye height of the viewer If...

Страница 20: ...wing steps You must have a modem router connected to an active broadband connection Ensure that Nero Media Home software is installed to your PC for DLNA function See Appendix A for more information o...

Страница 21: ...ing Use a LAN connection for quicker file sharing between other devices like computers The frequency and channel differ depending on the area The transmission speed differs depending on the distance a...

Страница 22: ...uld like to share with your TV If the connection is established correctly you should now be able to access the shared files from your cell phone via the Media Browser of your TV Enter the Media Browse...

Страница 23: ...press the GREEN button You can press MENU to exit If available networks are found they will be listed on this screen Select media server or network that you want to connect to using the or buttons and...

Страница 24: ...Press the PLAY button to resume the playback Use the STOP button to stop the playback Press the EXIT button to exit iPlayer Press the RETURN button for going back to the previous screen Note Episode...

Страница 25: ...l Is the picture or teletext unrecognisable 4 Check if you have entered the correct channel frequency if you have done manual tuning 5 Please retune the channels 6 The picture quality may degrade when...

Страница 26: ...Click the Next button The integrated serial is displayed Do not change the serial number 6 Click the Next button The License Conditions EULA screen is displayed 7 Click the Next button The Select Inst...

Страница 27: ...85Hz 36 1360x768 60Hz 37 1400x1050 60Hz 38 1400x1050 75Hz 39 1400x1050 85Hz 40 1440x900 60Hz 41 1440x900 75Hz 42 1600x1200 60Hz 43 1680x1050 60Hz 44 1920x1080 60Hz 45 1920x1200 60Hz Appendix C AV and...

Страница 28: ...AAC AC3 EAC3 LPCM ADPCM H 264 1080Px2 25fps 1080P 50fpsOther 1080P 30fps50Mbit sec RMVB RM rv30 rv40 LBR cook AAC HEAAC 1080P 30fps 50Mbit sec avi MPEG1 2 4 Xvid H 264 VC1 WMV3 Sorenson H 263 Motion J...

Страница 29: ...the Sky remote control blinks twice 4 Key in 065 The light on the Sky remote control should blink twice 5 Press the STANDBY button on your Sky remote control If your TV switches off press SELECT The l...

Страница 30: ...50226408...

Отзывы: