Finlux 42F701 Скачать руководство пользователя страница 11

English   

- 10 -

Using USB Inputs

USB Connection

You can connect a USB hard disk drive or USB 

• 

memory stick to your TV by using the USB inputs 
of the TV. This feature allows you to play 

fi

 les stored 

in a USB drive or record programmes.
2.5” and 3.5” inch (hdd with external power supply) 

• 

external hard disk drives are supported.
To record a programme, you should 

fi

 rst  connect 

• 

a USB disk to your TV while the TV is switched 
off. You should then switch on the TV to enable 
recording feature. Otherwise, recording feature will 
not be available. 

IMPORTANT !

You may back up your 

fi

 les before making any 

• 

connections to the TV set in order to avoid any 
possible data loss. Note that manufacturer will not 
be responsible for any 

fi

 le damage or dataloss.

It is possible that certain types of USB devices (e.g. 

• 

MP3 Players) or USB hard disk drives/memory sticks 
may not be compatible with this TV.

IMPORTANT

: The TV supports only FAT32 and 

NTFS disk formatting. However, NTFS format is not 
supported for recording features. For recording, if you 
connect a USB disk with NTFS format, the TV will ask 
you to format the content. See the section, “Format 
Disk” in the following pages for more information on 
disk formatting.
Note that ALL the data stored on the USB disk will 
be lost and then the disk format will be converted to 
FAT32 in such a case.

USB Disk Connection

• Plug your USB device to the USB input of the TV. 

Note: Plug or unplug your USB disk while the TV is 
switched off.
Note: If you are going to connect a USB hard disk drive 
to the TV set, USB connection cable used between 
the disk drive and the TV should have a USB logo 
and should be as short as possible.
Note: While formatting a USB hard disk that has 1TB 
(Tera Byte) or more 

fi

 le capacity, you can experience 

problems with the formatting process. In such a 
case, you should format the disk with your personal 
computer and the formatted disk type should be 
FAT32.

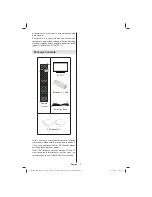
SIDE VIEW        USB MEMORY

CAUTION ! 

Quickly plugging and unplugging USB devices, 

• 

is a very hazardous operation. Especially, do not 
repeatedly quickly plug and unplug the drive. This 
may cause physical damage to the USB player and 
especially the USB device itself.
Do not pull out USB module while playing or 

• 

recording a 

fi

 le.

Programme Recording

To record a programme, you should 

fi

 rst connect a 

USB disk to your TV while the TV is switched off. 
You should then switch on the TV to enable recording 
feature.

IMPORTANT: When using a new USB hard disk drive, 
it is recommended that you 

fi

 rst format the disk using 

your TV’s “Format Disk” option.

For using recording function, you should connect a 

• 

USB disk or an external hard disk drive to the TV 
and connected USB disk should have at least 1 GB 
capacity and should have 2.0 speed compatibility. 
If the connected USB device does not support 2.0 
speed, an error message will be displayed.

Note: Recorded programmes are saved into the 
connected USB disk. If desired, you can store/copy 
recordings on a computer; however,  these 

fi

 les will 

not be available to be played on a computer. You can 
play the recordings only via your TV.

For more information on recording programmes, 

• 

see sections “Instant Recording”, “Timeshifting”, 
“Electronic Programme Guide”, “Recordings Library” 
or “Recording Timers” in the following parts.
Recorded  programmes  are  split  into  4GB 

Recorded programmes are split into 4GB 

• 

• 

partitions. 

partitions. 
Recorded programmes are stored in the following 

• 

directory of the connected USB disk: \DVR\RECS. 
All recordings are indicated with a number. A text 
(txt) 

fi

 le is created for each recording. This text 

file includes information such as broadcaster, 
programme, and recording time.
Timeshifting may be stopped according to USB  

• 

device write speed. If the USB device speed is  not 
enough for video stream bitrate, timeshifting may 
be stopped and recording may fail. If HD service 
bitrate is greater than 13 Mbp/sec. some freeze can 
be seen during timeshifting on both USB disk and 
on external HDD.Recordings of HD programmes 
can occupy bigger size on the USB disk depending 
on the broadcast’s resolution. For this reason it 
is recommended to use USB hard disk drives for 
recording HD programmes.
Do not plug out the USB/HDD during the recording. 

• 

This may harm the connected USB/HDD.
Multipartiton support is available. Maximum two 

• 

different partitions are supported. If the disk have 

01_MB69_[GB]_DVB-TC_PVR_GOLD17_5103UK_42947W_10077158_50209400.indd   10

01_MB69_[GB]_DVB-TC_PVR_GOLD17_5103UK_42947W_10077158_50209400.indd   10

29.12.2011   15:39:21

29.12.2011   15:39:21

Содержание 42F701

Страница 1: ...colour television Owner s manual 42F701...

Страница 2: ...tions 20 Playing Music via USB 21 Recordings Library 21 Media Browser Settings 21 Timeshift Recording 22 Instant Recording 22 Watching Recorded Programmes 22 Using the 3D Mode 23 Changing Image Size P...

Страница 3: ...the device is not used as intended or unauthorized modifications have been made To operate your LCD TV in extreme ambient conditions may cause the damage of the device Preparation For ventilation leav...

Страница 4: ...where you purchased the product Disconnecting the Device The mains plug is used to disconnect the TV set from the mains and therefore it must remain readily operable 3D Mode and 3D Images Read and un...

Страница 5: ...sure from earphones and headphones can cause hearing loss Installation To prevent injury this device must be securely attached to the wall in accordance with the installation instructions when mounted...

Страница 6: ...SLEEP DISPLAY PRESETS MODE Remote Control LCD TV Batteries 2 X AAA Instruction Book 3D Glasses 2x Note You should check the contents after opening your product Make sure that every item is included If...

Страница 7: ...off or disconnect the TV from the mains plug This will also reduce energy consumption Note that annually using the TV set in Power Save Mode has more power efficiency than disconnecting the TV from t...

Страница 8: ...No function 21 Play in Media Browser mode 22 Programme recording 23 No function 24 Rapid reverse in Media Browser mode 25 Image size 26 Mono Stereo Dual I II Current Language 27 Red button 28 Green bu...

Страница 9: ...ONENT VIDEO INPUTS on on the TV and the component video outputs of your device While connecting be sure that the letters on your TV Y Pb Pr correspond with your device s connectors PC YPbPr Audio Inpu...

Страница 10: ...Input 3 Headphone jack is used for connecting an external headphone to the system 4 Connect to the HEADPHONE jack to listen to the TV from headphones optional Video Input is used for connecting video...

Страница 11: ...e itself Do not pull out USB module while playing or recording a file Programme Recording To record a programme you should first connect a USB disk to your TV while the TV is switched off You should t...

Страница 12: ...atted as primary partition to be used for PVR ready features Some stream packets may not be recorded because of signal problems so sometimes video may freezes during playback Record Play Pause Display...

Страница 13: ...y mode either Press the button P P or a numeric button on the remote control Press the P CH or P CH touch button on theTV The TV will then switch on Note If you switch on your TV via PROGRAMME UP DOWN...

Страница 14: ...e Avolume level scale slider will be displayed on the screen Programme Selection Previous or Next Programme Press P button to select the previous programme Press P button to select the next programme...

Страница 15: ...u should then switch on the TV to enable recording feature Otherwise recording feature will not be available RECORD the TV will start to record the selected progamme You can press again to stop the re...

Страница 16: ...tions Afterwards select the desired Teletext Language Press OK button on the remote control to continue and the following message will be displayed on the screen To select the Yes or No option highlig...

Страница 17: ...Analogue Searches and stores both analogue and cable DVB stations Whenever you select an automatic search type and press OK button a confirmation screen will appear on the screen To start installatio...

Страница 18: ...tal Cable scan process the following screen will be displayed You can select frequency ranges from this screen For highlighting lines you see use or button You can enter the frequency range manually b...

Страница 19: ...moved Deleting a Channel You can press GREEN button to tag untag all channels YELLOW button to tag untag channel Select the channel that you want to delete and select Delete option Press OK button to...

Страница 20: ...name of the channel is displayed along with its channel list number Hint Not all channels broadcast the programme data If the name and time of the programme are not available then the information bann...

Страница 21: ...Photos from the main options available image files will be filtered and listed on this screen Jump Numeric buttons Jump to selected file using the numeric buttons OK Views the selected picture in full...

Страница 22: ...Jumps to previous or next file to play YELLOW Toggles viewing style BLUE Changes media type Recordings Library IMPORTANT To view recordings library you should first connect a USB disk to your TV while...

Страница 23: ...during the timeshifting Instant Recording IMPORTANT To record a programme you should first connect a USB disk to your TV while the TV is switched off You should then switch on the TV to enable record...

Страница 24: ...ic 3D glasses Connect a 3D compatible player via an HDMI cable and play the 3D content Refer to the manual of the player for the settings of the player Press SOURCE button and select the connected inp...

Страница 25: ...be available in HDMI YPbPr and DTV sources 16 9 This uniformly stretches the left and right sides of a normal picture 4 3 aspect ratio to fill the wide TV screen For 16 9 aspect ratio pictures that h...

Страница 26: ...Reduction If the broadcast signal is weak and the picture is noisy use Noise Reduction setting to reduce the noise amount Noise Reduction can be set to one of these options Low Medium High or Off Adv...

Страница 27: ...y picture on the screen In such a case you can use this item to get a clear picture by trial and error method Configuring Sound Settings Sound settings can be configured according to your personal pre...

Страница 28: ...only when the TV is SWITCHED OFF In order to watch certain digital channels a conditional access module CAM may be necessary This module must be inserted in the CI slot of your TV Obtain the Conditio...

Страница 29: ...the Language Settings item by pressing or buttons Press OK and Language Settings submenu will be displayed on the screen Use or buttons to highlight the menu item that will be adjusted and then press...

Страница 30: ...view Settings menu Use or button to highlight Timers and press OK to continue Setting Sleep Timer This setting is used for setting the TV to turn off after a certain time Highlight Sleep Timer by usin...

Страница 31: ...factory default is 0000 After you enter the pin a pop up menu appears on the screen to ensure that the hard disk should be formatted select YES and press OK to format the hard disk Select NO and press...

Страница 32: ...r enables any special signal concerning the audio you can set this setting as On to receive such signals Audio Description Audio description refers to an additional narration track for blind and visua...

Страница 33: ...n poor adverse weather conditions some text errors may occur or the teletext mode may be aborted Teletext function buttons are listed below Teletext Mix Activates teletext mode when pressed once Press...

Страница 34: ...suitable plugs used to connect the aerial If you are in doubt consult your dealer No Picture means that your TV is not receiving a transmission Have you selected the correct button on the remote cont...

Страница 35: ...z O 720P 60Hz O 1080I 50Hz O 1080I 60Hz O 1080P 50Hz O 1080P 60Hz O 1080P 24 HZ O X Not Available O Available In some cases a signal on the LCD TV may not be displayed properly The problem may be an i...

Страница 36: ...8 70Hz 12 1024x768 72Hz 13 1024x768 75Hz 14 1152x864 75Hz 15 1280x768 60Hz 16 1360x768 60Hz 17 1280x768 75Hz 18 1280x960 60Hz 19 1280x960 75Hz 20 1280x1024 60Hz 21 1280x1024 75Hz 22 1400x1050 60Hz 23...

Страница 37: ...upgrade and press OK button If a new upgrade is found it starts to download the upgrade Aprogress bar indicates the remaining download progress When the download completes successfully a message is d...

Страница 38: ...n the image s height is multiples of 2 and the image s width is multiples of 16 and if the image width is equal to the panel width or wider in DTV Supported only when the image s height is between 170...

Страница 39: ...DVB T MPEG2 DVB T MPEG4 HD I DEMODULATION Symbol rate COFDM with 2K 8K FFT mode Modulation 16 QAM 64 QAM FEC for all DVB modes automatically found MHEG 5 ENGINE compliant with ISO IEC 13522 5 UK engi...

Страница 40: ...e terminal which is marked with the letter N or coloured Black The wire which is coloured brown or red must be connected to the terminal which is marked with the letter L or coloured Red For continued...

Страница 41: ...50209400 www finluxdirect com Customer helpline 0845 459 5282...

Отзывы: