background image

English

   - 8 -

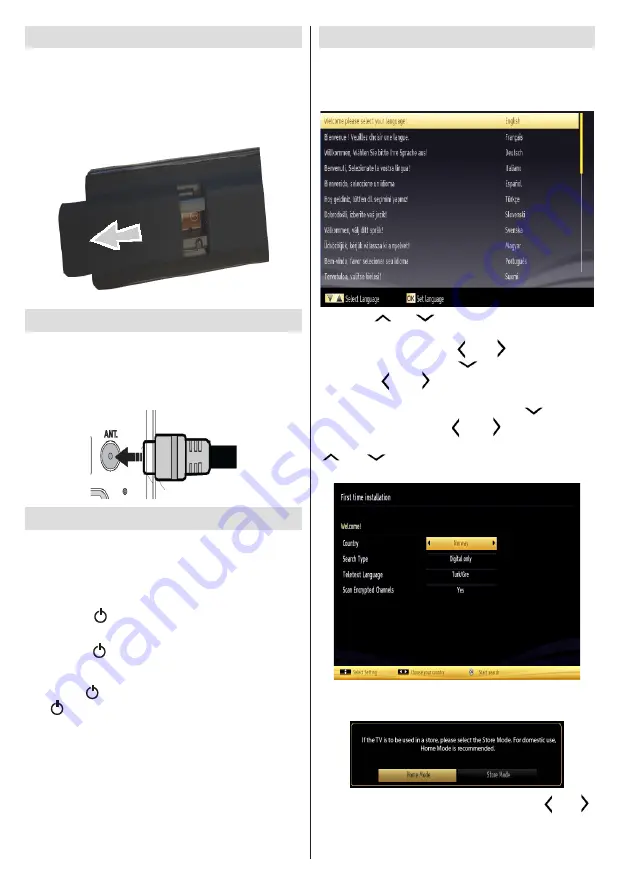
Inserting the Batteries to the Remote

1.

 Lift the cover on the back of the remote upward 

gently.

2.

 Install two AAA batteries. Make sure to match the + 

and - ends of the batteries in the battery compartment 

(observe the correct polarity.)

3.

 Replace the cover.

Connect Power & Antenna

IMPORTANT:

 The TV set is designed to operate on 

220-240V AC, 50 Hz socket. After unpacking, allow the 

TV set to reach the ambient room temperature before 

you connect the set to the mains. Plug the aerial cable 

into the ANT socket on your TV.

Switching On/Off

To Switch the TV On

Connect the power cord to the 220-240V AC, 50 Hz. 
Then the standby LED lights up.
To switch on the TV from standby mode either:
• Press the “ ” button, 

P+ / P- 

or a numeric button 

on the remote control.

• Press the “ ” or 

P/CH+/-

 button on the TV.

To Switch the TV Off

Press the “ “ button on the remote control or hold 

the “ “ switch on the Tv until shut down, so the TV 

will switch to standby mode.

To power down the TV completely, unplug the power 

cord from the mains socket.

Note: When the TV is switched to standby mode, standby LED 

can blink to indicate that features such as Standby Search, 

Over Air Download or Timer is active. The LED can also blink 

when you switch on the TV from standby mode.

First Time Installation

When  turned  on  for  the  first  time,  the  “language 

selection” menu appears. The message “

Welcome 

please select your language!

” is displayed and all 

language options are listed alphabetically. 

Press the “

” or “

” button to highlight the required 

language, press 

OK

 button to select. “First Time 

Installation” appears. Use “    ” or “   ” button to set the 

required country, and press “

” button to select Search 

Type. Use “   ” or “   ” to set the desired search type. 

Available search types are Digital and analog, digital 

only and analog only. When set, press “

” to select 

Teletext Language. Use “   ” or “   ” button to set the 

“Teletext Language” and select “Scan Encrypted” using 

” or “

” button. You can set 

Scan Encrypted 

as 

Yes

 if you want to scan coded stations. 

Press 

OK

 button on the remote control to continue and the 

following message will be displayed on the screen.

You can activate Store mode option by using “   ” or “   ” 

button. If Store Mode is selected, Store mode option will be 

available in other settings menu and your TV’s features will 

be illustrated on the top of the screen. A confirmation 

Содержание 32HME242B-T

Страница 1: ......

Страница 2: ...rding 16 Watching Recorded Programmes 16 Recordings Library 16 16 Wired Connectivity 16 To Connect to a Wired Network 16 17 17 IP Address 17 Mode 17 Wireless Connectivity 17 Connecting to a Wireless N...

Страница 3: ...ELECTRIC SHOCK DO NOT REMOVE COVER OR BACK NO USER SERVICEABLE PARTS INSIDE REFER SERVICING TO QUALIFIED SERVICE PERSONNEL RISK OF ELECTRIC SHOCK DO NOT OPEN CAUTION CAUTION TO REDUCE THE RISK OF ELEC...

Страница 4: ...erosol cleaners Only use a soft dry cloth Environmental Information This television is designed to consume less energy to help save environment You can not only help to save the environment but you ca...

Страница 5: ...8 ME 2000 XP Vista Windows 7 Game Mode optional Ethernet LAN for Internet connectivity 802 11n built in WiFi Support DLNA TV Control button Operation 1 Standby button 2 TV AV button 3 Programme Up Dow...

Страница 6: ...s again to superimpose the teletext over a normal broadcast picture mix 21 Media browser Opens the media browsing screen 22 EPG Electronic programme guide Displays the electronic programme guide 23 Ex...

Страница 7: ...before mounting on the wall Insert or remove the CI module only when the TV is SWITCHED OFF You should refer to the module instruction manual for details of the settings Obtain the Conditional Access...

Страница 8: ...Connect the TV to the mains supply switch on and then wait for few moments until the card is activated 5 When no module is inserted No Common Interface module detected message appears on the screen Y...

Страница 9: ...ched to standby mode standby LED can blink to indicate that features such as Standby Search Over Air Download or Timer is active The LED can also blink when you switch on the TV from standby mode Firs...

Страница 10: ...e g MP3 Players or USB hard disk drives memory sticks may not be compatible with this TV The TV supports FAT32 and NTFS disk formatting but recording will not be available with NTFS formatted disks N...

Страница 11: ...and OK buttons Quick Menu The Quick Settings menu allows you to access some options quickly This menu includes Power Save Mode Picture Mode Equalizer Settings Favourites Sleep Timer FollowMe TV Follo...

Страница 12: ...be enabled or disabled under the Settings Other Settings menu The TV supports also ARC Audio Return Channel feature This feature is an audio link meant to replace other cables between the TV and the...

Страница 13: ...Warm or Cool Picture Zoom Sets the picture size to Auto 16 9 Subtitle 14 9 14 9 Zoom 4 3 or Cinema HDMI True Black While watching from a HDMI source this feature will be visible in the Picture Setting...

Страница 14: ...ional Surround sound mode can be changed as On or Off Digital Out Sets digital audio output type Install and Retune Menu Contents Automatic Channel Scan Retune DigitalAerial Searches and stores aerial...

Страница 15: ...andby mode available broadcasts will be searched If the TV locates any new or missing broadcasts a menu screen will be displayed asking you whether or not to execute these changes The Channel list wil...

Страница 16: ...e Timer option The timer will be cancelled Note It is not possible to record two channels at the same time Recording a Programme IMPORTANT When using a new USB hard disk drive it is recommended that y...

Страница 17: ...mes the slow forward feature will be available You can use button to slow forward Pressing button consecutively will change slow forwarding speed Recordings Library To view the list of recordings sele...

Страница 18: ...on Status This section displays the status of the connection Select Connected if you want to activate a connection Select as Not Connected to end an active connection IP Address If an active connectio...

Страница 19: ...network from the list If the selected network is protected with a password please enter the correct key by using the virtual keyboard You can use this keyboard via the navigation buttons or or and the...

Страница 20: ...dard that eases the viewing process of digital electronics and makes them more convenient to use on a home network For further information visit www dlna org The DLNA standard allows you to view and p...

Страница 21: ...tion of the internet portal Press button on your remote control and the portal application options will be displayed The application options will be displayed in a manner similar to the template below...

Страница 22: ...the volume level 2 Sound is coming from only one speaker Is the balance set to one extreme See Sound Menu section Remote control does not operate Your TV no longer responds to the remote control The b...

Страница 23: ...nly DVB C MPEG2 DVB C MPEG4 HD DVBT 2 MPEG2 DVBT 2 MPEG4 HD RECEIVING CHANNELS VHF BAND I III UHF BAND U HYPERBAND NUMBER OF PRESET CHANNELS 1000 CHANNEL INDICATOR On Screen Display RF AERIAL INPUT 75...

Страница 24: ...earch keywords by clicking the search button in the address dialog box or another way to navigate to pages is by clicking on links on web pages and these will take you to the appropriate pages When yo...

Страница 25: ...d and must be installed before continuing installation 5 Click the Install button The integrated serial will be displayed Please do not change the displayed serial 6 Click the Next button The License...

Страница 26: ...Hz 28 1360x768 60Hz 29 1280x768 75Hz 30 1280x768 85Hz 31 1280x960 60Hz 32 1280x960 75Hz 33 1280x960 85Hz 34 1280x1024 60Hz 35 1280x1024 75Hz 36 1280x1024 85Hz 37 1400x1050 60Hz 38 1400x1050 75Hz 39 14...

Страница 27: ...c mp4 mov MPEG1 2 Layer 3 AAC HEAAC AC3 EAC3 LPCM ADPCM H 264 1080Px2 25fps 1080P 50fps Other 1080P 30fps 50Mbit sec avi MPEG1 2 4 Xvid H 264 VC1 WMV3 Sorenson H 263 Motion JPEG MPEG1 2 Layer 1 2 3 AA...

Страница 28: ...40x900 1600x1200 1680x1050 1920x1080 1920x1200 The Sky Code is 0065 1 Turn your TV on 2 Press TV on your Sky remote control handset 3 Hold down SELECT and the RED button together for about two seconds...

Страница 29: ...0I 50Hz O 1080I 60Hz O HDMI1 HDMI2 HDMI3 480I 60Hz O 480P 60Hz O 576I 50Hz O 576P 50Hz O 720P 50Hz O 720P 60Hz O 1080I 50Hz O 1080I 60Hz O 1080P 24Hz 25Hz 30Hz 50Hz 60Hz O X Not Available O Available...

Страница 30: ...reen or green and yellow The wire which is coloured blue or black must be connected to the terminal which is marked with the letter N or coloured Black The wire which is coloured brown or red must be...

Страница 31: ...ME242B T E Energy efficiency class A F Visible screen size diagonal approx inch cm 32 inches 81 cm G On mode average power consumption Watt 41 H Annual energy consumption kWh annum 59 I Standby power...

Страница 32: ......

Отзывы: