background image

English

   - 23 -

Customer Helpline 0845 459 5282

Managing Stations: Sorting 
Channel List

You can select broadcasts to be listed in the channel 
list. To display speci

fi

 c types of broadcast, you should 

use Active Channel List setting.

Select Active Channel List from the Channel list 
menu by using “ ” or “ ” button. Press 

OK

 button 

to continue.

You can select a broadcast type option from the list 
by using “ ” /“ ” and

 OK

 buttons.

On-Screen Information

You can press 

“INFO”

 button to display on-screen 

information. Details of the station and current 
programme will be displayed on the information 
banner.

The information banner gives information on the 
channel selected and the programmes on it. The name 
of the channel is displayed, along with its channel 
list number. 

Hint: Not all channels broadcast the programme 
data. If the name and time of the programme are not 
available, then information banner will be displayed 
with blanks. 

If the selected channel is locked, you must enter the 
correct four-digit numeric code to view the channel 
(default code is 

0000

). “

Enter PIN

” will be displayed 

on the screen in such a case:

Media Playback Using Media 
Browser

If the USB stick is not recognized after power off/on 
or First Time Installation, 

fi

 rst, plug the USB device 

out and power off/on the TV set. Plug the USB device 
in again.

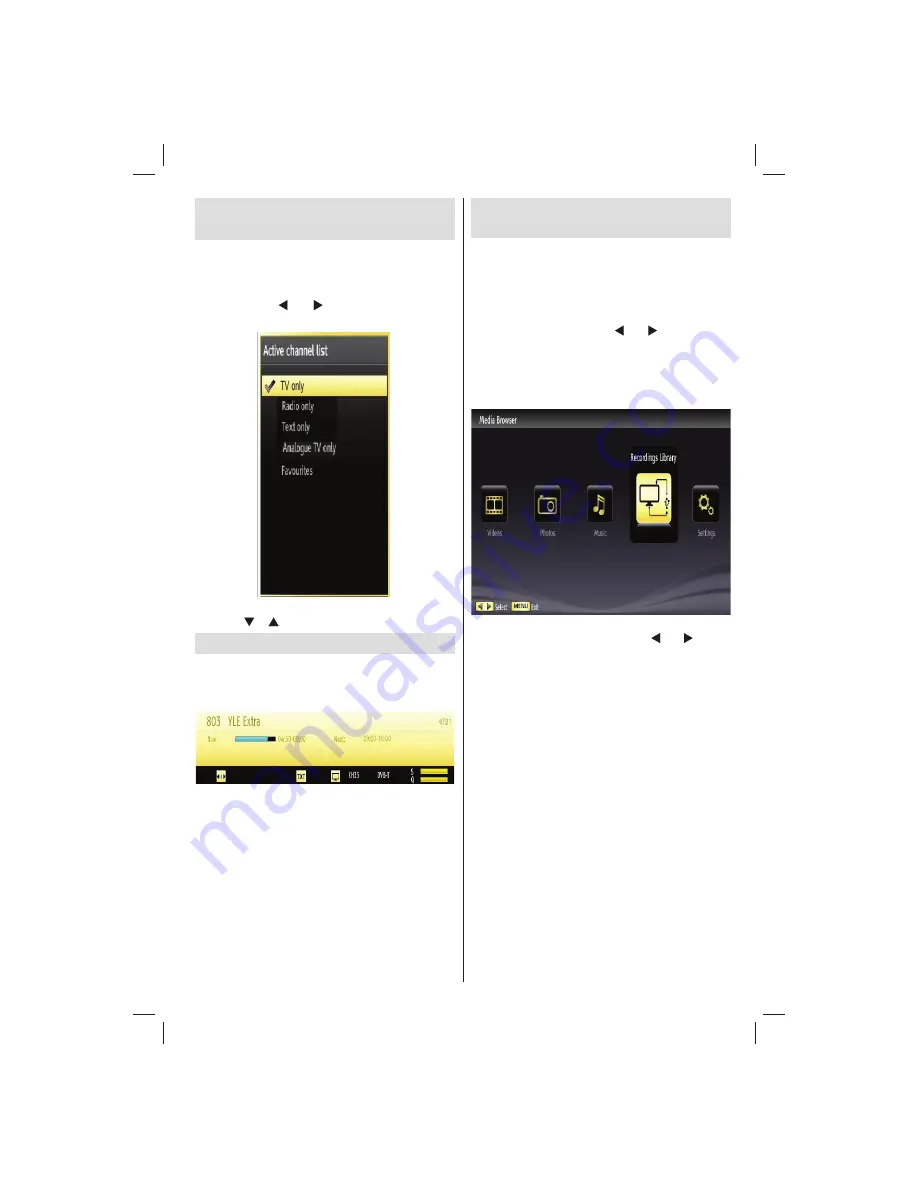
To display Media Browser window, press either 

MENU

” button on the remote control and then select 

Media Browser by pressing “ ” or “ ” button. Press 

OK

 button to continue. Media Browser menu options 

will be displayed. 

Also, when you insert a USB device, the media 
browser screen will be displayed automatically:

You can play music, picture and video 

fi

 les from the 

connected USB memory stick. Use “ ” or “ ” button 
to select Videos, Photos, Music or Settings. 
When you have selected the desired media type 
Videos, Photos or Music the USB device will be 
scanned for all matching media, this may take several 
minutes depending on the device size and number of 

fi

 les contained within. During the scanning process 

“Please wait…” will be displayed along with an 
animated logo, please do not remove the USB device 
during this time. The use of large USB storage devices 
containing mixed media and many sub directories 
levels may cause mis-operation of the media player 
and the TV may require switching off to restore normal 
operation.
You can connect two USB devices to your TV. If both 
USB devices include music, picture or video 

fi

 les, USB 

selection OSD will be displayed on the screen. The 

fi

 rst USB device connected to the TV will be named 

as USB Drive1.

01_[GB]_MB70_5112UK_IDTV_T_DLNA_MMH_IPLAYER_32965LED_GOLD11_10077102_50209143.indd   23

01_[GB]_MB70_5112UK_IDTV_T_DLNA_MMH_IPLAYER_32965LED_GOLD11_10077102_50209143.indd   23

06.01.2012   10:57:26

06.01.2012   10:57:26

Содержание 32F8030

Страница 1: ...colour television owner s manual 32F8030...

Страница 2: ...me Guide Menu 19 EPG Now and Next Menu 19 Recording via EPG Screen 19 Programme Options 19 Installation 20 Auto Channel Scan Menu Operation 20 Manual Tuning 20 Analogue Fine Tune 21 First Time Install...

Страница 3: ...one via WiFi Optional 37 Configuring Other Settings 38 Operation 38 Other Features 38 Digital Teletext 39 Analogue Teletext 39 Tips 40 AppendixA INTERNET PORTAL 41 Appendix B BBC iPlayer Launch 42 Pla...

Страница 4: ...ital TV DVB T MPEG2 DVB T MPEG4 4 HDMI connectors 2 USB inputs Programme recording Programme timeshifting 10 000 programmes On Screen Display OSD menu system 2 Scart sockets Teletext Fastext TOP text...

Страница 5: ...cord by the plug Do not unplug the appliance by pulling from the power cord and never touch the power cord with wet hands as this could cause a short circuit or electric shock Never make a knot in the...

Страница 6: ...rate collection systems for recycling in EU For more information please contact the local authority or the dealer where you purchased the product Disconnecting the Device The mains plug is used to dis...

Страница 7: ...ergency the mains plug can be pulled immediately During periods of prolonged non use the TV should be disconnected from the main power supply HDMI the HDMI logo and High Definition Multimedia Interfac...

Страница 8: ...t the TV from the mains plug This will also reduce energy consumption Disconnect power when going away for a prolonged period It is highly recommended to activate Power Save Mode setting to reduce you...

Страница 9: ...T 23 mode OK Select Hold in TXT mode Channel List 24 Volume up down 25 Navigation buttons 26 Mute 27 Previous programme Now in EPG mode 28 Sleep timer 29 Favourite mode selection 30 Picture mode selec...

Страница 10: ...ayer Note If an external device is connected via the SCART socket the TV will automatically switch to AV mode Note SCART cable not supplied Component Video Inputs YPbPr 3 are used for connecting compo...

Страница 11: ...NPUT on the TV and the PC output on your PC Ethernet input for service 12 Viewing the Connections Side Connectors CI Slot is used for inserting a CI card A CI card allows you to view all the channels...

Страница 12: ...socket Note When the TV is switched to standby mode the standby LED can blink to indicate that features such as Standby Search Over Air Download or Timer is active The LED can also blink when you swi...

Страница 13: ...ntenna is used instead of the active antenna You can activate Store mode option by using or button If the Store mode is set to enabled Store mode option will be available in other settings menu If it...

Страница 14: ...methods HDMI inputs Scart sockets Component video inputs Component audio inputs DVD Player Connecting the LED TV to a PC For displaying your computer s screen image on your LED TV you can connect you...

Страница 15: ...o record a programme you should first connect a USB disk to your TV while the TV is switched off You should then switch on the TV to enable the recording feature Otherwise the recording feature will n...

Страница 16: ...Library or Recording Timers Recorded programmes are stored in the following directory of the connected USB disk DVR RECS All recordings are indicated with a number such as 4801 000 ts A text txt file...

Страница 17: ...the connection to your TV You can add your TV to your LAN by connecting the LAN port at the rear of your TV to your modem s LAN connector as illustrated below PC with Nero Media Home software install...

Страница 18: ...area The transmission speed differs depending on the distance and number of obstructions between the transmission products the configuration of these products the radio wave conditions the line traffi...

Страница 19: ...e A volume level scale slider will be displayed on the screen Programme Selection Previous or Next Programme Press CH button to select the previous programme Press CH button to select the next program...

Страница 20: ...ets timer for future programs INFO Event Details Displays the programmes in detail RECORD the TV will start to record the selected progamme You can press again to stop the recording EPG Now and Next M...

Страница 21: ...select Installation by using or button Press OK button and the following menu screen will be displayed Select Automatic Channel Scan Retune by using button and press OK button Automatic Channel Scan R...

Страница 22: ...ress OK The TV s memory will be deleted and installation progress starts Clear Service List This setting is visible only when the Country option is set to Denmark Sweden Norway or Finland Use this set...

Страница 23: ...c by Pressing the numeric buttons 0 9 replaces the highlighted character with the characters printed above the button one by one as the button is pressed When finished press OK button to save Press M...

Страница 24: ...Plug the USB device in again To display Media Browser window press either MENU button on the remote control and then select Media Browser by pressing or button Press OK button to continue Media Brows...

Страница 25: ...subtitle time correction menu Press RETURN button to switch back to previous menu Viewing Photos via USB When you select Photos from the main options available image files will be filtered and listed...

Страница 26: ...ons Media Browser Settings You can set your Media Browser preferences by using the Settings dialog Press or button to highlight an item and use or button to set View Style Sets default browsing mode S...

Страница 27: ...on Press BLUE button to start searching for available wireless networks If any active wireless networks are found a list will be displayed Please select your desired network from the list If the selec...

Страница 28: ...IMPORTANT To record a programme you should first connect a USB disk to your TV while the TV is switched off You should then switch on the TV to enable the recording feature Otherwise the recording fea...

Страница 29: ...g Recorded Programmes In the main menu use or buttons to select Media Browser Highlight Recordings Library item by using or button and press OK button to enter Recordings Library will then be displaye...

Страница 30: ...that have been squeezed into a normal picture 4 3 aspect ratio use the 16 9 mode to restore the picture to its original shape Subtitle This zooms up the wide picture 16 9 aspect ratio with subtitles...

Страница 31: ...nal is weak and the picture is noisy use Noise Reduction setting to reduce the noise amount Noise Reduction can be set to one of these options Low Medium High or Off Advanced Settings Dynamic Contrast...

Страница 32: ...ions like spreadsheets or paragraphs or text in smaller fonts Phase Depending on the resolution and scan frequency that you input to the TV set you may see a hazy or noisy picture on the screen In suc...

Страница 33: ...setting options of the TV set Using a Conditional Access Module not supplied IMPORTANT Insert or remove the CI module only when the TV is SWITCHED OFF In order to watch certain digital channels a cond...

Страница 34: ...hanges the audio language for the current channel Subtitle Sets the subtitle language for the current channel Note If the Country option is set to Denmark Sweden Norway or Finland the Language Setting...

Страница 35: ...tandby mode with the Standby On button To switch the TV on again you need the remote control Hence if one of those buttons is pressed Child Lock Is On will be displayed on the screen when the menu scr...

Страница 36: ...owed for timeshifting Duration options are approximate and can change accordingly depending on the broadcast received When the Max Timeshift time is reached auto play will proceed Format Disk IMPORTAN...

Страница 37: ...gle a warning screen will appear and the TV will not get an IP address Try connecting the LAN cable after this and then the TV will be able to get an IP address Configuring Wired Device Settings On Ne...

Страница 38: ...e bottom of the dialog shows features that you may use Press BLUE button to check your internet connection speed You can check the signal strenght by using the network settings menu for the wireless d...

Страница 39: ...e description narrator talks through the presentation describing what is happening on the screen during the natural pauses in the audio and sometimes during dialogue if deemed necessary You can use th...

Страница 40: ...TV Note that if the signal degrades for example in poor adverse weather conditions some text errors may occur or the teletext mode may be aborted Teletext function buttons are listed below TEXT Telet...

Страница 41: ...off the TV and then re inserting the USB device while the TV is switched off USB Is too Slow If USB is too slow message is displayed on the screen while starting a recording try restarting the recordi...

Страница 42: ...al application options will be displayed Application options will be displayed as the template below Available applications contents may change depending on the app lication content provider Select a...

Страница 43: ...ss OK button to confirm your selection Playing a Programme via iPlayer Select a programme and press OK button The programme playback will begin You can press button to pause a programme Press to resum...

Страница 44: ...our PC manufacturer Index Resolution Frequency Hz 1 640x480p VGA 59 2 640x480p VGA 72 3 640x480p VGA 75 4 640x480p VGA 85 5 800x600p SVGA 56 6 800x600p SVGA 60 7 800x600p SVGA 72 8 800x600p SVGA 75 9...

Страница 45: ...60Hz O 576I 50Hz O 576P 50Hz O 720P 50Hz O 720P 60Hz O 1080I 50Hz O 1080I 60Hz O 1080P 50Hz O 1080P 60Hz O 1080P 24Hz O X Not Available O Available In some cases a signal on the LED TV may not be dis...

Страница 46: ...eam Video Decoder MSVD Audio Decoder MSAD Audio MP3 None MP3 Audio WAV AIFF None LPCM Windows Media optional WMA ASF VC1 WMA MPEG1 Program Stream MPEG 1 MPEG1 MP3 AC 3 and PCM MPEG2 Program Stream MPE...

Страница 47: ...ls for new software upgrade If new software is found and downloaded successfully with next power up TV opens with new software version Note on reboot operation Reboot is the last step in software upgr...

Страница 48: ...age from the language selection menu before continuing Click the Next button 3 The integrated serial is displayed Please do not change displayed serial Click the Next button 4 The License Conditions E...

Страница 49: ...rogress of the installation process Installation finishes 10 The Help us to Enhance Nero Software screen is displayed In order to offer a better service Nero is collecting anonymous data to determine...

Страница 50: ...e folder that you want to share and click START SERVER You can display all media types from the library 15 Click Refresh icon to refresh Click STOP SERVER icon to stop server 01_ GB _MB70_5112UK_IDTV_...

Страница 51: ...h 2K 8K FFT mode Modulation 16 QAM 64 QAM FEC for all DVB modes automatically found MHEG 5 ENGINE compliant with ISO IEC 13522 5 UK engine Profile UK only Object carousel support compliant with ISO IE...

Страница 52: ...he terminal which is marked with the letter N or coloured Black The wire which is coloured brown or red must be connected to the terminal which is marked with the letter L or coloured Red For continue...

Страница 53: ...50209143 www finluxdirect com Customer helpline 0845 459 5282...

Отзывы: