Finlux 26F7030 Скачать руководство пользователя страница 14

English  

- 13 -

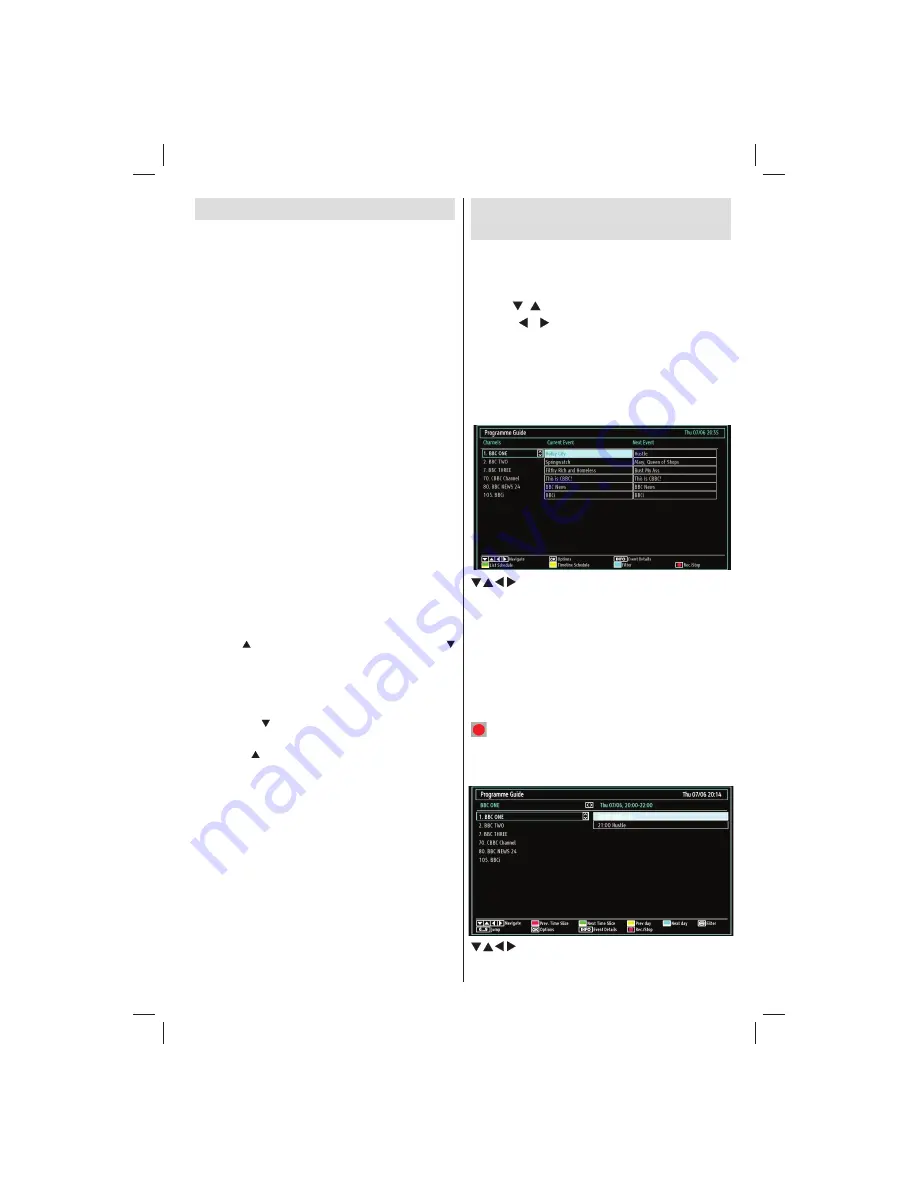
Viewing Electronic Programme 
Guide (EPG)

You can view the electronic programme guide (EPG) 
to see information about available programmes.To 
view the EPG menu please press EPG button on the 
remote control.

Press “

• 

”/“ ”  buttons to navigate through channels.

Press “

• 

”/“ ” buttons to navigate through the 

programme list.
Please note that event information is updated 

• 

automatically. If there is no event information data 
available for channels, the EPG will be displayed 
with blanks.

EPG Timeline Schedule


/ / /  : Navigate 

OK (Options):

 Views/records or sets timer for future 

programmes.

Blue button (Filter): 

Views 

fi

 ltering options.

INFO (Event Details): 

Displays the programmes in 

detail.

Green button: 

Programme schedule will be listed

Yellow button: 

Display EPG data in accordane with 

timeline schedule


 (RECORD): the TV will start to record the 

selected programme. You can press again to stop 
the recording.

EPG Channel Schedule

/ / /   : Navigate

Basic Operations

You can operate your TV using both the remote 
control and onset buttons.

Operation with the Buttons on the TV
Volume Setting

You can use the control switch to change the 

• 

volume of the TV. To increase volume, please move 
the switch upward. Move the switch downward to 
decrease the volume. A volume level scale (slider) 
will be displayed on the screen.

Programme Selection

First press the control switch once to change 

• 

channel. You can move the switch upward to select 
the next programme or move it downward to select 
the previous programme.

Viewing Main Menu

The Main Menu screen cannot be displayed by using 

• 

the control switch on the TV.

AV Mode

Press the control switch consecutively until the 

• 

source OSD is displayed on the screen.

Operation with the Remote Control

The remote control of your TV is designed to control 

• 

all the functions of the model you selected. The 
functions will be described in accordance with the 
menu system of your TV.

Volume Setting

Press 

• 

V

 button to increase the volume. Press 

V  

button to decrease the volume. A volume level scale 
(slider) will be displayed on the screen.

Programme Selection (Previous or Next 
Programme)

Press 

• 

CH

 button to select the previous 

programme. 
Press 

• 

CH

 button to select the next programme.

Programme Selection (Direct Access)

Press the numeric buttons on the remote control to 

• 

select programmes between 0 and 9. The TV will 
switch to the selected programme.

A01_MB62_[GB]_woypbpr_DVBTC_PVR_NICKEL17_5103UK_26965WLED_10079350_50220218.indd   13

A01_MB62_[GB]_woypbpr_DVBTC_PVR_NICKEL17_5103UK_26965WLED_10079350_50220218.indd   13

10.05.2012   08:54:59

10.05.2012   08:54:59

Содержание 26F7030

Страница 1: ...26in LED Passive 3D TV 26F7030 Owner s manual happy Finnish...

Страница 2: ...ser 19 Using the 3D Mode 22 3D Mode 22 3D Settings 22 Mode 22 2D Only 22 Supported 3D Content Resolutions 23 Timeshift Recording 23 Instant Recording 23 Watching Recorded Programmes 23 Changing Image...

Страница 3: ...is intended solely for private domestic use and may not be used for industrial and commercial purposes We exclude liability in principle if the device is not used as intended or unauthorized modificat...

Страница 4: ...Find out about the legal regulations which apply in your area Do not try to recharge batteries there is a danger of explosion Replace batteries only with the same or equivalent type This symbol on th...

Страница 5: ...ional sense cramps or nausea When watching 3D TV monitor your children including teenagers because they may be more sensitive to the effects of watching 3D such as these symptoms Use only the supplied...

Страница 6: ...ther apparatus with a connection to protective earthing and to a television distribution system using a coaxial cable may in some circumstances create a fire hazard Connection to a cable distribution...

Страница 7: ...ill switch to energy saving mode and luminance level of TV set will be decreased to optimum level Note that some picture settings will be unavailable to be changed when the TV is in Power Save Mode Wh...

Страница 8: ...tings optional 18 Picture mode selection Changes picture mode 19 in Media Browser video mode Recordings Library 20 No function 21 Play in Media Browser mode 22 Programme recording 23 No function 24 Ra...

Страница 9: ...ble of displaying High Definition pictures from devices such as a High Definition Satellite receiver or Blu Ray Player These sockets can receive a number of different resolutions Please see Appendix B...

Страница 10: ...of the supplied AV connection cable Colours of the connected jacks should match To enable audio connection you must use RED and WHITE inputs of the side AV connection cable Afterwards insert your devi...

Страница 11: ...o the USB player and especially the USB device itself Do not pull out USB module while playing or recording a file Programme Recording To record a programme you should first connect a USB disk to your...

Страница 12: ...e noise in the picture For selecting the related source see the section Input selection in the following parts To listen the TV sound from headphones connect to the HEADPHONE jack of theTV Connecting...

Страница 13: ...ndby On Off To switch the TV on from standby mode either Press the button CH CH or a numeric button on the remote control Press the button P CH or P CH button on the TV The TV will then switch on Note...

Страница 14: ...the switch downward to decrease the volume A volume level scale slider will be displayed on the screen Programme Selection First press the control switch once to change channel You can move the switc...

Страница 15: ...ext for UK only Press the TXT button The digital teletext information appears Operate it with the coloured buttons cursor buttons and OK button The operation method may differ depending on the content...

Страница 16: ...e same time interval First Time Installation IMPORTANT Ensure that the aerial or cable is connected and a Common Interface module is not inserted before switching on the TV for the first time installa...

Страница 17: ...utton and press OK button Automatic Channel Scan Retune options will be displayed You can select options by using and OK buttons Auto Channel Scan Retune Menu Operation Analogue Searches and stores an...

Страница 18: ...layed Analogue Fine Tune feature will not be available if there are no analog channels digital channels and external sources stored Press OK button to proceed Use or button to set Fine Tune When finis...

Страница 19: ...sing the numeric buttons 0 9 replaces the highlighted character with the characters printed above the button one by one as the button is pressed When finished press the OK button to save Press MENU to...

Страница 20: ...the USB device turn the TV off and on again and re insert the USB device To display the Media Browser window press either MENU button on the remote control and then select Media Browser by pressing o...

Страница 21: ...gate menu Slideshow button Starts the slideshow using all images GREEN button Views images in thumbnails RED button Sorts files by date Yellow Button Change viewing style BLUE Changes media options Sl...

Страница 22: ...f You should then switch on the TV to enable recording feature Otherwise recording feature will not be available To view the list of recordings select Recordings Library and press the OK button Record...

Страница 23: ...supplied 3D Glasses 3D Mode Press 3D button to view 3D Settings menu directly 3D feature enables you to view 3D content using the supplied 3D glasses To enable and customize 3D mode on the TV perform...

Страница 24: ...e you should first connect a USB disk to your TV while the TV is switched off You should then switch on the TV to enable recording feature Otherwise recording feature will not be available Press RECOR...

Страница 25: ...bPr and DTV sources 16 9 This uniformly stretches the left and right sides of a normal picture 4 3 aspect ratio to fill the wide TV screen For 16 9 aspect ratio pictures that have been squeezed into a...

Страница 26: ...Settings Colour Temp Sets the desired colour tone Setting Cool option gives white colours a slight blue stress For normal colours select Normal option Setting Warm option gives white colours a slight...

Страница 27: ...djusts volume level Equalizer Press OK button to view equalizer sub menu In the equalizer menu the preset can be changed to Music Movie Speech Flat Classic and User Press the MENU button to return to...

Страница 28: ...rs on the screen Refer to the module instruction manual for details of the settings Viewing Conditional Access Menu These menu settings may change depending on the service provider Press MENU button a...

Страница 29: ...ess to the installation menu or the whole menu system Maturity Lock When set this option gets the maturity information from the broadcast and if this maturity level is disabLED disables access to the...

Страница 30: ...options are available for adjustments Start Early You set recording timer s starting time to start earlier by using this setting Available only for EU country options End Late You set recording timer...

Страница 31: ...to select a source Use or button to enable or disable the selected source Changes are automatically stored Note YPbPr mode can be used only when you connect a device that has a YPbPr output through th...

Страница 32: ...andby Search to Off this function will be unavailable To use Standby search please make sure that you select Standby Search as On If the Standby Search is set to On when the TV is in standby mode avai...

Страница 33: ...rrect TV system Is yourTV set or house aerial located too close to a non earthed audio equipment or neon lights etc Mountains or high buildings can cause double pictures or ghost images Sometimes you...

Страница 34: ...21 1920x1080 60 HzB 22 1920x1200 60HzA 23 1920x1200 60Hz Appendix B AV and HDMI Signal Compatibility Input Signal Types Source Supported Signals Available EXT SCART PAL 50 60 O NTSC 60 O RGB 50 O RGB...

Страница 35: ...pgrade and press OK button If a new upgrade is found it starts to download the upgrade A progress bar indicates the remaining download progress When the download completes successfully a message is di...

Страница 36: ...n the middle of the screen SBS Side By Side TB Top Bottom MBP Media Browser Picture MBV Media Browser Video FC Frame Compatible FP Frame Pack in MBP Supported only when the image s height is multiples...

Страница 37: ...g distance m 2 50 2 75 2 80 3 25 Horizontal Viewing Angle 45 45 Vertical Viewing Angle It is always recommended to place a TV at the correct seated eye height of the viewer If the TV must be placed hi...

Страница 38: ...EG max WxH 15360x8640 4147200bytes Progressive JPEG max WxH 1024x768 6291456bytes bmp max WxH 9600x6400 3840000bytes Subtitle sub srt Products Battery Information for Users on Disposal of old Equipmen...

Страница 39: ...135818 6 and UK DTT profile Frequency range 474 850 MHz for UK models 170 862 MHz for EU models Transmission standard DVB T MPEG 2 MPEG 4 Demodulation COFDM with 2K 8K FFT mode FEC all DVB modes Vide...

Страница 40: ...ich is marked with the letter N or coloured Black The wire which is coloured brown or red must be connected to the terminal which is marked with the letter L or coloured Red For continued protection a...

Страница 41: ...50220218 www finluxdirect com Customer helpline 0845 459 5282...

Отзывы: