background image

- 16 -

Auto Channel Scan (Retune) Menu 

Operation

Analogue:

 Searches and stores analogue stations.

Digital  & Analogue:

  Searches  and  stores  both 

analogue and aerial DVB stations.

Whenever you select an automatic search type and 

• 

press 

OK 

button, a confirmation screen will appear 

on the screen. To start installation process, select 

Yes

, to cancel select 

No 

by using .“ ” or “ ” and 

OK

 button. 

After the auto channel scan type is set and selected 

• 

and confirmed, the installation process will start and 

the progress bar will move along. Press

 “MENU”


button to cancel process. Located channels are not 

stored if the process is cancelled.

Manual Tuning 

HINT:

 This feature can be used for direct broadcast 

entry.

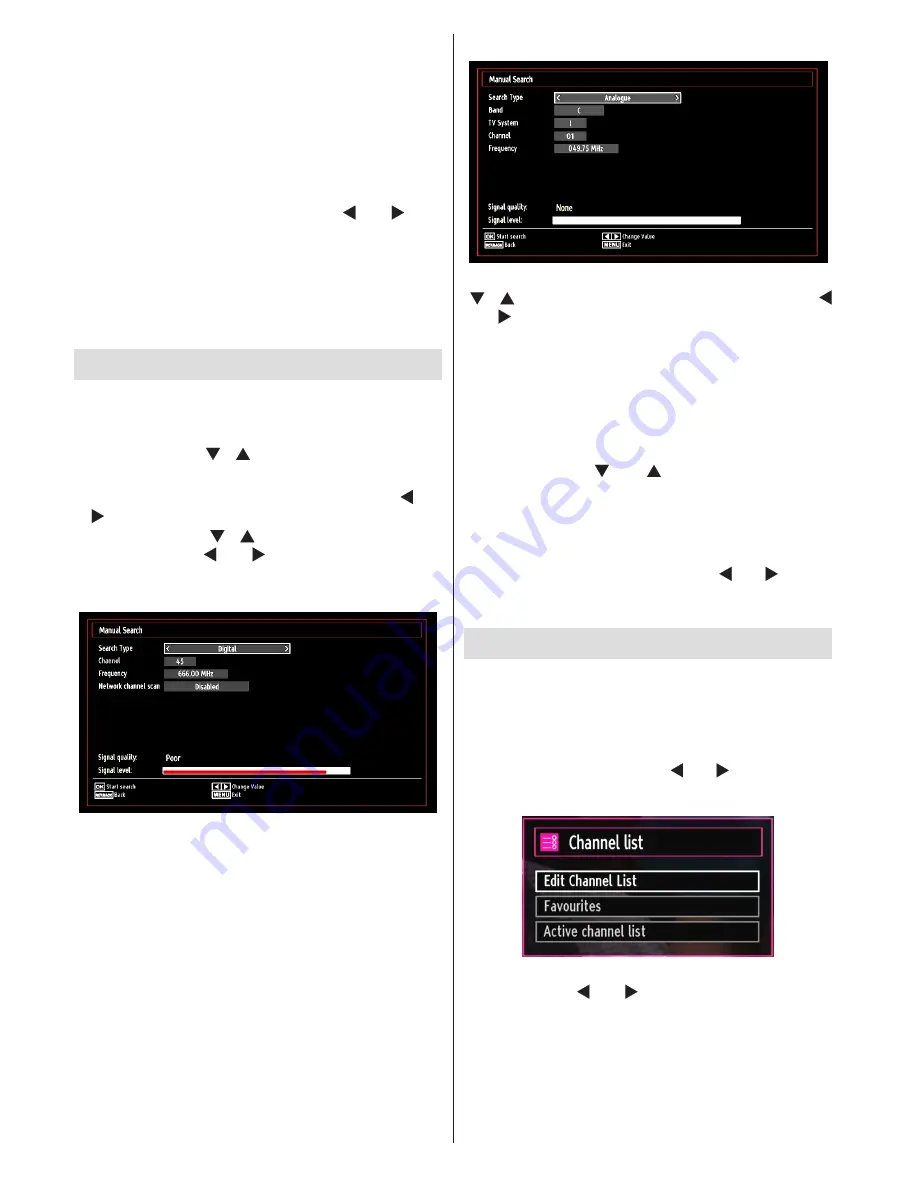
Select 

• 

Manual Channel Scan

 from the Installation 

menu  by  using  “ ”/“ ”  and 

OK

  buttons.  Manual 

Scan options screen will be displayed. 
Select  the  desired 

• 

Search  Type

  using  “ ”  or                 

“ ”  button.  Manual  search  options  will  change 

accordingly. Use “ ”/“ ” button to highlight an item 

and then press “ ” or “ ” button to set an option. 

You can press 

“MENU”

 button to cancel.

Digital Manual Search

In manual channel scan, the number of the multiplex 

or  frequency  are  entered  manually  and  only  that 

multiplex or frequency are searched for the channels. 

After selecting search type as 

Digital

, you can enter 

the multiplex or frequency number using the numeric 

buttons and press 

OK

 button to search.

Analogue Manual Search

After selecting search type as analogue, you can use 

“ ”/“ ” button to highlight an item and then press “

” or “ ” button to set an option. 
Enter  the  channel  number  or  frequency  using  the 

numeric  buttons.  You  can  then  press 

OK

  button 

to  search.  When  the  channel  is  located,  any  new 

channels that are not on the list will be stored.

Analogue Fine Tune

Select 

• 

Analogue Fine Tune

 from the Installation 

menu by using “ ” or “ ” and 

OK

 buttons.  The 

analogue  fine  tune  screen  will  be  displayed. The 

Analogue Fine Tune feature will not be available if 

there  are  no  analogue  channels,  digital  channels 
and external sources stored. 
Press 

• 

OK

 button to proceed. Use “ ” or “ ” button 

to set Fine Tune. When finished, press 

OK

 button 

again.

Managing Stations: Channel List

The TV sorts all stored stations in the Channel List. 

You can edit this channel list, set favourites or set 

active stations to be listed by using the Channel List 

options.

Press 

• 

MENU

 button to view main menu. Select the 

Channel List item by using “ ” or “ ” button. Press 

OK

 to view menu contents.

Select 

Edit  Channel  List

  to  manage  all  stored 

channels. Use “ ” or “ ”  and 

OK

 buttons to select 

Edit Channel List.

Содержание 22F7030

Страница 1: ...22in LED 3D TV 22F7030 Owner s manual happy Finnish...

Страница 2: ...the Channel List 18 On Screen Information 18 Media Playback Using Media Browser 18 Viewing Videos via USB 18 Viewing Photos via USB 19 Slideshow Options 19 Playing Music via USB 19 Recordings Library...

Страница 3: ...Features 3D Viewing This product supports the 3D viewing function via an available broadcast or via HDMI PC YPBPR source Remote controlled colour LED TV Fully integrated Terrestrial digital TV DVB T M...

Страница 4: ...ped on A damaged power cord can cause fire or give you an electric shock When it is damaged and needs to be replaced it should be done by qualified personnel Moisture and Water Do not use this device...

Страница 5: ...with a soft cloth As the product may be scratched if there is any foreign Batteries including those which are heavy metal free should not be disposed of with household waste Please dispose of used bat...

Страница 6: ...sy when exposed to certain conditions including flashing lights or images in TV or video games Sometimes certain symptoms can occur in unspecified conditions even if you do not have any previous histo...

Страница 7: ...TV should be disconnected from the mains power supply TRADEMARK ACKNOWLEDGMENT Dolby and the double D symbol are trademarks of Dolby Laboratories Licence Notification Optional Manufactured under lice...

Страница 8: ...rsor right 13 Mute 14 Volume up down 15 Exit Return Index page in TXT mode 16 Sleep timer 17 3D Settings optional 18 Picture mode selection Changes picture mode 19 in Media Browser video mode Recordin...

Страница 9: ...2 SPDIF Coax OUT HDMI 2 HDMI Input 1 HDMI 1 HDMI Input 2 HDMI Inputs are for connecting a device that has a HDMI socket Your TV is capable of displaying high definition pictures from devices such as a...

Страница 10: ...video cable s not supplied connector into the YELLOW input located on the plural side of the supplied AV connection cable Colours of the connected jacks should match To enable audio connection you mus...

Страница 11: ...ion Especially do not repeatedly quickly plug and unplug the drive This may cause physical damage to the USB player and especially the USB device itself Do not pull out USB module while playing or rec...

Страница 12: ...me time since it can cause noise in the picture For selecting the related source see the section Input selection in the following parts To listen the TV sound from headphones connect to the HEADPHONE...

Страница 13: ...o learn the usage of the menus refer to the menu system sections AV Mode Press the TV AV button in the control panel on the TV to switch between AV modes HDMI inputs Scart sockets DVD Player Scart Cab...

Страница 14: ...the language selection screen will be displayed Use or buttons to select your language and press OK button to set the selected language and continue After selecting the language Welcome screen will b...

Страница 15: ...tons Jump Jumps to the preferred channel directly via numeric buttons INFO Details Displays the programmes in detail OK Options Views records or sets timer for future programmes Search Displays Guide...

Страница 16: ...TV is switched off You should then switch on the TV to enable recording feature Otherwise recording feature will not be available After you have selected a programme in EPG menu press the OK button an...

Страница 17: ...ultiplex or frequency are searched for the channels After selecting search type as Digital you can enter the multiplex or frequency number using the numeric buttons and press OK button to search Analo...

Страница 18: ...haracter Pressing or button toggles the current character i e b character becomes a by and c by Pressing the numeric buttons 0 9 replaces the highlighted character with the characters printed above th...

Страница 19: ...on again and re insert the USB device To display the Media Browser window press either MENU button on the remote control and then select Media Browser by pressing or button Press OK button to continue...

Страница 20: ...ted picture in full screen Navigate menu Slideshow button Starts the slideshow using all images GREEN button Views images in thumbnails RED button Sorts files by date Yellow Button Change viewing styl...

Страница 21: ...there is no need to sort files again by pressing FAV button INFO Displays settings Recordings Library IMPORTANT To view recordings library you should first connect a USB disk to your TV while the TV...

Страница 22: ...You should select suitable 3D Mode before viewing To view 3D contents or programmes in 3D mode 3 Dimensional you must wear the supplied 3D Glasses 3D Mode Press 3D button to view 3D Settings menu dire...

Страница 23: ...ng Lip Sync delay may occur during the timeshifting Instant Recording IMPORTANT To record a programme you should first connect a USB disk to your TV while the TV is switched off You should then switch...

Страница 24: ...selected the aspect ratio of the screen is adjusted by the information provided by the selected source if available Note Auto mode only will be available in HDMI YPbPr and DTV sources 16 9 This unifo...

Страница 25: ...n be set to one of these options Low Medium High or Off Advanced Settings Colour Temp Sets the desired colour tone Setting Cool option gives white colours a slight blue stress For normal colours selec...

Страница 26: ...a menu item Use or button to set an item Press MENU button to exit Sound Settings Menu Items Volume Adjusts volume level Equalizer Press OK button to view equalizer sub menu In the equalizer menu the...

Страница 27: ...l the card is activated When no module is inserted No Common Interface module detected message appears on the screen Refer to the module instruction manual for details of the settings Viewing Conditio...

Страница 28: ...ay parental lock menu options the PIN number should be entered The factory default PIN number is 0000 After coding the correct PIN number parental settings menu will be displayed Parental Settings Men...

Страница 29: ...ress GREEN button Edit Timer menu screen will be displayed When finished with editing press GREEN button to save You can press MENU button to cancel Deleting a Timer Select the timer you want to delet...

Страница 30: ...set If MANUAL option is selected as the Time Zone can be altered By pressing or buttons select Time Zone Use or buttons to change the Time Zone between GMT 12 or GMT 12 Date Time on the top of the me...

Страница 31: ...Standby Search to Off this function will be unavailable To use Standby search please make sure that you select Standby Search as On Other Features Displaying TV Information Programme Number Programme...

Страница 32: ...rial located too close to a non earthed audio equipment or neon lights etc Mountains or high buildings can cause double pictures or ghost images Sometimes you can improve the picture quality by changi...

Страница 33: ...1400x1050 75Hz 85Hz 17 1400x900 65Hz 75Hz 18 1600x1200 60 Hz 19 1680x1050 60 Hz 20 1920x1080 60 HzA 21 1920x1080 60 HzB 22 1920x1200 60HzA 23 1920x1200 60Hz Appendix B AV and HDMI Signal Compatibilit...

Страница 34: ...grade Options menu In Upgrade Options menu select Scan for upgrade and press OK button If a new upgrade is found it starts to download the upgrade A progress bar indicates the remaining download progr...

Страница 35: ...ry contains lead Media File Extension Format Remarks Video Audio Maximum resolution Bit rate etc Movie mpg mpeg MPEG1 2 MPEG Layer 1 2 3 MAX 1920x1080 30P 20Mbit sec dat MPEG1 2 MPEG2 vob MPEG2 mkv H...

Страница 36: ...note that if you apply 720p FC TB input the picture will be scaled smaller than the original size in the middle of the screen SBS Side By Side TB Top Bottom MBP Media Browser Picture MBV Media Browse...

Страница 37: ...nce Size inch 22 26 32 37 40 Viewing distance m 1 30 1 50 1 90 2 20 2 40 Size inch 42 46 47 55 Viewing distance m 2 50 2 75 2 80 3 25 Horizontal Viewing Angle 45 45 Vertical Viewing Angle It is always...

Страница 38: ...W max PANEL 16 9 display 22 Screen Size DIMENSIONS mm DxLxH With foot 134 x 536 x 379 Weight Kg 4 45 DxLxH Without foot 35 x 536 x 347 Weight Kg 4 25 Digital Reception DVB T MHEG 5 ENGINE compliant w...

Страница 39: ...en or green and yellow The wire which is coloured blue or black must be connected to the terminal which is marked with the letter N or coloured Black The wire which is coloured brown or red must be co...

Страница 40: ...50220183 www finluxdirect com Customer helpline 0845 459 5282...

Отзывы: