Finlu 19H6030S Скачать руководство пользователя страница 32

- 31 -

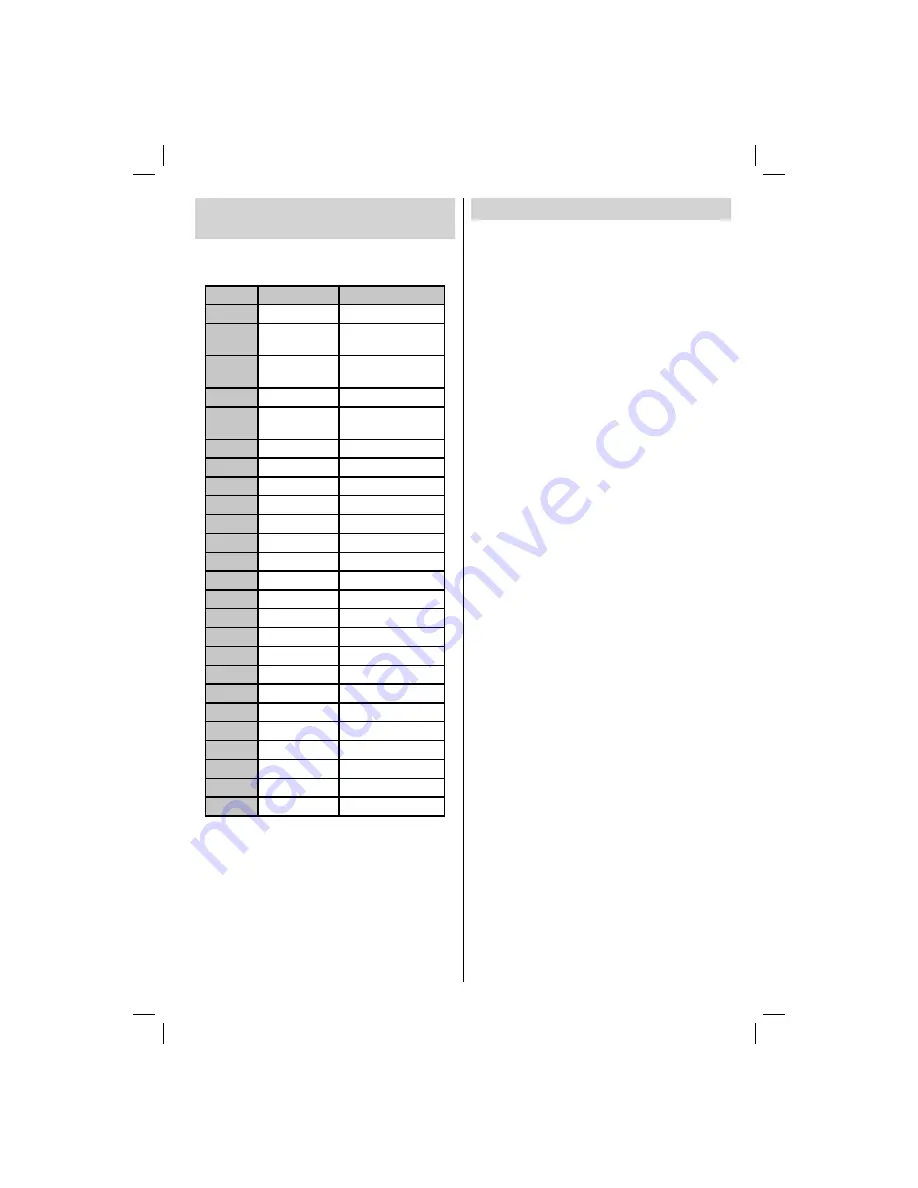
Appendix C: Supported DVI 
Resolutions

When connecting devices to your TV’s connectors by 
using DVI to HDMI cables (not supplied), you can refer 
to the following resolution information.

Index

Resolution

Frequency

1

640x400

70Hz

2

640x480

60Hz-66Hz-72Hz 

-75Hz

3

800x600

56Hz-60Hz-70Hz-

72Hz -75Hz

4

832x624

75 Hz

5

1024x768

60Hz-66Hz-70Hz-

72Hz -75Hz

6

1152x864

60Hz-70Hz-75Hz 

7

1152x870

75Hz

8

1280x768

60 HzA

9

1280x768

60 HzB

10

1280x768

75Hz

11

1280x960

60Hz-75Hz

12

1280x1024

60Hz-75Hz

13

1360x768

60 Hz

14

1400x1050

60 HzA

15

1400x1050

60 HzB

16

1400x1050

75Hz

17

1400x900

65Hz-75Hz

18

1600x1200

60 Hz

19

1680x1050

60 Hz

20

1920x1080

60 HzA

21

1920x1080

60 HzB

22

1920x1200

60HzA

23

1920x1200

60Hz

24

480i-480p

60Hz

25

576i-576p

50Hz

Appendix D: Software Upgrade

• Your TV is capable of 

fi

 nding and updating new 

software upgrades over broadcast channels. 
• For broadcast channels search, the TV looks at the 
available channels stored in your settings. So before 
the software upgrade search, it is advised to auto 
search and update all available channels.

1) Software upgrade search via user interface

• It is possible to manually to check if there is a new 
software upgrade for your TV set.
• Simply navigate on your main menu. Choose 

Settings

 and select 

Other Settings

 menu. In 

Other 

Settings

 menu navigate on to the 

Software Upgrade


item and press 

OK

 button to open 

Upgrade Options


menu.
• In 

Upgrade Options

 menu select 

Scan for upgrade


and press 

OK

 button.

• If a new upgrade is found, it starts to download 
the upgrade. A progress bar indicates the remaining 
download progress. When the download completes 
successfully a message is displayed for reboot to 
activate new software. Press 

OK

 to continue with the 

reboot operation.

2) 3.AM search and upgrade mode

• If 

Automatic scanning 

in 

Upgrade Options

 menu is 

enabled, the TV wakes up at 03:00 and searches the 
broadcast channels for new software upgrade. If new 
software is found and downloaded successfully, with 
the next power up the TV opens with new software 
version.

Note on reboot operation

: Reboot is the last step 

in software upgrade operation if download of new 
software is 

fi

 nished successfully. During reboot TV 

makes 

fi

 nal initializations. In the reboot sequence 

panel power is closed and front led indicates the 
activity with blinking. Around 5 minutes later TV 
restarts with new software activated.

• If your TV fails to restart in 10 minutes, unplug power 
for 10 minutes and re-plug again. TV should open with 
new software safely. If you still can not get TV working, 
please kindly repeat unplug and plug sequence a few 
times more. If your set still can not operate, please call 
the service personnel to 

fi

 x the problem for you.

Caution: While the LED is blinking during reboot 
do not unplug your TV’s power. Doing this may 
cause your TV not to re-start again and can only 
be 

fi

 xed by service personnel.

MB62_[GB]_(01-TV)_woypbpr_IDTV_PVR_NICKEL17_5110UK_19965LED_10073978_50192728.indd   31

MB62_[GB]_(01-TV)_woypbpr_IDTV_PVR_NICKEL17_5110UK_19965LED_10073978_50192728.indd   31

07.09.2011   11:52:43

07.09.2011   11:52:43

Содержание 19H6030S

Страница 1: ...colour television Owner s manual 19H6030S...

Страница 2: ...Channel List 17 On Screen Information 17 Media Playback Using Media Browser 17 Viewing Videos via USB 18 Viewing Photos via USB 18 Slideshow Options 18 Playing Music via USB 19 Recordings Library 19 M...

Страница 3: ...connectors for digital video and audio USB input Programme recording Programme timeshifting 1000 programmes analogue digital On Screen Display OSD menu system Integrated tuner DVB T MPEG2 compatible...

Страница 4: ...shock When it is damaged and needs to be replaced it should be done by qualified personnel Moisture and Water Do not use this device in a humid and damp place avoid the bathroom the sink in the kitch...

Страница 5: ...license from Dolby Laboratories materials such as a foil bag must be kept away from children Batteries including those which are heavy metal free should not be disposed of with household waste Please...

Страница 6: ...nded to activate Power Save Mode setting to reduce your annual power consumption And also it is recommended to disconnect the TV from the mains plug to save energy more when you do not use Please help...

Страница 7: ...brary 19 Picture mode selection 20 Electronic Programme Guide 21 Sleep timer 22 Menu on off 23 OK Select Hold in TXT mode Channel List 24 Volume up down 25 Navigation buttons 26 AV Source 27 Previous...

Страница 8: ...s capable of displaying High Definition pictures from devices such as a High Definition Satellite Receiver or DVD Player These devices must be connected via the HDMI or Component source These sockets...

Страница 9: ...he connected jacks should match To enable audio connection you must use RED and WHITE inputs of the side AV connection cable Afterwards insert your device s audio cable s connectors into the RED and W...

Страница 10: ...es such as Standby Search Over Air Download or Timer is active First Time Installation IMPORTANT Ensure that the aerial is connected and a Common Interface module is not inserted before switching on t...

Страница 11: ...V and the device before making any connections Note Cables shown in the illustration are not supplied If your DVD player has an HDMI socket you can connect via HDMI When you connect to a DVD player as...

Страница 12: ...ordings of HD programmes can occupy bigger size on the USB disk depending on the broadcast s resolution For this reason it is recommended to use USB hard disk drives for recording HD programmes Using...

Страница 13: ...AV Note If you connect a PC to the TV using HDMI connection radio interference may occur Therefore this type of connection is not recommended You should use VGA connection instead Using Side AV Conne...

Страница 14: ...The TV will switch to the selected programme Viewing Electronic Programme Guide EPG You can view the electronic programme guide EPG to see information about available programmes To view the EPG menu p...

Страница 15: ...e selected progamme You can press again to stop the recording Note Switching to a different broadcast or source is not available during the recording Page left Page right Programme Options In EPG menu...

Страница 16: ...nu by using and OK buttons Manual Scan options screen will be displayed Select the desired Search Type using or button Manual search options will change accordingly Use button to highlight an item and...

Страница 17: ...all channels YELLOW button to tag untag channel Select the channel that you want to delete and select Delete option Press the OK button to continue A warning screen will appear Select YES to delete se...

Страница 18: ...ner The information banner gives information on the channel selected and the programmes on it The name of the channel is displayed along with its channel list number Hint Not all channels broadcast th...

Страница 19: ...via USB When you select Photos from the main options available image files will be filtered and listed on this screen Jump Numeric buttons Jump to selected file using the numeric buttons OK Views the...

Страница 20: ...revious Next Left Right buttons Jumps to previous or next file to play Yellow Button Change viewing style BLUE Changes media options Note If the Viewing Style is set to Folder in Media Browser Setting...

Страница 21: ...broadcast Press STOP button to quit timeshifting mode Similtaneous timeshifting recording s duration depends on your connected USB disk s file size and defined Max Timeshift in the Recordings Configur...

Страница 22: ...ly will change slow forwarding speed Changing Image Size Picture Formats You can change the aspect ratio image size of the TV for viewing the picture in different zoom modes Press the SCREEN button re...

Страница 23: ...quirements you can set various screen modes The Picture mode can be set to one of these options Cinema Game Dynamic and Natural Contrast Sets the lightness and darkness values of the screen Brightness...

Страница 24: ...o select Picture icon Picture menu appears on the screen Contrast Brightness Colour Colour Temp and Picture Zoom settings in this menu are identical to settings defined in TV picture menu under Main M...

Страница 25: ...disables selected source options Other Settings Displays other setting options of the TV set Using a Conditional Access Module not included IMPORTANT Insert or remove the CI module only when the TV i...

Страница 26: ...he Settings icon by using or button Press OK button to view Settings menu Use or button to highlight Parental and press OK to continue To display parental lock menu options the PIN number should be en...

Страница 27: ...o save You can press MENU button to cancel Deleting a Timer Select the timer you want to delete by pressing or button Press RED button Select YES by using or buttons to delete the timer Select NO to c...

Страница 28: ...Use or buttons to change the Time Zone between GMT 12 or GMT 12 Date Time on the top of the menu list will then change according to the selected Time Zone Changes are automatically stored Press MENU t...

Страница 29: ...lect Standby Search as On Other Features Displaying TV Information Programme Number Programme Name Sound Indicator time teletext channel type and resolution information is displayed on the screen when...

Страница 30: ...cause double pictures or ghost images Sometimes you can improve the picture quality by changing the direction of the aerial Is the picture or teletext unrecognisable Check if you have entered the cor...

Страница 31: ...20x1080 60 HzB 22 1920x1200 60HzA 23 1920x1200 60Hz Appendix B AV and HDMI Signal Compatibility Input Signal Types Source Supported Signals Available EXT SCART PAL 50 60 O NTSC 60 O RGB 50 O RGB 60 O...

Страница 32: ...and press OK button If a new upgrade is found it starts to download the upgrade A progress bar indicates the remaining download progress When the download completes successfully a message is displaye...

Страница 33: ...d Batteries European Union only These symbols indicate that equipment with these symbols should not be disposed of as general household waste If you want to dispose of the product or battery please co...

Страница 34: ...H Without foot 35 x 469 x 308 Weight Kg 3 20 Digital Reception DVB T MHEG 5 ENGINE compliant with ISO IEC 13522 5 UK engine Profile 1 for UK Object carousel support compliant with ISO IEC 135818 6 and...

Страница 35: ...marked with the letter N or coloured Black The wire which is coloured brown or red must be connected to the terminal which is marked with the letter L or coloured Red For continued protection against...

Страница 36: ...50208036 www finluxdirect com Customer helpline 0845 459 5282...

Отзывы: