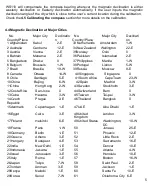
Fine Offset Electronics WS110 Скачать руководство пользователя страница 6

30Malaysia 

Kuala 

Lumpur   

1-E 

62 

Salem   

18-E 

31Mexico 

Mexico City 

6-E 

63 

Harrisburg 

11-E 

32Nepal 

Katmandu   

64 

Slat Lake City  14-E 

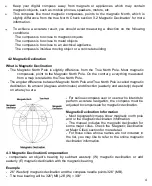
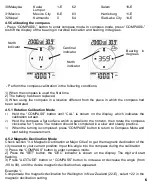
4.5 Calibrating the compass

- Press “COMPASS/-” button to enter compass mode. In compass mode, press “COMPASS/-” 

to shift the display of the bearing in cardinal indication and bearing in degrees.


- Perform the compass calibration in the following conditions: 

North

indicator 

Cardinal 

indicator 

North

indicator 

Bearing  in 

degrees 

1) When the compass is used the first time 

2) The battery has been replaced,   

3) When using the compass in a location different from the place in which the compass had 

been calibrated. 

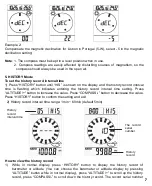
4.5.1 Rotation Calibration Mode   

1)

  Hold  the  “COMPASS”  button  until  “CAL”  is  shown  on  the  display,  which  indicates  the 

calibration screen. 

2)

  Hold the compass a flat surface which is parallel to the horizon, then rotate the compass 

clockwise for 1 turns. The rotation should be completed in a slow and steady practice. 

3)

  When the turning is completed, press “COMPASS” button to return to Compass Mode and 

start taking measurement. 

4.5.2 Magnetic Declination Mode   

Check section “3.4 Magnetic Declination at Major Cities” to get the magnetic declination of the 

city nearest to your current position. Input this angle into the compass during the calibration 

1) Press the “COMPASS” button to enter compass mode. 

2)  Press  the  “SET”  button,  the  “DE

C

”  indicator  is  shown  on  the  display.  The  digit  will  start 

flashing. 

3) Press “ALTITUDE” button or “COMPASS” button to increase or decrease the angle (from 
-90 to 90), until the desire magnetic declination has appeared.   
Example 1: 

Compensate the magnetic declination for Wellington in New Zealand (22-E), 22 in the 

magnetic declination setting. 

6

6

Содержание WS110

Страница 1: ...value is zero Hold the ALTITUDE button for 2s the relative altitude will be reset to absolute altitude again Relative altitude mode is useful when accumulated altitude reading is desired 1 2 2 The CO...

Страница 2: ...OMPASS button to decrease the value Press HISTORY button to confirm the setting and exit The program mode can be exited at any time by pressing HISTORY button 1 3 LCD display The following illustratio...

Страница 3: ...tude Relative altitude can be set whenever required over the whole measurement range To set the relative altitude to zero While in absolute altitude display mode hold the ALTITUDE button for 2s the ab...

Страница 4: ...d to the True North Pole The angular difference between Magnetic North Pole and True North Pole is called magnetic declination Its amount degrees and minutes and direction easterly and westerly depend...

Страница 5: ...n 5 W 7 Brazil Brasilia 19 W 39Russia Moscow 9 E 8 Canada Ottawa 14 W 40Singapore Singapore 0 9 Chile Santiago 5 E 41South Africa Cape Town 23 W 10China Beijing 6 W 42Spain Madrid 3 W 11China Hong Kon...

Страница 6: ...bration screen 2 Hold the compass a flat surface which is parallel to the horizon then rotate the compass clockwise for 1 turns The rotation should be completed in a slow and steady practice 3 When th...

Страница 7: ...tes entering the history record interval time setting Press ALTITUDE button to increase the value Press COMPASS button to decrease the value Press HISTORY button to confirm the setting and exit 2 Hist...

Страница 8: ...t the influence of pressure change when you are climbing a mountain This feature avoids wrong weather forecast while in motion Vice versa normal pressure change happened when you are not moving will n...

Отзывы: