


Page 2
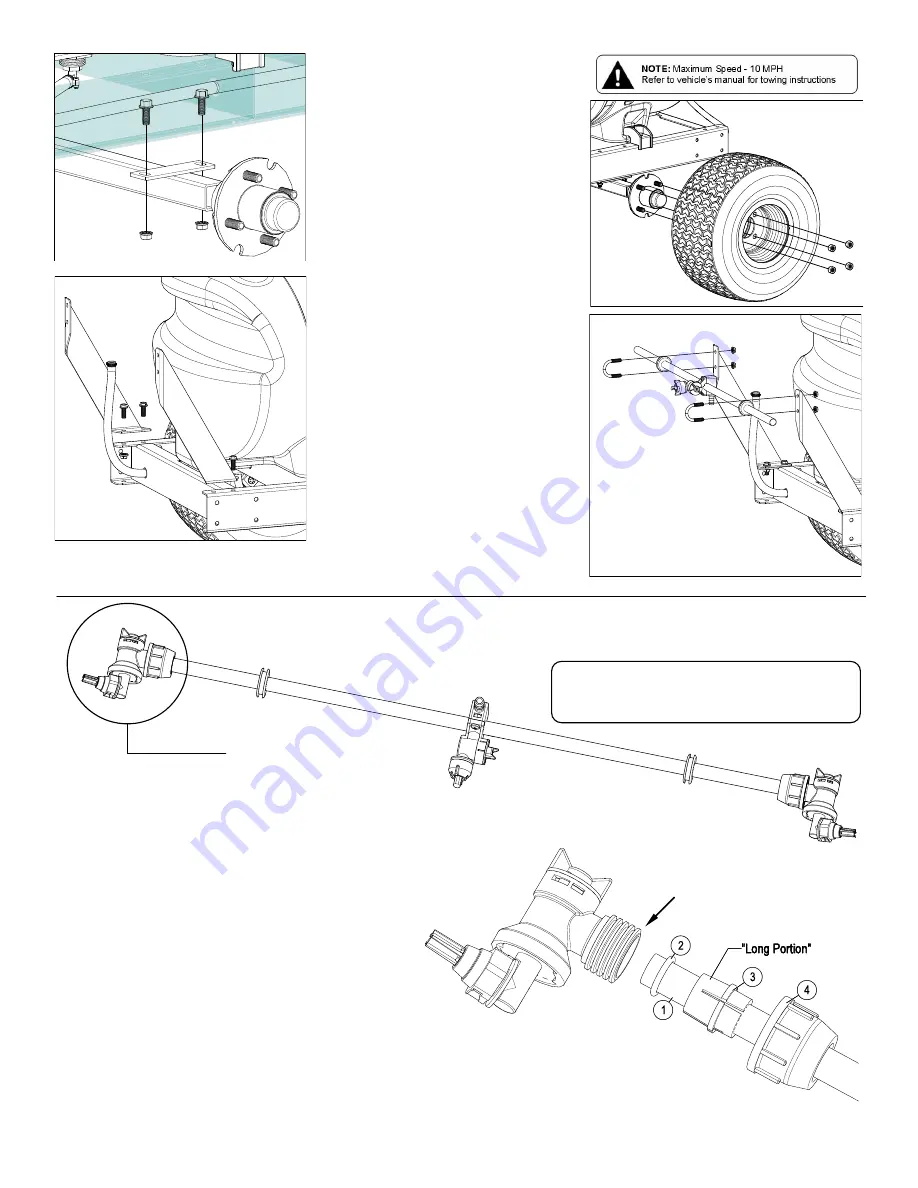
Step 1:
Attach the axle to the trailer frame with (4) bolts
& nuts as shown.
Step 2:
Slide a wheel onto the hub of the axle and use
the wheel nuts to hold the wheel in place. Re-
peat for other side.
Step 3:
The left and right boom mounting brackets are
to be mounted on the trailer frame. Use 4 bolts
and nuts to secure them in place.
Step 4:
Center the boom tube on the boom mounts
and secure in place with the (2) round U-bolts
and whiz nuts provided.
Make sure the U-bolts are positioned within the
grooves of the grommets on the boom tube.
NOTE:
The purpose of these grommets is to
prevent metal-to-metal contact between the U-
bolts, boom tube and boom mounting brackets.
The grommets will ‘compress’ as you tighten
the whiz locknuts onto the U-bolts. Tighten just
so that the boom tube will NOT rotate within
the grommets. Alternate the tightening of the
locknuts to provide even pressure on the grom-
met.
**DO NOT OVER TIGHTEN the whiz lock-
nuts, as this may cause the boom tube to
flatten slightly!
See Below for end nozzle attachment.
End Nozzle Assembly Procedure
For Boomless “Wet” Boom
Your boom will come with the (2) end nozzle assemblies
NOT affixed to your boom tube. Follow the instructions
below to attach these properly to the boom tube, as
shown.
Assembled
End Nozzle
1. Start by sliding Item 4, 3, 2 onto the boom tube
(Item 1) as shown, leaving about 1/2” to 3/4”
between the end of the boom tube and Item 2.
Make sure the “Long” portion of Item 3 is facing the
nozzle end.
2. Slide the (complete) end nozzle assembly onto the
stainless steel boom tube, with a somewhat
“twisting” motion, so that the end face of the boom
tube “butts” up against the surface face inside the
nozzle body.
3. Now push the “compression olive” (Item 3) against
O-ring (Item 2) and slide (both) into the nozzle
body opening firmly.
4. Firmly tighten flynut (Item 4) onto threads of
nozzle body.
5. Repeat for other side.
NOTE: If water is shooting back on the boom tube,
item 2 is not in the correct placement.
Item 2 is shipped inside of
the end nozzle assembly.
Remove & place on tube.
Step 5:
Step 1:
Step 3:
Step 2:
Step 4:
Содержание 5301307
Страница 11: ...Page 11 NOTES ...


