ADJUSTMENT INTERVENTIONS
Before carrying out any adjustments, proceed as follows:
1. Take the machine to the maintenance area.
N.B.:
the place given over to this operation must comply with current environmental protection regulations.
2. Make sure the machine is in a safe condition (see chapter “
CAUTION:
it is recommended to wear the appropriate PPE (Personal Protective Equipment), suitable for the work to be carried out.
REPLACING THE BRUSH HEAD SPLASH GUARD
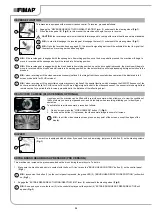
If the splash guard rubber blades of the brush head side casing are damaged they cannot work properly, namely they cannot convey the dirty
detergent solution towards the squeegee, therefore the splash guard rubber blades need to be checked. To replace the brush head splash
guards, proceed as follows:
1. Stand on the left side of the machine.
2. Remove the left splash guard (1), unscrew the knobs (2) on the brush head body (
Fig.1
).
3. Remove the rear rubber blade compression plate (3), and release the stopper (4) on rubber blade compression plate (
Fig.2
).
4. Remove the splash guards (5) from the left splash guard body and replace it with a new one or else turn it around (
Fig.3
).
5. Repeat the operations in reverse order to reassemble all the parts.
6. Repeat the operations just carried out also for the right side casing as well.
1
2
3
2
3
1
4
5
ADJUSTING THE SQUEEGEE BODY'S RUBBER BLADES
The careful adjustment of the squeegee body rubber blades guarantees better cleaning of the floor.
To adjust the squeegee body blades, proceed as follows:
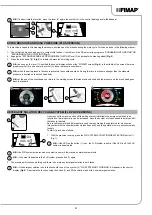
1. Lower the brush head body, and for PRO versions, press the “BRUSH HEAD CONTROL” button (1) on the control panel (
Fig.1
). For PLUS
versions, using the DS selector on the control display (
Fig.2
), select the “scrubbing with drying” program (3) (see “
”).
N.B.:
as soon as the button (1) on the control panel is pressed, the green LED (2) (“BRUSH HEAD BODY WORK POSITION”) will switch
on (
Fig.1
).
2. For PRO versions, lower the squeegee body and press the “SQUEEGEE CONTROL” button (4) on the control panel (
Fig.1
).
N.B.:
as soon as the button (4) on the control panel is pressed, the green LED (5) (“SQUEEGEE BODY WORK POSITION”) will switch on
(
Fig.1
).
3. Press the drive pedal (6) (
Fig.3
) to begin moving the machine.
4. As soon as the brush head and the squeegee have reached their working positions, perform the procedure for securing the machine (see
the section titled “
5. Stand at the back of the machine.
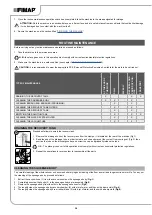
Adjusting the height of the squeegee body:
•
Adjust the height of the rubber blade in relation to the floor by loosening or tightening the knobs (7) (
Fig.4
).
N.B.:
Figure 4 indicates the direction of rotation for decreasing the distance between the squeegee support and the floor. This distance
can be increased by turning it in the opposite direction.
N.B.:
By decreasing the distance between the squeegee support and the floor, the rubber blades present in the squeegee's body move
closer to the floor.
3
6
Back
0000.00
100%
1
2
5
2
4
1
3
43


