8
Consumable Components:
Foot Shell and Spectra
®
Sock
The Aeris Activity uses a unique cosmetic foot shell that is flexible and durable (sold
separately). Use care in the installation and removal of the foot shell to maintain
its appearance and durability. Always use the shell with an internal Spectra sock
(included). Never use a sharp-edged tool such as a screwdriver to install or remove the
foot shell.
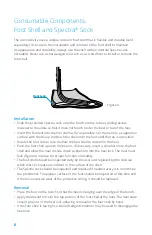
Figure 4
Heel Lock
Installation
• Slide the provided Spectra sock onto the foot from toe to heel, pulling excess
material to the ankle so that it does not bunch under the heel or toe of the foot.
• Insert the forefoot into the foot shell as far as possible. Set the heel on a supportive
surface with the toe up and push the shell onto the foot until the toe is in position.
• Rotate the foot side to side to allow the foot shell to slide onto the heel.
• Push the foot shell up onto the heel or, if necessary, insert a shoehorn into the foot
shell and allow the heel to slide down a shoehorn into the heel lock. The heel must
lock (Figure 4) in place for proper function and safety.
• The foot shell should be inspected daily by the user and replaced by the clinician
when tears or breaks are evident in the surface of the shell.
• The Spectra sock should be inspected and replaced if needed every 3–6 months by
the prosthetist. The plantar surface of the foot should be inspected at this time and
if there is excessive wear of the protective soling, it should be replaced.
Removal
• Place the foot on the bench so that the heel is hanging over the edge of the bench.
• Apply downward force to the top portion of the foot shell at the heel. The heel plate
should pop out of the heel lock, allowing removal of the foot shell by hand.
• If the foot shell is too tight, a smooth-edged shoehorn may be used to disengage the
heel lock .
Содержание Aeris Activity
Страница 1: ...Aeris Activity Product Manual...


