background image

Fields at Work GmbH, Hegibachstrasse 41, 8032 Zürich, Schweiz


2019 Fields at Work GmbH, Zurich 


Page 8/16


ExpoM - RF manual rev. 2.3


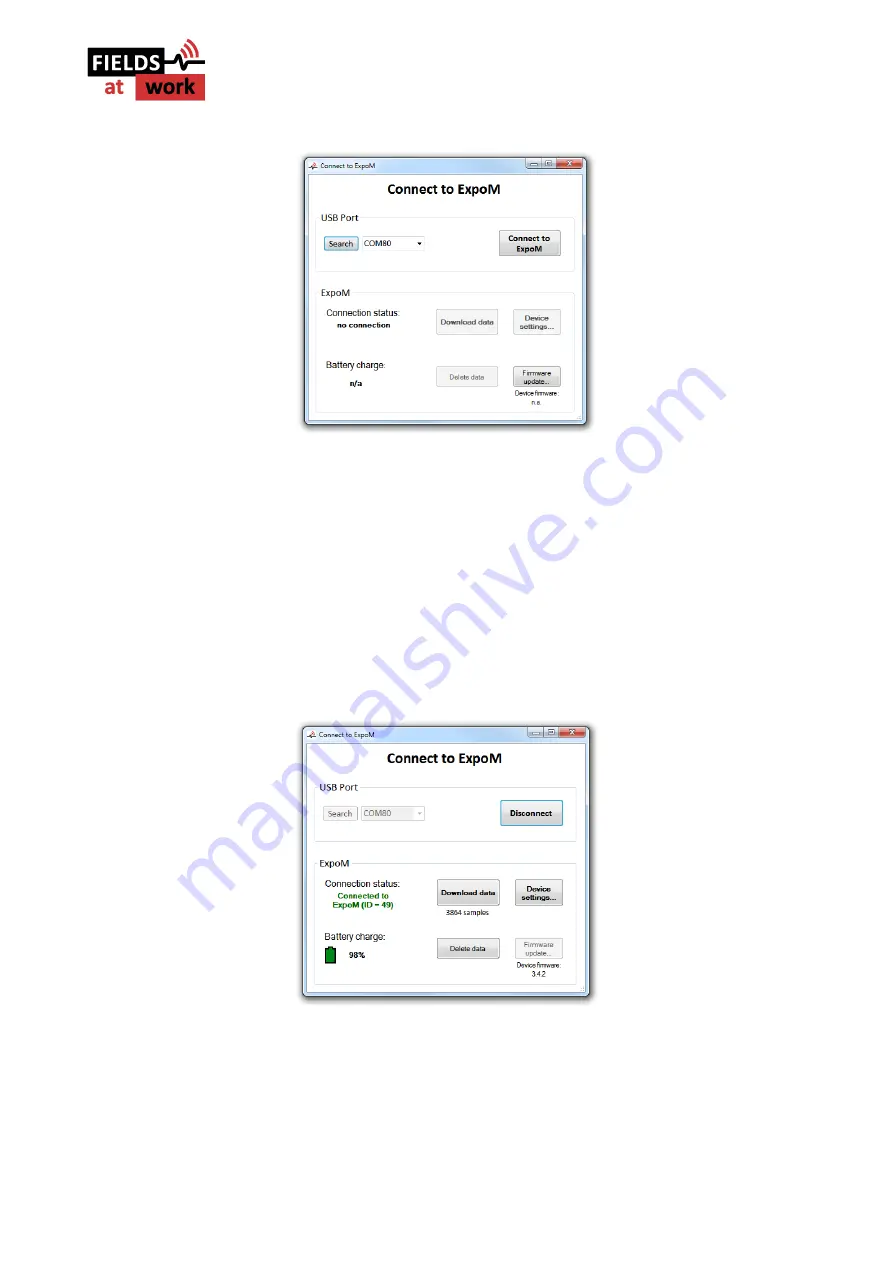
Figure 4: Dialog window for connecting to an ExpoM - RF via USB 

The 

USB Port


control element on the top left lists all serial ports found on the computer. If your 

device has been successfully recognized, there will be at least one entry in the 

USB port

 drop-down 

menu. If more than one port was found on your computer, it is possible that a wrong one is chosen 
by the application. In that case it is necessary to select the right port number manually using the 
drop-down menu. If the Utility it is not able to recognize any COM port or no connection to your 
device is possible even after several attempts, please refer to chapter 5.1. . 

Turn on ExpoM RF. Wait 3-5 seconds for the device to switch into measurement mode and select 

Connect  to  ExpoM

.  As  soon  as  a  connection  to  the  device  has  been  successfully  established  the 

command window will change and the data information of the device is displayed (Figure 5). 


Figure 5: Dialog window after selecting the device 

Using the 

Download data

 button the data stored on the device is downloaded and displayed in the 

Main  window.  Depending  on  the  number  of  measurement  samples  stored  on  the  device  this 
operation can take several minutes. The 

Delete data

 button erases all the data saved on the device. 

Selecting the 

Device settings...

 button brings you to the Device Settings window shown in Figure 6. 

Содержание ExpoM - RF

Страница 1: ...ExpoM RF User Manual ...

Страница 2: ...4 Battery management 5 4 1 Charging the battery 5 4 2 Over discharge protection automatic shutdown 6 5 ExpoM RF Utility PC Software 6 5 1 Installing the USB driver 10 5 2 Data format 10 6 Smartphone App 11 6 1 Establishing the Bluetooth connection 11 7 Technical Specifications 13 7 1 Frequency bands and measurement range 13 7 2 RF Measurement 13 7 3 Size Conditions 13 7 4 Connectivity Storage 13 7...

Страница 3: ...calization and Bluetooth connectivity The integrated Bluetooth module allows to stream the measurement data to any Android based device for real time display Important notice The accuracy and reliability of the GPS localization depends on the environmental conditions Inside buildings and homes GPS localization may not be possible Important notice After switching on the device it may take several m...

Страница 4: ...r at power on Series of fast red flashes shortly after power on Device has to be restarted using the ON OFF switch 3 Using ExpoM RF 3 1 Starting a measurement As soon as the device is turned on by means of the ON OFF switch it starts to measure and log the data using the last device settings described in paragraph 5 Figure 6 The device can be turned on and off at any time When ExpoM RF is powered ...

Страница 5: ...d of the charging cycle the red light turns off Important Notice Using USB chargers that do not fulfill the USB dedicated charger port specification can lead to incomplete and slow charging process of the batteries It is strongly recommended to use an USB charger with a current rating of at least 1A 1000mA More information about suitable USB charger types for ExpoM RF can be obtained from the dist...

Страница 6: ... at least 10 minutes before switching it on again 5 ExpoM RF Utility PC Software The ExpoM RF Utility software is required for transferring and displaying the measurement data from the ExpoM RF to a PC and for changing the various device settings This software is currently only available for Windows operating systems Figure 2 Main window of the ExpoM RF Utility Software In the following the functi...

Страница 7: ...d at the selected location on the PC This function corresponds to the Save As functionality of all common Windows software KML GPS export The data is exported in a file format that can be directly loaded into Google Earth ExpoM Connecting to an ExpoM RF device and change the device settings Please make sure to turn on your ExpoM RF and connect it to the PC using an USB cable When this button is pr...

Страница 8: ... to recognize any COM port or no connection to your device is possible even after several attempts please refer to chapter 5 1 Turn on ExpoM RF Wait 3 5 seconds for the device to switch into measurement mode and select Connect to ExpoM As soon as a connection to the device has been successfully established the command window will change and the data information of the device is displayed Figure 5 ...

Страница 9: ...e computer clock that the device is connected to The sampling interval in seconds can be either selected in a pull down menu or entered in the corresponding text field Values between 3 and 3000 seconds in steps of 0 1 second are accepted The device s marker number counter is reset to 0 using the Reset button in the Marker counter section Print chart Printing of the curves displayed in the main win...

Страница 10: ...ead to no GPS data being exported at all Figure 8 Main window with displayed data set and monitor window displaying the field strengths 5 1 Installing the USB driver The USB driver required for ExpoM RF is included with most Windows versions and is automatically installed the first time ExpoM RF is connected to the PC If the automatic driver installation fails however it is necessary to install th...

Страница 11: ...meters 1 GPS fix 0 invalid 1 2D only no accurate altitude information 2 full GPS localization 2 Latitude NMEA format degrees minutes decimal_minutes 3 Longitude NMEA format degrees minutes decimal_minutes 4 Altitude Meters above mean sea level Caution accuracy is strongly signal dependent 5 HDOP GPS fix quality lower better 2 very good 2 5 OK 5 limited accuracy 6 Nsat Number of satellites in view ...

Страница 12: ...nd and can be paired code 0000 ExpoM RF is successfully connected and streams the measurements After this step the Bluetooth icon turns green and ExpoM RF starts to stream the measurements last picture In order to improve readability all measurement values below ExpoM RF s detection limit are greyed out The device s current battery status is displayed by means of the bar left to the Bluetooth icon...

Страница 13: ...0 2170 MHz 0 003 V m 5 V m ISM 2 4 GHz 2400 2485 MHz 0 005 V m 5 V m Mobile 2 6 GHz uplink Band VII 2500 2570 MHz 0 003 V m 5 V m Mobile 2 6 GHz downlink Band VII 2620 2690 MHz 0 003 V m 5 V m Mobile 3 5 GHz Band 42 3400 3600 MHz 0 003 V m 3 V m ISM 5 8 GHz U NII 1 2e 5150 5875 MHz 0 05 V m 5 V m 7 2 RF Measurement Detection method True RMS 0 3 seconds integration time for each band Sample interva...

Страница 14: ...Installation No installation required ExpoM RF Utility can be started from the downloaded folder Download www fieldsatwork ch 7 7 ExpoM RF Android Software Processor No limitations Operating System Android 4 0 or newer Storage usage Less than 5 MB Download www fieldsatwork ch Size and weight 16 cm x 8 cm x 3 5 cm L x W x H weight approx 320g Time Integrated precision 2 ppm real time clock Connecti...

Страница 15: ...Fields at Work GmbH Hegibachstrasse 41 8032 Zürich Schweiz 2019 Fields at Work GmbH Zurich Page 15 16 ExpoM RF manual rev 2 3 ...

Страница 16: ...Fields at Work GmbH Hegibachstrasse 41 8032 Zürich Schweiz 2019 Fields at Work GmbH Zurich Page 16 16 ExpoM RF manual rev 2 3 ...

Отзывы: