background image

EN

10

FZS 2050-E


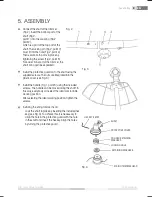
-    Install the individual components in the following 

order:


  1.    Cogged retaining washer A (also equipped 

with a retaining hole) 


  2.  Retaining washer B


  3.  String trimmer head 


-     Screw the string trimmer head on to the shaft by 

turning it clockwise (attention: reverse thread) 
and tighten fi rmly.


-   Take the hex key out of the retaining hole.    

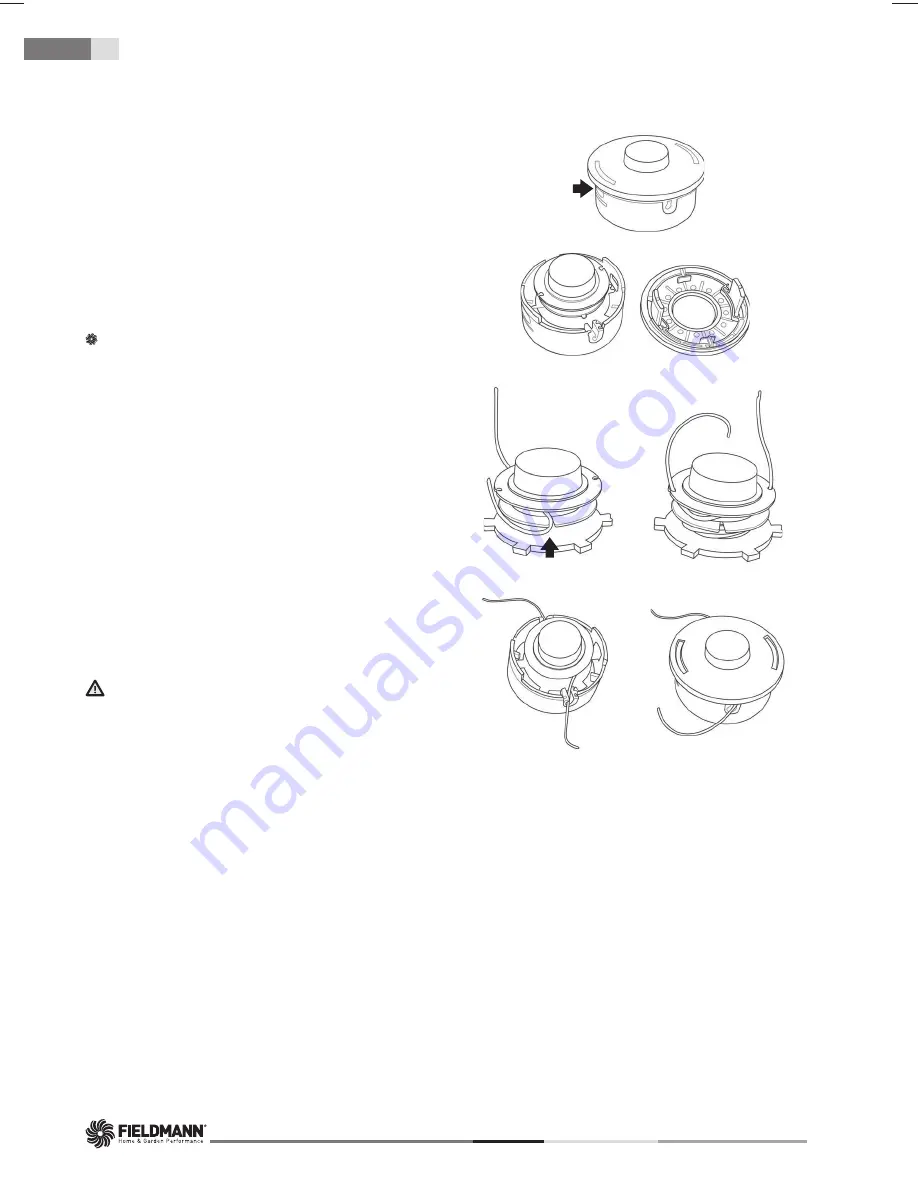
  Winding string trimmer line on to the trimmer head 


1.   Push in the retaining latches on the side of the 

head and take off the cover (see Fig. 5, points 
A&B)


2.    Take the spool out of the string trimmer head. 

Prepare about 2-3 m of string trimmer line with 
a diameter of 1.6 mm. 


3.   Bend the string trimmer line in the middle and 

secure the bend in the groove (see Fig. 5, 
point C) 


4.    Wind both ends in parallel on to the spool in 

a clockwise direction. Secure the ends of the 
wound on string trimmer line into the prepared 
holes (see Fig. 5, point D)       


5.   Return the spool back into the string trimmer 

head and secure in place with the cover 
(see Fig. 5, points E&F)   

WARNING


Use only good quality nylon string trimmer line with 
a diameter of 1.6 mm. Never use wire or wire-
reinforced string trimmer line instead of the nylon 
string trimmer line. Only use the original string 
trimmer head.

B

C

D

E

F

A

Fig. 5

Assembly

Содержание FZS 2050-E

Страница 1: ...EN ...

Страница 2: ...ase carefully read this user s manual and save it for possible future use TABLE OF CONTENTS 1 GENERAL SAFETY INSTRUCTIONS 4 2 EXPLANATION OF INSTRUCTION LABELS ON THE POWER TOOL 5 3 SAFETY INSTRUCTIONS 7 4 DESCRIPTION OF THE POWER TOOL 8 5 ASSEMBLY 9 6 STARTING THE TRIMMER 11 7 CUTTING 12 8 MAINTENANCE 14 9 DISPOSAL 15 10 DECLARATION OF CONFORMITY 16 11 TECHNICAL SPECIFICATIONS 17 ...

Страница 3: ...ating elements and the correct use of the power tool Keep the user s manual in a safe place where it can be easily retrieved for future use Save the original packaging including the internal packing material warranty card and proof of purchase receipt at least for the duration of the warranty If you need to ship this power tool pack it in the original cardboard box to ensure maximum protection dur...

Страница 4: ...tion of instruction labels on the machine 2 EXPLANATION OF INSTRUCTION LABELS ON THE MACHINE Warning Read the user s manual before using Keep other persons at a sufficient distance away Do not use in rain or in wet conditions Always wear eye protection ...

Страница 5: ...gloves Use solid insulating work footwear Use hearing protection In the event that the power cord is damaged immediately disconnect it from the power supply DANGER Do not use the power tool if there are children other persons or animals in your vicinity Be careful not to be hit by deflect objects ...

Страница 6: ...ot it may endanger the user Always use protective guards when using the string trimmer Do not use the string trimmer if the protective guards are damaged Remove from the work area all stones metal pieces roots other hard items and plastic bags nylon string and other items that cannot be cut up Prior to starting the string trimmer make sure that the nylon cutting edge is not touching stones or frag...

Страница 7: ... Handle setting screw 4 Shoulder strap hitch 5 Handle 6 Split shaft coupler 7 Split shaft coupler fastening screw 8 Protective safety guard 9 Trimmer line cutter 10 Semi automatic string trimmer head metal three tooth blade Fig 1 Included contents Electric trimmer string trimmer head metal three tooth blade shoulder strap tool set ...

Страница 8: ...nuts are integrated into the plastic cover see Fig 3 Install the handle Fig 1 point 5 using the included screws The handle can be moved along the shaft In this way everybody can select the ideal comfortable working position After selecting the ideal working position tighten the screws Installing the string trimmer head Lock the shaft in place by inserting the included hex key see Fig 4 To achieve ...

Страница 9: ...of the string trimmer head Prepare about 2 3 m of string trimmer line with a diameter of 1 6 mm 3 Bend the string trimmer line in the middle and secure the bend in the groove see Fig 5 point C 4 Wind both ends in parallel on to the spool in a clockwise direction Secure the ends of the wound on string trimmer line into the prepared holes see Fig 5 point D 5 Return the spool back into the string tri...

Страница 10: ...njuries Only use original accessories when performing maintenance or servicing this product 6 STARTING THE TRIMMER POINTS TO CHECK BEFORE STARTING WORK 1 Check whether any screws nuts and installation elements are loose Tighten any loose screws 2 Make sure that the plastic head guard and the blade is securely fastened in place 3 Check the blade or the string trimmer head for damage WARNING Prior t...

Страница 11: ...rm stance on slippery surfaces Do not wear ties jewellery or loose clothing that could become caught in the moving parts of the tool Do not wear footwear with an open tip Do not work barefoot or with bare legs In certain situations you must use full face and head protection Take care to avoid recoil and jamming of the blade WARNING Always use the shoulder strap Set the shoulder strap and its hitch...

Страница 12: ...f the weed never the top because the stem may start quivering and the string trimmer line may become caught in it Rather than attempting to cut the weed directly it is better to use only the end of the string trimmer line and to cut the stem slowly CLEARING AND TRIMMING EDGES Both these tasks are performed using the head with the nylon line tilted at large angle Clearing means removing the top veg...

Страница 13: ...ELECTRICAL WIRE RUBBER MASONRY STONES FENCES WARNING Do not cut if the metal blade is blunt cracked or damaged Before starting to cut check that there are no obstacles in the work area such as rocks metal poles or wound up wires If you cannot remove these obstacles mark them out so that they do not come in contact with the blade Rocks or metal objects will blunt or damage the blade Wires may wind ...

Страница 14: ... for waste in your municipality The machine and its accessories are manufactured from various materials e g metal and plastic Take damaged parts to a recycling centre Inquire at the relevant government department Changes in the text design and technical specifications may be made without prior notice and we reserve the right to make these changes User s manual in original language Disposal ...

Страница 15: ...of outdoor equipment ES Council Directive No 2006 42 ES for Machinery ES Directive No 2004 108 ES for electromagnetic compatibility EMC EC Directive No 2002 95 ES for RoHS and norms EN 60335 1 A15 2011 EN 60335 2 91 2003 EN 62233 2008 EN ISO 11806 1 2011 EN 55014 1 2006 A1 2009 A2 2011 EN 55014 2 1997 A1 2001 A2 2008 EN 61000 3 2 2006 A1 2009 A2 2009 EN 61000 3 11 2000 CE mark 14 FAST ČR a s is au...

Страница 16: ... Model FZS 2050 E Voltage Frequency 230 240V 50Hz Electric motor power input 1 400 W Cutting coverage 42 cm Type of string trimmer head Semi automatic Idling speed 10 000 rpm Trimmer line diameter 1 6 mm Weight without fuel and cutting tools 6 0 kg Technical specifications ...

Страница 17: ...EN 18 FZS 2050 E Notes ...

Отзывы: