Page 3
can be replaced with 70 feet of 12Ga stranded wire.
P
ROPERLY WRAPPING THE ANTENNAE
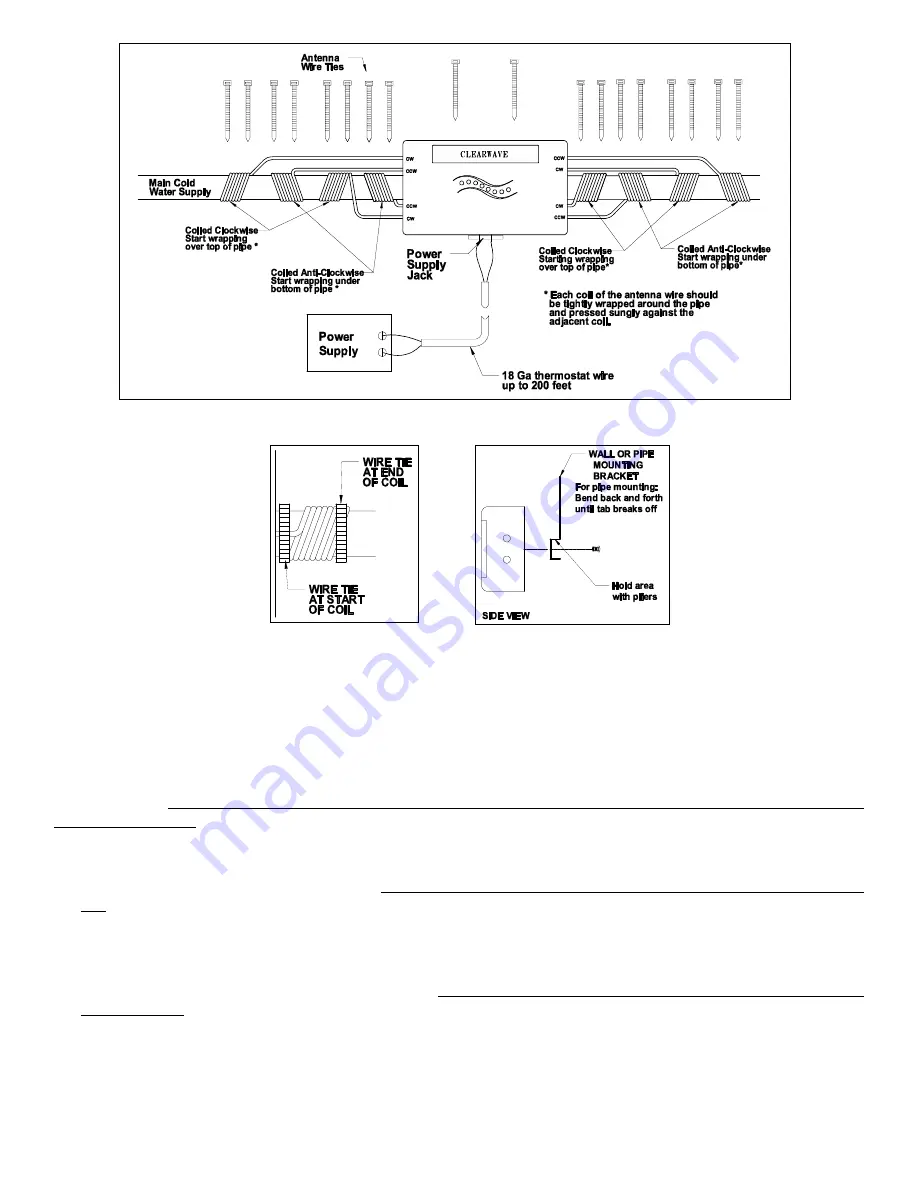
The antenna wrap around the water pipe on each end of the ClearWave™ (see Figure 1). A minimum of
seven fully wrapped coils of the antenna wire, with each coil wrapped tightly against the pipe and pressed
snugly against each other is required for best results (see Figure 1A). Each wire coil should be spaced I inch to
2 inches apart. The operation of the ClearWave™ and the antenna installation is not based on direction of
water flow, but one antenna MUST be wrapped in a clockwise direction and the other wrapped in an counter-
clockwise direction.
1. On the right side of the unit wrap the first antenna onto the water pipe by securing the “CW” clockwise
antenna to the water pipe next to the ClearWave™ housing with a wire tie. Wrap the right antenna
clockwise (over the top of the pipe first), keeping the antenna wire tight against the pipe and the preceding
coil. Secure the end of the antenna wire to the water pipe with a wire tie (see Figure 1A). Repeat
wrapping the remainder of the antennas onto the pipe alternating the wrap direction (see Figure 1).
2. On left side of the unit wrap the first antenna onto the water pipe by securing the “CCW counter clockwise
antenna to the water pipe next to the ClearWave™ housing with a wire tie. Wrap the antenna counter
clockwise (Under the bottom of the pipe first), keeping the antenna wire tight against the pipe and the
preceding coil. Secure the end of the antenna wire to the water pipe with a wire tie. Repeat wrapping the
remainder of the antennas onto the pipe alternating the wrap direction (see Figure 1).
3. When energized, the ClearWave™ by plugging in the power supply, the modulation indicator lights start
flashing sequentially indicating that the ClearWave™ is functioning properly. If the indicator lights do not
flash sequentially, unplug the power supply, wait one minute then plug in the power supply again. If at any
Figure 1
Figure 2
Figure 1A
Содержание CLEARWAVETM WATER CONDITIONER CW-HD-4
Страница 6: ...Page 6...


