40139-0905
2
4
IMPORTANT
Keep keys and combination number in a secure place, away from children. Keep this record of your
key number and combination in a secure place separate from your safe. To order a replacement key
set, follow the instructions on the attached form.
NOTE:
The Manufacturer, retailer, and brand license owner are not responsible for any cost incurred if the safe is damaged due to a
flood.
WARNING
Keep your safe closed and locked at all times when not in use. Children could accidentally be locked inside the safe.
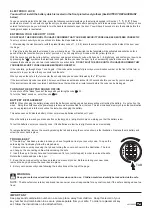
TAB
TROUBLE KEY
A "Trouble Key" has been provided in case you have forgotten or lost your security code. To open the
safe using the trouble key follow the steps below:
1. Remove the cover by pressing the tab and turning the cover as shown in the illustration. The lock
can hang by the connecting cable while unlocking the safe.
2. Insert the key in the key hole and turn clockwise 1/4 turn (until stopped) in order to unlock the safe.
Rotate the handle and open the door.
3. Keep the door open until you have entered a new security code. Before entering your new code,
remove the key and screw the cover back in place.
4. Enter your new security code following the instructions at the top of the page.
ELECTRONIC LOCK
You must first install the battery which is located in the front protective styrofoam (See BATTERY REPLACEMANT
below)
To open an electronic lock the first time, press the following numbers/symbols on the electronic keypad in this order:
1, 5, 9, #
. (These
numbers are preset. You should change the entry code as soon as possible after opening the safe to insure proper security). After you have
entered the factory code, you will need to turn the handle clockwise to open the door. You will have 5 seconds to turn the handle before the
locking mechanism is reactivated.
ENTERING YOUR SECURITY CODE
DO NOT SHUT THE DOOR UNTIL YOU HAVE CONFIRMED THAT YOUR NEW SECURITY CODE HAS BEEN ENTERED CORRECTLY.
To enter your own security code you will need to follow the steps listed below:
1. After opening the electronic safe (with the preset factory code of 1, 5, 9, #) locate the small red red button on the inside of the door near
the hinge.
2. Press the red button and then release it, you will hear a beep. The yellow light on the faceplate will be activated and will stay on for a
period of time that should allow you to enter your code. You can only enter your code while the yellow light is on.
With the door open and the yellow light on, enter your own personal security code, which can be 3 - 8 digits long, and confirm your new code
by pressing the " " symbol on the electronic touch pad. Before you close the door, try the new security code to make sure the lock
releases the handle so you can turn it and retract the live action bolts.
DO NOT SHUT THE DOOR UNTIL YOU HAVE CONFIRMED THAT
YOUR NEW SECURITY CODE HAS BEEN ENTERED CORRECTLY.
If the code fails, go through steps 1 and 2 again. If the code works successfully record your combination number on the front of this form or
somewhere in your records, then you should lock the safe.
When you open the safe in the future enter the security code you have set followed by the "
#
" symbol.
If the incorrect security code is entered 3 times you will have an automatic lockout for 20 seconds before you can try your code again.
If the incorrect security code is entered 3 additional times there will be a 5-minute lockout before the code can be tried again.
TURNING THE KEYPAD SOUND OFF/ON
You can turn off the "Beep" sound of the keypad by entering the code 633.
To turn the "Beep" sound on, enter the code 66.
BATTERY REPLACEMENT
NOTE:
When changing the battery, always hold the battery connecting cap while disconnecting or attaching the battery. Do not pull on the
wires. Doing this could cause the power supply to become disconnected from the lock. This lock includes a memory chip so the combination
you have programmed into the lock will not be lost when changing the battery.
This safe uses one 9V alkaline battery. Under normal use, batteries will last about 1 year.
When the battery is low and you press a button on the keypad, a red light will come on warning you that the battery is low.
To test the batteries, enter your security code. If the batteries are low the red light will come on momentarily.
To replace the battery, remove the cover by pressing the tab and turning the cover as shown in the illustration. Replace the old battery and
screw the cover back in place.


