background image

 8

Network Connection 


Your TV will require an internet connection to operate all functions. Data usage charges may apply.

              Please refer to your Internet Service Provider (ISP) for additional information.

To access the internet, you must subscribe high speed broadband internet service from your internet service provider.
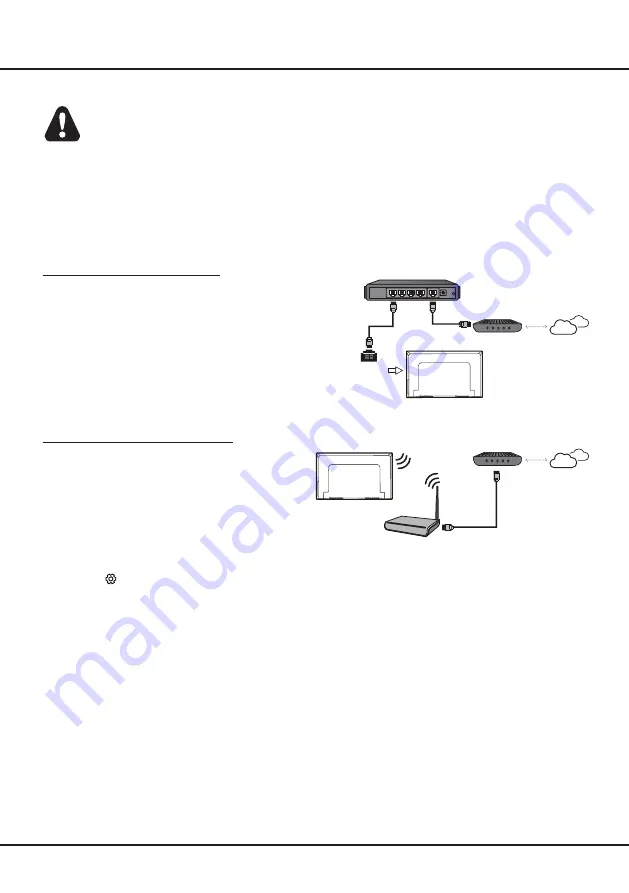
Your TV can be connected to your home network in two ways:
• Wired, using the RJ45 (LAN) connector on the back panel.
• Wireless, using the internal wireless or external wireless USB adapter and your home wireless network.

Note:

 The following instructions are just the usual ways to connect your TV to the wired or wireless network. The 

connection method may be different depending on your actual network configuration. If you have any questions about 

your home network, please refer to your ISP(Internet Service Provider).

Chapter 2 

Getting Started

Connecting to a Wired Network 

To connect to a wired network:
1. Ensure you have:
  • An Ethernet cable long enough to reach your TV
  • A router or modem with an available Ethernet port
  • A high-speed internet connection
  • An 

Ethernet (LAN) port

 on the back of the TV

2. Connect your Ethernet cable to the router and to the
    

Ethernet port

 on the back of the TV.

3. Use the 

Network Settings

 to configure the TV.

Connecting to a Wireless Network

To connect to a wireless network 
1. Ensure you have:

•  A router broadcasting a high-speed wireless signal
•  A high-speed internet connection

2. Use the 

Network Settings

 to configure the TV. 

Router

Modem

Internet

LAN port

Modem

Internet

Wireless router

Note: 

Press 


on the remote control, select 

Network

 and press 

OK

/


to enter the 

Network

 menu.

Содержание UF2 Series

Страница 1: ...UF2 SERIES...

Страница 2: ...tant Power On 9 Automatic Channel Search 9 Chapter 4 Homepage Operation Using Homepage Home 10 Using Homepage Videos 11 Using Homepage TV 11 Using Homepage Apps 12 Chapter 5 Using More of Your TV Sett...

Страница 3: ...ct the TV screen with hard pressure as this may damage the TV screen severely This appliance is not intended for use by young children or infirm persons without supervision Young children should be su...

Страница 4: ...or reference only and may vary depending on the model Initial Setup The first time you switch the set on the Hello screen appears which guides you through the initial setup process Follow the on scree...

Страница 5: ...rries both video and audio data by way of an integrated mini plug cable AV RCA audio video sockets input The AV IN sockets can be used to connect a range of equipment including video recorders camcord...

Страница 6: ...play the Option menu Navigation direction buttons OK To confirm an entry or selection To return to the previous menu or quit an App To select input source EXIT To exit the Settings menu LANG To select...

Страница 7: ...e to the mains socket Your TV set should only be connected to an AC supply It must not be connected to a DC supply If the plug is detached from the cable do not under any circumstances connect it to a...

Страница 8: ...twork configuration If you have any questions about your home network please refer to your ISP Internet Service Provider Chapter 2 Getting Started Connecting to a Wired Network To connect to a wired n...

Страница 9: ...ress on the remote control select System Menu language and press OK to enter 2 Press to select your desired language to display the menus and press OK to confirm 3 Press EXIT or to close the menu Inst...

Страница 10: ...der According to circumstances of the contents provider an application s updates or the application itself may be discontinued Depending on your country s regulations some applications may have limite...

Страница 11: ...options may not be available for certain signal sources This section explores the input sources of your TV Press on the remote control to display homepage Press to enter TV page and select input sour...

Страница 12: ...ist Press OK to enter each option Press EXIT or repeatedly to return to the homepage App Store Many useful and entertaining apps are available for downloading After entering the App Store you will see...

Страница 13: ...description refers to an additional narration track for blind and visually impaired viewers of visual media including television programs and movies The description narrator talks through the presenta...

Страница 14: ...By USB and press OK to enter Follow the on screen instructions to complete the process By channel Enables you to install the latest version software if available from the broadcast Select By channel...

Страница 15: ...get information about the current or next program playing on each channel Navigate through the different programs using the buttons on the remote control 2 Use the related buttons shown at the bottom...

Страница 16: ...ur normal TV remote control You can then control your TV through your smart device Follow the on screen instructions to scan the QR code on the TV screen and download T Cast Note Make sure the smart d...

Страница 17: ...to live and Catch Up programs What You Need Your television must be connected to a high speed broadband internet connection as well as an aerial To Launch Freeview Plus When you are watching TV you w...

Страница 18: ...rting only one hard drive or a low power consumption portable hard drive 4 The video from a portable hard drive USB is playing with no sound The audio format of the video in your portable hard drive i...

Страница 19: ...ssary to install a special antenna to improve the reception 1 Adjust the position and orientation of the indoor outdoor antenna 2 Check the connection of antenna 3 Fine tune the channel 4 Try another...

Страница 20: ...is at your sole risk and that the entire risk as to satisfactory quality performance and accuracy is with you The device and all third party content and services are provided as is without warranty of...

Страница 21: ...72 FFMS86 EAU1B www ffalcon com au Customer Support 1300 170 540...

Отзывы: