


T 15+3 Li, T 18+3 Li
15
GB
5
Machine features
The specified illustrations appear at the beginning
of the Operating Instructions.
6
Operation
6.1
Charger cable holder [3-2]
Unwind the cable completely from the recess
before using the charger.
6.2
Changing the battery pack [2]
Battery pack is ready for use immediately upon
delivery and can be charged at any time.
When using NiMH or NiCd battery packs, the va-
cant opening can be closed with the blanking
plug
[2-1]
.
The capacity display
[1-10]
automatically displays
the charge state of the battery pack
[1-3]
when the
ON/OFF switch is actuated:
(not NiCd- and NiMH-battery packs)
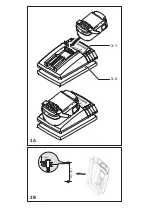
6.3
Charging the battery pack [3A]
The LED
[3-1]
on the charger indicates the respec-
tive operating status of the charger.
7
Settings
7.1
Changing direction of rotation [1-4]
• Switch to the left = clockwise rotation
• Switch to the right = counterclockwise rotation
7.2
Changing gear [1-6]
• Gear switch forwards (digit 1 visible) = 1st gear
• Gear switch to rear (digit 2 visible) = 2nd gear
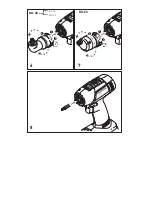
7.3
Fastening
Adjust the switch so that its marking
[1-9]
faces the
screw symbol
[1-8]
.
Adjust the torque accordingly at the torque wheel
[1-12]
.
Position 1 = low torque
Position 25 = high torque
An
acoustic signal
sounds when the preset torque
is reached and the machine then switches off. You
must release and press the ON/OFF switch
[1-3]
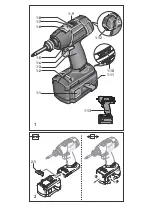
[1-1]
Buttons for releasing the battery pack
[1-2]
Bit store
[1-3]
On/Off switch
[1-4]
Right/left switch
[1-5]
LED lamp
[1-6]
Gear switch
[1-7]
Drilling symbol
[1-8]
Screwdriving symbol
[1-9]
Drilling/Fastening selector switch
[1-10]
Capacity display
[1-11]
Belt clip
[1-12]
Torque thumbwheel
[1-13]
Insulated gripping surfaces (grey shaded
area)
[2-1]
Battery blanking plug
[3-1]
LED-Display
[3-2]
Cable holder
[3B]
Wall mount for charger
70 - 100 %
40 - 70 %
15 - 40 %
< 15 %
Recommendation:
Charge bat-
tery pack before further use.
LED yellow - lit continuously
Charger is ready to use.
LED green - flashes quickly
Battery pack is charged to maxi-
mum capacity.
LED green - flashes slowly
Battery pack is charged with
reduced current. Li-ion is
charged to > 90 %.
LED green - lit continuously
Charging is complete or is not
restarted as current charge sta-
tus is greater than 90%.
LED red - flashes
General fault indication, e.g.
incomplete contact, short circuit,
defective battery pack, etc.
LED red - lit continuously
Battery temperature is outside
the permitted range.
CAUTION
Risk of injury
Always switch off the power tool before adjusting
settings!
Содержание T 15+3 Li
Страница 2: ...1 12 2 1 2 1 1 9 1 11 1 13 1 1 1 2 1 3 1 4 1 5 1 6 1 7 1 8 1 10 1 2 ...
Страница 3: ...3 1 3 2 3B 3A m m 0 2 1 5mm 4 mm ...
Страница 4: ...4 5 WH CE CENTROTEC BF FX klick klick 3 1 2 4 1 2 klick 4 3 ...
Страница 5: ...6 8 7 DD ES 2 2 DD AS WH CE 1 3 3 1 BF FX ...
Страница 87: ...2 klick 3 3B 4 mm Ø 5 mm m m 0 2 1 3 1 3 2 ...
Страница 88: ...PSC PSC 1 2 ca 3 mm PSC 4 1 4 2 4 4 4 5 4 6 4 5 2 5 1 5 4 3 ...
Страница 89: ...2 PSC PSC 7 7 1 8 1 6 3 6 1 6 2 6 8 8 2 ...
Страница 90: ...9 2 2 2 9 1 11 2 11 3 11 4 11 5 11 1 10 11 ADT PS 400 KS PS 400 max 20 mm L S 105 4 FSG FSG ...