15
7 Operation
7.1
Fastening the grinding wheel
Clean the fl ange
[2-1]
and fastening nut
[2-3]
,
as well as grinding wheel fastening areas
[2-2]
.
Mount grinding wheel
[2-2]
. Flange fitting
must fi t the grinding wheel aperture.
Press in the spindle blocking plunger
[1-6]
.
Press in the blocking plunger only when device
is switched off and spindle not active.
Turn the spindle until blocking plunger fi ts in.
Screw the fastening nut
[2-3]
by fi tting it from
the grinding wheel
[2-2]
on the spindle
[2-5]
.
Fasten the fastening nut
[2-3]
with key
[2-4]
.
Before starting the device, make sure the
grinding wheel rotates smoothly.
Use only grinding wheels recommended by the
manufacturer and designed fl ange, which are
included in the package.
7.2
Positioning the handle
Suffi ciently release the handle manual screw
[1-
9]
and tilt the handle
[1-5]
to set the most suitable
working position. Re-fasten the manual screw
[1-9]
.
7.3 Dust
suction
Always work with connected suction device. Insert
the suction device pipe into the suction extension
[1-3]
. In order to increase the effi ciency, we rec-
ommend to use pipes with 36 mm.
Use solely suction devices with antistatic pipe
design.
7.4
Lifting the front brush
For wall lifting, it is possible to lift the lifting seg-
ment
[3-1]
– see fi gure
[3]
.
7.5 Brush
replacement
After wear and tear of the brush
[4-1]
, it must be
replaced.
At fi rst unscrew the screws with washers
[4-2]
,
remove the brush from the cover
[4-3]
with the
springs
[4-4]
.
Insert the springs into the holes in the new
brush and secure the in the holes by turning
them clockwise – see fi gure
[4 a]
. Defl ecting
the springs from vertical direction does not
constitute a defect.
Then remove the brush with fi tted springs, at-
tach them on the cover
[4-3]
from the front end
and tilt them – see fi gure
[4 b]
.
Make sure that the springs in the cover fi t into
the guiding holes and screw back the screws
with washers
[4-2]
.
7.6 Grinding
wheel
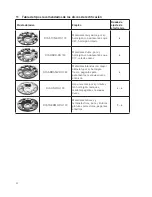
Depending on the application area, various grind-
ing wheels are available – see table on page 16
Use solely wheels of Festool trademark, which
guarantees the grinding output of the machine.
8
Service and maintenance
WARNING
Risk of accident, electric shock
Always pull the plug out of the socket before
performing any type of work on the machine.
All maintenance and repair work which re-
quires the motor housing to be opened, must
only be carried out by an authorised service
workshop.
- Wrapped electric tools can be stored in a dry
place without heating, with temperatures not
lower than −5 °C. Unwrapped electric tools can
only be stored in dry places with temperatures
not lower than +5 °C, without sudden changes
in the temperature.
- To ensure the airflow is sufficient, cooling
openings of the motor must be always clean
and free.
- The machine is equipped with special self-
disconnecting brushes. When the brushes are
worn, the power supply is automatically dis-
connected, and the machine is stopped.
Customer service and repair. Only through
manufacturer or service workshops:
Please fi nd the nearest address at: www.
festool.com/service
EKAT
1
2
3
5
4
Use only original Festool spare parts! Or-
der No. at:
www.festool.com/service
9 Environment
Do not throw the power tool in your household
waste!
Dispose of the machine, accessories and
packaging at an environmentally-responsible re-
cycling centre! Observe the valid national regula-
tions.
EU only:
European Directive 2002/96/EC stipulate
that used electric power tools must be collected
separately and disposed of at an environmentally
responsible recycling centre.
Information on REACh:
www.festool.com/reach
Содержание RG 130 E
Страница 2: ...1 9 1 2 1 3 1 4 1 1 1 2 1 5 1 6 1 7 1 8 2 1 2 2 2 3 2 4 2 5 ...
Страница 3: ...3 4 a 4 b 4 4 1 4 2 4 4 4 3 ...


