background image

3

Assembly and installation

Festo – GDCP-EXPT-KM-KOMP-EN – 1204a – English

21

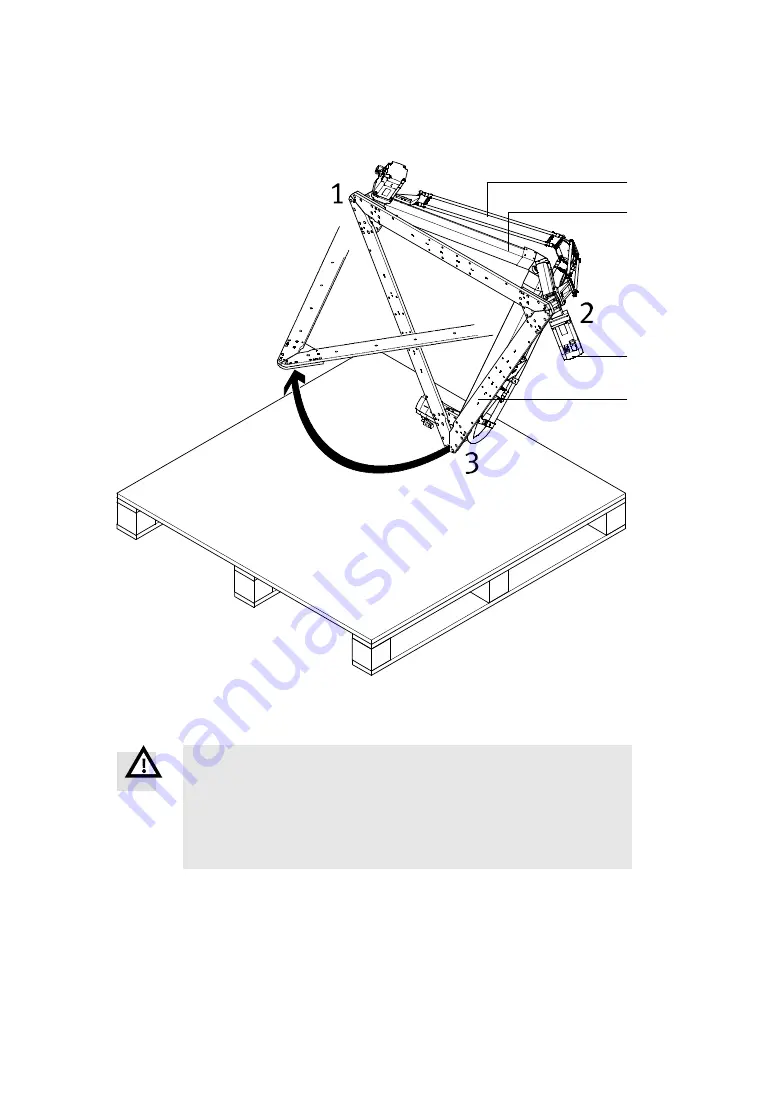
Turning and installing the tripod kinematics

1

2

3

4

1

Pair of rods

2

Toothed belt axis

3

Motor

4

Mounting frame

Fig. 3.11

Warning

Crushing of body parts. If improperly fastened, the tripod kinematics can come undone

and fall down.

Fasten the tripod kinematics on the frame in accordance with the specifications on

the assembly drawing.

Observe the specifications for mounting (

Chapter 3.6 and 3.7).

Secure the screw connections.

Содержание EXPT 120

Страница 1: ...Description Mechanical assembly 8003784 1204a Tripod kinematics EXPT...

Страница 2: ...m Warning Hazards that can cause death or serious injuries Caution Hazards that can cause minor injuries or serious material damage Other symbols Note Material damage or loss of function Recommendatio...

Страница 3: ...nd installation 11 3 1 Transport 11 3 2 Storage conditions 11 3 3 Unpacking 12 3 4 Checking tripod kinematics and scope of delivery 13 3 5 Preparations for assembly 14 3 5 1 Dimensions 14 3 5 2 Requir...

Страница 4: ...motors 35 6 1 3 Dismounting the front unit 36 6 1 4 Dismantling the protective conduit 38 6 1 5 Dismounting a pair of rods 39 6 2 Repair 40 6 3 Accessories 40 6 4 Disposal 40 A Technical appendix 41...

Страница 5: ...s and are to be used as follows in excellent technical condition in original status without unauthorised modifications within the limits of the product defined by the technical data Appendix A 1 in an...

Страница 6: ...ents All warnings and instructions in this documentation for the correct and safe use of the product must be observed at all times Comply with the connection and environmental conditions of the produc...

Страница 7: ...with rotary drive size 11 T4 Front unit with rotary drive size 11 and pneumatic rotary through feed Motor attachment position Fig 3 12 HHH Motor axis A1 A2 A3 rear HHV Motor axis A1 rear Motor axis A2...

Страница 8: ...controller Without control system C1 Control system with multi axis controller CMXR C1 C2 Control system with multi axis controller CMXR C2 and integrated PLC Operator terminal Without operator unit...

Страница 9: ...identical to the other variants The only difference being that the axes are rotated by 180 and the toothed belt faces upwards This prevents abrasion in the working space The optional control system in...

Страница 10: ...mple and corresponds to the variant T1 to T4 with rotary drive and motors in attachment position HHH the position of the electrical and pneumatic connections The interface housing is located opposite...

Страница 11: ...s 45 47 5 61 5 66 Total weight1 165 170 220 225 1 With max accessories Tab 3 1 Note For transport observe the marking on the upper side of the transport box 1 Transport the packed tripod kinematics to...

Страница 12: ...ing for later use or dispose of it in the proper manner Removing transport packaging 1 Remove the four screws of the lid and lift the lid up and off the transport box 2 Remove all screws from the side...

Страница 13: ...ontents 3 Remove the mounting screw in the box and remove the box from the pallet 4 Check that the delivery is complete Designation Number for EXPT T0 Number for EXPT T1 to T4 Description of tripod ki...

Страница 14: ...he mounting holes www festo com catalogue The following conditions must be met otherwise the range of functions may be restricted enough room for the tripod kinematics to move including room outside t...

Страница 15: ...e corner bracket of the mounting frame There must be a torsionally rigid flat bearing surface in the area of the corner bracket In order for the tripod kinematics to attain the positioning accuracy st...

Страница 16: ...oved Screws M8 to DIN 912 Direct mounting with at least 4 screws per corner bracket directly on the frame dimensions catalogue specifications These 4 screws should be placed far enough apart to ensure...

Страница 17: ...t mounting parallel to mounting frame Example 1 The holes in the corner brackets are arranged so that a 80x80 profile 1 with 40 mm between slots can be fastened in a number of different posi tions 1 P...

Страница 18: ...dditional angle brackets Note The additional angle brackets are required in the following examples in order to increase the torsional rigidity and the bearing surface Example 1 Holes for slot nut moun...

Страница 19: ...down or tip over The front unit must not strike against anything or be placed against the floor Grip the EXPT only in the area of the motors and axes or on the mounting frame Set down the tripod kine...

Страница 20: ...matics are fastened to the base pallet with 6 triple square socket screws 2 Grip the tripod kinematics together with a second person and only in the area of the motors axes and mounting frame corners...

Страница 21: ...hed belt axis 3 Motor 4 Mounting frame Fig 3 11 Warning Crushing of body parts If improperly fastened the tripod kinematics can come undone and fall down Fasten the tripod kinematics on the frame in a...

Страница 22: ...ng position on the frame where they can be screwed in place by a fourth person 7 The tightening torque is 10 Nm 20 in the case of slot nut mounting Note When installing on the frame be mindful of the...

Страница 23: ...the markings EXPT T0 EXPT T1 to T4 1 2 3 1 3 4 5 6 7 1 Ball 2 Central hole 4 mm 3 Ball stud with pneumatic port 4 Air port variant T2 and T4 5 Connection for encoder cable 6 Connection for motor cable...

Страница 24: ...ion the alignment of the motors The illustrated variant is an example and corres ponds to the standard alignment HHH the interface housing is located opposite motor 1 on the mounting frame 1 2 3 4 5 6...

Страница 25: ...t the factory The built in pressure switch SDE5 4 sets an output signal when at least one pair of rods is detached Connect the air port 5 or pneumatic rotary through feed to the front unit variant T2...

Страница 26: ...only by a specialist trained as an electrotechnician SDE 5 connection Port identification signal Pin Plug pattern Circuit diagram 24 V DC Operating voltage 1 Switching output A out A 2 4 0 V 3 Fig 3 1...

Страница 27: ...otective earth conductor PE 4 Fig 3 18 Connection of ENC encoder for rotary drive Port identification signal Pin Plug pattern Signal trace A 1 Signal trace A 2 Signal trace B 3 Signal trace B 4 Signal...

Страница 28: ...st The following knowledge is required specialist with knowledge of robotics and CoDeSys knowledge of the handling of the Festo components CMMP and CMXR knowledge of the handling and operation of the...

Страница 29: ...s so that they cannot move unexpectedly or bring them into a secure end position Note Maintenance work should only be conducted by properly trained personnel in accord ance with these instructions 5 1...

Страница 30: ...GDCP EXPT KM KOMP EN 1204a English Size 95 120 Toothed belt axis EGC 80 TB KF Maintenance task Greasing the bearing guide 1 Lubrication interval in operating hours h 6000 Lubricant grease Lub KC1 fro...

Страница 31: ...rication interval in operating hours h 6000 Lubricant grease Lub KC1 from Festo Lubricating point Tab 5 3 5 2 Troubleshooting Malfunction Possible cause Remedy Audible leakage of compressed air Rod lo...

Страница 32: ...e to their size and weight the tripod kinematics should be held and turned over by a total of three persons Tab 3 1 An additional person is required to release the mounting Caution Crushing of body pa...

Страница 33: ...oosening the mounting screws 2 Have three people holding the tripod kinematics while a fourth person unscrews them 3 Carefully remove the tripod kinematics from the mounting frame and bring them to th...

Страница 34: ...g frame Fig 6 2 6 Acting together lower the tripod kinematics until they are resting on the mounting frame Make sure that the corner 3 on which the tripod kinematics are standing is securely in place...

Страница 35: ...or bring them into a secure end position Note Removing a motor causes the referencing of the corresponding axis to be lost When commissioning the axis must be referenced again Removal of the motor is...

Страница 36: ...all joint 3 Push in T fitting Fig 6 4 Caution Danger of crushing exists when disconnecting the ball cups from the balls Be sure that you do not let your fingers be pinched between the balls and the ba...

Страница 37: ...nt T2 and T4 5 Connection for encoder cable 6 Connection for motor cable 7 Connection for sensor cable Fig 6 5 3 Disconnect the rods of the first rod pair from the balls as follows Hold the front unit...

Страница 38: ...he protective conduit proceed as follows 1 Vent the supply ports 2 Pull the rod loss detection hoses coming from the protective conduit 1 out of their push in T fit tings 3 For T1 to T4 remove the enc...

Страница 39: ...ics 1 Use a cloth to clean the balls and ball cups of the detached rods 2 Check the balls and ball cups for damage 3 Likewise check the springs pins washers and supports for damage If there is any dam...

Страница 40: ...ccessories Please select the appropriate accessories from our catalogue www festo com catalogue 6 4 Disposal When dismantling parts observe the instructions Chapter 6 1 Observe the local regulations f...

Страница 41: ...A 1 2 Mechanical Size 45 70 95 120 Working space Nominal diameter mm 450 700 950 1200 Nominal height mm 100 Rod loss detection Pneumatic connection Hose with a nominal diameter of 4 mm Operating press...

Страница 42: ...force in Z direction N 1000 750 750 750 Max frame strength horizontal N 145 150 200 215 Max frame strength vertical N 250 290 325 475 1 When used in conjunction with motor controller CMMP AS C5 3A an...

Страница 43: ...T3 T4 Rotation angle Infinite Gear ratio mm 30 1 Repetition accuracy 0 01 Max output speed rpm 200 Max continuous speed rpm 117 Nominal torque Nm 0 75 0 75 1 8 1 8 Peak torque Nm 1 8 1 8 4 5 4 5 Max a...

Страница 44: ...is prohibited Offenders will be liable for damages All rights re served in the event that a patent utility model or design patent is registered Copyright Festo AG Co KG Postfach D 73726 Esslingen Pho...

Отзывы: