background image

EN

6

(OHFWULFDOVDIHW\

 Always check that the voltage on the 
battery block corresponds to the voltage 
on the rating plate. Also check that your 
mains voltage corresponds to the input 
voltage of the battery charger.

Class II machine – Double insulation – 
You don’t need any earthed plug.

Replacing cables or plugs

Immediately throw away old cables or plugs when 
they have been replaced by new ones.

‡

Remove the battery block when the power 
tool is not being used and prior to 
maintenance.

‡

The tool is suitable for use as a screwdriver 
and drill. Any other application is specifically 
excluded.

0RXQWLQJDFFHVVRULHV

Prior to mounting an accessory always 
remove the battery.

)LWWLQJDQGUHPRYLQJGULOOFXWWHUV
Fig. B

In addition to screwdriver bits with a hexagonal 
shaft, this tool can also accommodate drill bits 
with a hexagonal shaft.

‡

Loosen the drill chuck (3) by rotating the 
hand-grip (9).

‡

Insert the shaft of the drill cutter into the 
chuck.

‡

Tighten the drill chuck so that the drill cutter is 
firmly clamped.

‡

Rotate the drill chuck in the opposite direction 
when you wish to change the cutter.

&RQQHFWLQJDQGUHPRYLQJWKHEDWWHU\
Fig. C

Ensure that the exterior of the battery 
block or tool is clean and dry before 
connecting the charger.

‡

Ensure that the direction reversing switch (5, 
Fig. A) is in the central position in order to 

prevent the appliance from being switched on 
unexpectedly.

‡

Insert the battery (4) into the base of the 
appliance, as shown on the illustration. Push 
the battery until it latches in.

‡

Press the locking buttons (10) on both sides 
before removing the battery, and disengage 
the battery from the base of the appliance.

2SHUDWLRQ

Always follow the safety notes and the 
relevant safety code.

Hold the appliance firmly and press the drill 
steadily onto the workpiece. Do not overload the 
appliance. Only use drills with no visible wear. 
Worn drills will have a bad effect on the 
functioning of the appliance.

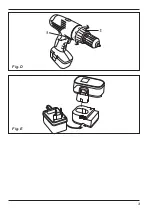
Adjusting the torque
Fig. D

The appliance has 16 different torque settings 
with which to set the power for driving and 
removing screws.

‡

Set the torque adjustment ring (2) to the 
desired position. The available torque settings 
are indicated on the adjustment ring by the 
numbers 1 to 5 and by dots between the 
figures to define intermediate settings (16 in 
total).

‡

You should preferably choose a setting as low 
as possible when using the screwdriver. 
Select a higher setting if the motor slips.

Driving and removing screws

‡

Set the direction reversing switch (5) to 
position ‘L’ in order to drive screws.

‡

Set the direction reversing switch to position 
‘R’ in order to remove screws.

Drilling 

‡

Rotate the torque adjustment ring (2) to the 
drilling position.

Ensure that the direction reversing 
switch (5) is always set to ‘L’ during 
drilling.

Switching the device on and off
Fig. A

Содержание CDM1105

Страница 1: ...ali 33 vers ttning av bruksanvisning i original 38 Alkuper isten ohjeiden k nn s 42 Oversatt fra orginal veiledning 46 Overs ttelse af den originale brugsanvisning 51 Eredeti haszn lati utas t s ford...

Страница 2: ...2 Fig C Fig B Fig A...

Страница 3: ...3 Fig E Fig D...

Страница 4: ...essure 74 3 dB A Lwa acoustic power 85 3 dB A Vibration value When drilling in metal 1 18 1 5 m s2 Vibration level The vibration emission level stated in this instruction manual has been measured in a...

Страница 5: ...he cable 7 If the charger has been dropped or has otherwise been exposed to high mechanical stresses you should have it checked for damage by an authorised dealer before using it again Damaged parts s...

Страница 6: ...the central position in order to prevent the appliance from being switched on unexpectedly Insert the battery 4 into the base of the appliance as shown on the illustration Push the battery until it la...

Страница 7: ...the drill is diminishing and that the maximum rotational speed is not reached The battery is almost discharged now Only now you can start charging the battery Charging the battery while it is still ch...

Страница 8: ...Einklang mit den h chsten Standards f r Leistung und Sicherheit gefertigt Als Teil unserer Philosophie bieten wir auch einen ausgezeichneten Kundenservice unterst tzt von unserer umfangreichen Garanti...

Страница 9: ...b A 1 Ein Aus Schalter 2 Einstellring Drehmoment 3 Bohrfutter 4 Akku 5 Drehrichtungsschalter 6LFKHUKHLWVYRUVFKULIWHQ UOlXWHUXQJ GHU 6 PEROH Lebens und Verletzungsgefahr und Gefahr von Besch digungen a...

Страница 10: ...her Stromst rke berhitzung Brandgefahr oder Platzen des Akkublocks k nnen die Folge sein Dies kann zu Besch digung des Akkublocks bzw Unfallgefahr f r den Benutzer f hren Deshalb Schlie en Sie keine K...

Страница 11: ...den beeinflussen die Funktionst chtigkeit der Maschine nachteilig Drehmoment einstellen Abb D Die Maschine hat 16 verschiedene Drehmoment einstellungen mit denen die Kraft f r das Ein und Herausdrehen...

Страница 12: ...ryeffekt auftreten Weil beim Aufladen jetzt nur noch der entladene Teil der Akkukapazit t aktiviert wird kann der Akku in dem Drittel das noch geladen ist zu kristallisieren beginnen Dadurch ist diese...

Страница 13: ...daarden voor wat betreft prestaties en veiligheid Als onderdeel van onze filosofie leveren wij tevens een excellente klantenservice gesteund door onze uitgebreide garantie Wij hopen dat u dit product...

Страница 14: ...tiebewijs Controleer het apparaat loszittende onderdelen en accessoires op beschadigingen die zijn veroorzaakt gedurende het transport Productinformatie Afb A 1 Aan uit schakelaar 2 Instelring koppel...

Страница 15: ...tieopeningen van de acculader moeten altijd onbedekt zijn 13 De accu mag niet worden kortgesloten Bij kortsluiting vloeit de stroom met een hogere stroomsterkte Oververhitting brandgevaar of ontploffe...

Страница 16: ...ste stand De instellingen voor het draaimoment waaruit u kunt kiezen worden op de instelring met behulp van de cijfers 1 tot en met 5 en met een punt tussen twee cijfers voor de tussenliggende standen...

Страница 17: ...verwisseld de wordt de en de wordt de Is dit eenmaal opgetreden dan zal bij het laden de polariteit verwisseld blijven en zal de accu onherstelbaar beschadigd worden Wanneer u de accuboormachine lange...

Страница 18: ...acoustique 74 3 dB A Lwa puissance acoustique 85 3 dB A Valeur de vibration Pendant le per age du m tal 1 18 1 5 m s2 1LYHDX GH YLEUDWLRQV Le niveau de vibrations mises indiqu en ce manuel d instructi...

Страница 19: ...contr lez toujours que tous les c bles sont raccord s correctement 5 Si vous constatez qu un ou plusieurs c bles sont endommag s il est interdit d utiliser l appareil Faites imm diatement remplacer le...

Страница 20: ...B Outre les m ches la machine peut galement tre dot e d embouts de vissage six pans D bloquez le mandrin 3 en faisant tourner le collet 9 Placez la tige de la m che dans l orifice du mandrin Serrez le...

Страница 21: ...la batterie dans son support Faites attention au marquage des p le et Introduisez la fiche de l adaptateur dans le connecteur sur le c t du support de la batterie Branchez l adaptateur sur le r seau...

Страница 22: ...n chiffon doux humect d eau savonneuse Proscrivez l emploi de solvants comme l essence l alcool l ammoniaque etc car ces substances attaquent les pi ces en plastique Lubrification Cette machine ne n c...

Страница 23: ...arga 0 550 min Alojamiento portabroca 0 8 10 mm Peso incluido acumulador 1 579kg Lpa Presi n ac stica 74 3 dB A Lwa Potencia ac stica 85 3 dB A Valor de vibraci n Al taladrar en metal 1 18 1 5 m s2 1L...

Страница 24: ...la herramienta el ctrica de la humedad como por ejemplo la lluvia o la nieve 4 Antes de utilizar el cargador compruebe siempre la conexi n correcta de todos los cables 5 Si detecta da os en los cables...

Страница 25: ...pre la bater a 3RQHU UHWLUDU ODV EURFDV GH OD WDODGUDGRUD Fig B La m quina puede albergar adem s de filos de taladrar tambi n puntas de atornillar con tronco hexagonal Afloje el portabrocas 3 girando...

Страница 26: ...ter a en un rango de temperatura entre 5 y 40 Celsius Use el cargador de bater a s lo en salas secas y ventiladas Carga Fig E Coloque el soporte de la bater a en una mesa plana y ponga la bater a en e...

Страница 27: ...pie regularmente el aparato con un pa o preferentemente despu s de cada uso Aseg rese de que las rejillas de ventilaci n no posean part culas de polvo ni suciedad Si hubiera suciedad incrustada utilic...

Страница 28: ...ss o sonora 74 3 dB A Lwa n vel de press o sonora 85 3 dB A Vibra o Ao perfurar en metal 1 18 1 5 m s2 1tYHO GH YLEUDomR O n vel de emiss o de vibra es indicado na parte posterior deste manual de inst...

Страница 29: ...substitu dos 6 Quando o carregador n o se encontrar em utiliza o n o deve permanecer ligado Quando desligar n o puxe pelo cabo 7 Se o carregador interromper o seu funcionamento ou apresentar quaisquer...

Страница 30: ...opre et s che avant de raccorder le chargeur Veillez ce que le commutateur d inversion du sens de rotation 5 Fi A soit en plac au milieu afin d viter que la machine ne puisse tre mise en marche par in...

Страница 31: ...s allume indiquant ainsi que le chargement a commenc Le chargement d une batterie vide dure la premi re fois environ 5 heures puis 3 heures les fois suivantes Le t moin ne s teint pas automatiquement...

Страница 32: ...a sujidade n o sair utilize um pano humedecido em gua com detergente Nunca utilize solventes tais como petr leo lcool amon aco etc Estes solventes podem danificar as pe as de pl stico Lubrifica o A m...

Страница 33: ...ador 1 579kg Lpa Presi n ac stica 74 3 dB A Lwa Potencia ac stica 85 3 dB A Valor de vibraci n Al taladrar en metal 1 18 1 5 m s2 1tYHO GH YLEUDomR O n vel de emiss o de vibra es indicado na parte pos...

Страница 34: ...i elettrici siano collegati correttamente 5 Se uno dei conduttori elettrici del caricabatterie danneggiato non utilizzare il caricabatterie fino a quando il conduttore non sar stato sostituito 6 Quand...

Страница 35: ...seguire operazioni di trapanazione e di avvitamento Qualsiasi utilizzo dell apparecchio per scopi diversi da quelli indicati da considerarsi improprio FFHVVRUL GL PRQWDJJLR Prima di montare un accesso...

Страница 36: ...ile solo ad avvenuto e completo arresto del motore Evitare di posare l utensile su superfici polverose la polvere potrebbe infatti introdursi all interno delle parti meccaniche Caricamento delle batte...

Страница 37: ...per pulire l apparecchio Pulire la macchina spazzolandola con un pennello Le macchine sono state progettate per funzionare per lunghi periodi di tempo pur richiedendo interventi di manutenzione minim...

Страница 38: ...8V Sp nning batteriladdare 230 V Frekvens batteriladdare 50 Hz Batterieffekt 1 0 Ah Laddningens l ngd 3 5 tim Max vridmoment 10 Nm Varvtal utan belastning 0 550 min Borrchuckens h llare 0 8 10 mm Vikt...

Страница 39: ...hand reparera laddaren eller batteriblocket Reparationer m ste alltid utf ras av en godk nd person med fackkunskaper annars finns det risk f r olycka 10 Dra alltid ut kontakten ur laddarens kontaktutt...

Страница 40: ...maskinens funktionsduglighet negativt St lla in vridmoment Fig D Maskinen har 16 olika vridmomentsinst llningar med vilka kraften f r i och urdragning av skruvar kan best mmas Vrid st llringen f r vri...

Страница 41: ...den s k polv ndningseffekten uppst Batteriernas poler byter plats blir d och blir Om detta en g ng har skett kommer polariteten att f rbli omv nd under laddningen vilket ohj lpligt skadar batteriet O...

Страница 42: ...nenpaine 74 3 dB A Lwa nitehotaso 85 3 dB A T rin arvo Metalliin porattaessa 1 18 1 5 m s2 T rin taso T m n ohjekirjan takana mainittu t rin s teilytaso on mitattu standardin EN 60745 mukaisen standar...

Страница 43: ...on muualla laitettu alttiiksi voimakkaalle mekaaniselle rasitukselle j t se ennen lis k ytt ensin tunnustetun ammattikorjaamon tutkittavaksi vaurion varalta Vaurioituneet osat t ytyy vaihtaa 8 K sitt...

Страница 44: ...on keskiasennossa v ltt ksesi ett kone voidaan kytke p lle odottamattomasti Aseta akku 4 koneen jalkaan kuten piirustuksessa on esitetty Paina akku tiukkaan kunnes se lukittuu Paina molemmin k sin sul...

Страница 45: ...kuporakonetta on k ytett v kunnes huomaat poran tehon pienenev n niin ettei pora py ri en t ydell nopeudella T ll in akun lataus on purkautunut l hes kokonaan Akun lataaminen voidaan aloittaa vasta ny...

Страница 46: ...sofien v r har vi ogs en ypperlig kundeservice som st ttes av omfattende garanti Vi h per du vil like bruke dette produktet i mange r framover Tallene i teksten henviser til diagrammene p side 2 3 Les...

Страница 47: ...re for personskade livsfare eller skade p maskinen hvis instruksjonene i denne bruksanvisningen ikke f lges Fare for elektrisk st t M ikke brukes i regn Maskinens turtall kan reguleres elektronisk Kun...

Страница 48: ...il og eller risiko m du utelukkende bruke den medf lgende batteriblokken i kombinasjon med denne batteridrevne drillen skrutrekkeren 14 En skadet batteriblokk eller en batteriblokk som ikke lenger kan...

Страница 49: ...kes p bryteren Hvis du slipper av p bryteren 1 bremses chucken med n gang og fortsetter ikke rotere Sett retningsvelgeren 5 i midtstilling for l se maskinen i avsl tt tilstand Du m ikke legge fra deg...

Страница 50: ...hold Hvis maskinen rengj res regelmessig og behandles p riktig m te bidrar dette til gi maskinen en lang levetid HLO Dersom maskinen ikke fungerer som den skal kan du se gjennom oversikten over mulige...

Страница 51: ...dB A Lydeffekt 85 3 dB A Vibrationsv rdi Ved boring i metal 1 18 1 5 m s2 Vibrationsniveau Det vibrationsniveau der er anf rt bag p denne betjeningsvejledning er m lt i henhold til den standardisered...

Страница 52: ...ikket ikke i kablet 7 Hvis opladeren falder p gulvet eller p anden vis uds ttes for en kraftig mekanisk belastning skal man f den unders gt for skader p et godkendt specialv rksted inden man anvender...

Страница 53: ...f maskinen S t batteriet 4 ind i maskinens sokkel som vist p tegningen Tryk det helt i bund s det g r i hak For at fjerne batteriet skal du trykke l sekapperne 10 p begge sider ind og tr kke batteriet...

Страница 54: ...korrekt bidrager De til en l ngere levetid for maskinen Reng ring Reng r regelm ssigt maskinkappen med en bl d klud helst efter hvert brug S rg for at ventilationshullerne er fri for st v og snavs Br...

Страница 55: ...Lwa hangteljes tm ny 85 3 dB A Vibr ci s rt k F m f r sakor 1 18 1 5 m s2 Rezg sszint Az ezen felhaszn l i k zik nyv v g n megadott rezg s kibocs t si szint m r se az EN 60745 szabv nyban meghat rozo...

Страница 56: ...ib sodott k belt D QHP KDV QiOMD D W OW NpV OpNHW DNNRU D csatlakoz t h zza ki a csatlakoz aljzatb l A h l zati csatlakoz t ne a h l zati k belhez csatlakoztassa D D W OW NpV OpN OHHVHWW YDJ PiV HU V...

Страница 57: ...GHONH FVDYDUK y KHJ HNHW LV IHO WXG IRJQL Laz tsa ki a fur bet tet 3 amelyikben a peremez st 9 forgatja Helyezze be a f r fej sz r t a tokm nyba U VHQ FVDYDUMD EH D I UyEHWpWHW KRJ D f r fej r gz lj...

Страница 58: ...matikusan Az akkumul tort 5 ra W OWpV XWiQ NDSFVROMD OH D W OW U O D D DNNXPXOiWRUW D W OWpVL LG HOWHOWpYHO QHP NDSFVROMD OH D W OW U O J D t lmelegedhet Az akkumul tor lemer t se Nem csak az akkumul...

Страница 59: ...sodott vagy haszn lhatat lann v lt elektromos berendez seket adja le jrafeldolgoz sra Garancia A garanci lis felt teleket a k zik nyvh z csatolt garanciak rtya tartalmazza 808 72529 957 NXMHPH YiP D...

Страница 60: ...6NOt LGOR XStQDFt SRX GUR 4 Baterie 3 HStQD VP UX RWi HQt H SH QRVWQt SRN Q 9 VY WOHQt V PERO 2 QD XMH UL LNR RVREQtKR UDQ Qt WUiW LYRWD QHER SR NR HQt QiVWURMH Y S tSDG QHGRGU HQt SRN Q Y WRPWR n vo...

Страница 61: ...ELQDFL V DNXPXOiWRURY P URXERYiNHP tP VH DEUiQt SRUXFKiP D QHER UL LN P 14 Je li akumul tor po kozen nebo jej nen PR Qp QDEtW MH W HED KR OLNYLGRYDW XU HQ P S VREHP 1HKi HMWH MHM GR GRPRYQtKR odpadu 1...

Страница 62: ...DYWH VP URY VStQD GR SRORK 3UR XYROQ Qt URXE QDVWDYWH VP URY VStQD GR SRORK 5 Vrt n 1DVWDYWH QDVWDYRYDFt NURX HN WR LYpKR PRPHQWX 2 do vrtac polohy DMLVW WH DE VP URY VStQD E O nastaven v poloze L DSQ...

Страница 63: ...MHVWOL H SURYiGtWH GU EX PRWRUX 3 tVWURMH QD N MVRX NRQVWUXRYiQ SUR GORXKRGREp SRX tYiQt S L PLQLPiOQt GU E XGRX IXQJRYDW EH SUREOpP SRNXG VH MLP EXGH Y QRYDW QiOH LWi Sp H D SRNXG EXGRX SUDYLGHOQ L...

Страница 64: ...V YUiWDQH EDWpULH NJ Lpa akustick tlak 74 3 dB A Lwa akustick v kon 85 3 dB A Hodnota vibr ci 3UL Y WDQt GR NRYX P V URYH YLEUiFLt URYH HPLVLH YLEUiFLt XYHGHQi Y WHMWR SUHYiG NRYHM SUtUX NH EROD RGPHU...

Страница 65: ...XYN 1HY DKXMWH iVWU NX WDN H EXGHWH DKD D k bel N QDEtMD ND VSDGOD DOHER VD LQ P VS VRERP vystavila vysok mu mechanick mu tlaku PDOL E VWH GD VNRQWURORYD L QLH MH po koden u autorizovan ho predajcu sk...

Страница 66: ...DNR MH WR Qi RUQHQp QD REUi NX DWOi DMWH bat riu k m nezapadne 6WOD WH SRLVWQp WOD LGOi QD RERFK stran ch sk r ako vyberiete bat riu a odpojte EDWpULX RG iNODGQH VSRWUHEL D 3UHYiG ND 9 G GRGU LDYDMWH...

Страница 67: ...u jednu tretinu svojej kapacity P H VS VREL WDN YDQ SDPl RY HIHNW 3UHWR H SR DV QDEtMDQLD VD WHUD QDEtMD OHQ Y ELWi DV NDSDFLW EDWpULH EDWpULD P H D D NU WDOL RYD Y MHGQHM WUHWLQH NWRUi MH st le nabit...

Страница 68: ...e izvajamo RGOL QH VWRULWYH D VWUDQNH NDU SRGSLUDPR raz irjeno 3 letno garancijo 8SDPR GD ERVWH YUVWR OHW X LYDOL SUL XSRUDEL WHJD izdelka tevilke v besedilu ustrezajo diagramom na straneh 2 3 Pred up...

Страница 69: ...o stikalo 9DUQRVWQD QDYRGLOD Informacije o izdelku 2 QD XMH QHYDUQRVW SR NRGE VPUWL DOL PDWHULDOQLK NRG QD QDSUDYL LQ SUHGPHWLK DUDGL QHXSR WHYDQMD QDYRGLO NL VR DMHWD Y WHP SULUR QLNX 2 QD XMH QHYDUQ...

Страница 70: ...umulatorske baterije ne izpostavljajte YRGL R GH MX 3ULOR HQR DNXPXODWRUVNR EDWHULMR uporabljajte le v kombinaciji s tem DNXPXODWRUVNLP YUWDOQLNRP YLMD QLNRP LQ WDNR SUHSUH LWH QDSDNH LQ DOL GUXJD QR...

Страница 71: ...FLIUDPL RG GR LQ SLNR PHG GYHPD FLIUDPD NL R QD XMH vmesno pozicijo skupaj torej 16 3R PR QRVWL L EHULWH QDMQL MR SR LFLMR QDYRUD ki spodbudi premikanje vijaka Vi jo pozicijo QDYRUD QDVWDYLWH H PRWRU...

Страница 72: ...olov se zamenja postane in postane Ko pride do tak ne zamenjave polarnost ostane zamenjana tudi med polnjenjem in sledi neodpravljiva napaka akumulatorske baterije Akumulatorsko baterijo po vsakem GDO...

Страница 73: ...DNXPXODWRUD K DV DGRZDQLD JRG LQ Maks moment obrotowy 10 Nm 3U GNR REURWRZD EH REFL HQLD PLQ Uchwyt wiertarski 0 8 10 mm L DU ZUD DNXPXODWRUHP NJ SD J R QR V OLILHUNL G ZD J R QR V OLI SU SUDF 85 3 dB...

Страница 74: ...centa w przeciwnym wypadku istnieje QLHEH SLHF H VWZR Z SDGNX KURQL DGRZDUN DNXPXODWRU RUD QDU G LD HOHNWU F QH SU HG ZLOJRFL MDN QS GHV F OXE QLHJ 3U HG X FLHP DGRZDUNL DZV H VSUDZG D SRSUDZQH SRG F...

Страница 75: ...PLDQD NDEOL ZW F HN 8VXZD VWDUH NDEOH OXE ZW F NL EH SR UHGQLR SR Z PLDQLH QD QRZH 3RG F DQLH OX QHJR NDEOD wtyczki do gniazda jest niebezpieczne FL JQ DNXPXODWRU G QDU G LH HOHNWU F QH QLH MHVW X ZDQ...

Страница 76: ...QD DQLHF V F RQ P SRG R X VWNL S X PRJ GRVWD VL GR PHFKDQL PX DGRZDQLH DNXPXODWRUyZ NXPXODWRU QDMGXM F VL Z HVWDZLH QLH MHVW QD DGRZDQ 8U G HQLH GR DGRZDQLD DNXPXODWRUyZ SRZLQQR E X ZDQH MHG QLH Z WH...

Страница 77: ...RQVHUZDFML L UHJXODUQHJR F V F HQLD V F HQLH 8U G HQLH QDOH F FLF UHJXODUQLH PL NN V PDWN QDMOHSLHM ND GRUD RZR SR X FLX 1DOH ZUyFL XZDJ E XVXQ S L zabrudzenia z otworu wentylacyjnego 3RZD QLHMV H DEU...

Страница 78: ...alo 1 18 1 5 m s2 9LEUDFLMRV O JLV Vibracijos sklaidos lygis nurodytas ant io LQVWUXNFLM YDGRYR X SDNDOLQLR YLU HOLR L PDWXRWDV SDJDO VWDQGDUWH 1 L G VW WXV VWDQGDUWL XRWR EDQG PR UHLNDODYLPXV L YHUW...

Страница 79: ...roviklis nukrito ar buvo kitaip sutrenktas SULH Y O M QDXGRMDQW WLHN MDV WXU W SDWLNULQWL DU NURYLNOLV QHEXYR SD HLVWDV 3D HLVWDV detales reikia sutaisyti WVDUJLDL QH NLWH DNXPXOLDWRUL NDG QHL PHVWXP...

Страница 80: ...DL UD VDXVL LU YDU V VLWLNLQNLWH NDG VXNLPRVL NU SWLHV QXVWD W PR MXQJLNOLV 3DY UD QXVWDW WDV SHU YLGXU NDG SULHWDLVDV QHWLN WDL QH VLMXQJW VWDW NLWH DNXPXOLDWRUL SULHWDLVR SDJULQG NDLS SDURG WD SDYHL...

Страница 81: ...QJL NUDXQDPD WLN L VLNURYXVL DNXPXOLDWRULDXV GDOLV MDX NUDX WDPH WUH GDO MH JDOL SUDVLG WL NULVWDOL DFLMD 7D akumuliatoriaus dalis daugiau nebus naudojama 1HL NUDXNLWH DNXPXOLDWRULDXV LNL JDOR NUDX NL...

Страница 82: ...LVV NDV LHWLOSVW P VX GDXG SXV JDM JDUDQWLM 0 V FHUDP ND R L VWU G MXPX DU SULHNX OLHWRVLHW gadiem ilgi 7XUSP N WHNVW GRWLH FLSDUL DWWLHFDV X DWW OLHP 33 3LUPV LHU FHV OLHWR DQDV U S JL L ODVLHW HNVSO...

Страница 83: ...WR DQD SDP F E WLHN L PDQWRWL GL simboli QVWUXPHQWD VDERM DQ V XQ YDL WUDXPX J DQDV Q YHV LHVW DQ V ULVNV V LQVWUXNFLMDV QRU G MXPX QHLHY UR DQDV JDG MXP 1RU GD HOHNWULVN V VWU YDV WULHFLHQD GUDXGX E...

Страница 84: ...QRW QHN GXV YDGXV 1HSLH DXW ND X DNXPXODWRUD VSDLO P QRN VW MHEN GL PHW OD SULHN PHWL QDJODV PRQ WDV VDVSUDXGHV 1HSDN DXW DNXPXODWRUD OLHWXV XQ PLWUXPD LHGDUE EDL DL L YDLU WRV QR ERM MXPLHP XQ QHWLNW...

Страница 85: ...L LU DW P WL X JUHG HQYHLGD UHJXO W MD FLSDUX YHLG QR YLHQV O G DVWR L EHW VWDUSOLHOXPL SXQNWL X YHLG VWDUS FLSDULHP SDYLVDP VW YRN L 9LVODE N LHVWDW W PLQLP OR VS ND OLHOXPX HOHNWURPRWRUD EXNV DQDV J...

Страница 86: ...ODWRUD ERM MXPXV NXUX G DNXPXODWRUV YDLUV QHE V izmantojums Ja bezvadu urbis netiek izmantots LOJ NX ODLNX YLVSLUPV LU SLOQ E M X O G DNXPXODWRUV NXPXODWRUV LU M X JODE X O G WV 6HUYLVD XQ WHKQLVN DSN...

Страница 87: ...li puurimisel 1 18 1 5 m s2 Vibratsioonitase K esoleva juhendi tagakaanel nimetatud tekkiva vibratsiooni tase on m detud vastavalt standardis EN 60745 kirjeldatud standarditud testile seda v ib kasuta...

Страница 88: ...utamist Vigastatud osad tuleks lasta parandada 8 Olge ettevaatlik k sitledes akut ning rge laske sellel maha kukkuda ega muud moodi kokkup rgata 9 rge kunagi proovige akut ega laadijat ise parandadaRe...

Страница 89: ...st ja eraldage aku aparaadi p hjast DXVXWDPLQH J rgige alati ohutusn udeid ja asjasse puutuvaid ohutuskoode Hoidke aparaati kindlalt ja vajutage puur kindlalt t pinnale rge aparaati lekoormake Kasutag...

Страница 90: ...rge t hjendage akut minimaalse v imalikuni Kohe kui m rkate et j udlus v i maksimaalsete p rete kiirus hakkab kahanema peate vahetama akut Kui te j tkate drelli kasutamist ja aku t hjeneb l puni v ib...

Страница 91: ...WXO XUP WRU VH UHIHU OD schema de la paginile 2 3 QDLQWH GH D XWLOL D LQVWUXPHQWXO FLWL L FX DWHQ LH LQVWUXF LXQLOH GH XWLOL DUH GH ID DPLOLDUL D L Y FX IXQF LXQLOH L RSHUDUHD JHQHUDOH 2SHUD L FX ins...

Страница 92: ...QWHORU GH SHUVRDQH SHULFOLW ULL D YLH LL L HYHQWXDOHL GHWHULRU UL D instrumentului n cazul c nd nu ar fi respec WDWH LQVWUXF LXQLOH GLQ PDQXDOXO DFHVWD QGLF ULVF GH RF HOHFWULF 1XP UXO WXUD LLORU SRDW...

Страница 93: ...OD SORDLH 8WLOL D L QXPDL EORFXO GH EDWHULL OLYUDW vQ FRPELQD LH FX DFHDVW PD LQD HOHFWULF GH J XULW vQ XUXEDW FX EDWHULL SHQWUX FD V SUHYHQL L GHIHFW UL L VDX eventual riscuri personale ORFXO GH EDW...

Страница 94: ...FkQG FXSOXO PRWRU DOXQHF VHOHFWD L R SR L LH GH PDL VXV 6WUkQJHUHD L VO ELUHD XUXEXULORU 3HQWUX VWUkQJHUHD XUXEXULORU UHJOD L FRPXWDWRUXO GH URWLUH VWkQJ GUHDSW vQ SR L LD 3HQWUX VO ELUHD XUXEXULORU U...

Страница 95: ...IRORVLW R SHULRDG PDL OXQJ GH WLPS vQWkL WUHEXLH EDWHULD vQF UFDW FRPSOHW DWHULD WUHEXLH GHSR LWDW vQ VWDUH vQF UFDW 6HUYLFH vQWUH LQHUH DFH L Y VLJXUL F DSDUDWXO QX HVWH FXSODW FX VXUV GH HQHUJLH vQ...

Страница 96: ...X XMX L EDWHULMX NJ SD YX QL WODN G ZD YX QD VQDJD G Vibracije 1 18 1 5 m s2 Razina vibracija 5D LQD HPLWLUDQMD YLEUDFLMD QDYHGHQD QD SROH LQL ovog naputka za uporabu izmjerena je sukladno normiranom...

Страница 97: ...o SULNOMX HQL SULMH NRUL WHQMD SXQMD D NR RWNULMHWH R WH HQMH QD NDEHOX QHPRMWH YL H NRULVWLWL SXQMD 2GPDK DPLMHQLWH NDEHO DGD QH NRULVWLWH SXQMD LVNOMX LWH JD L JODYQRJ QDSRQD 1H LVNOMX XMWH SXQMD L...

Страница 98: ...pajanje i uklanjanje baterije Fig C 2VLJXUDMWH GD MH YDQMVND SRYU LQD EDWHULMH L DODWD LVWD L VXKD SULMH VSDMDQMD SXQMD D XGLWH VLJXUQL GD MH SUHNLGD D SURPMHQX smjera 5 Fig A u centralnoj poziciji ta...

Страница 99: ...SDG VQDJH DODWD LOL GD DODW QH GRVWL H PDNVLPDOQX EU LQX URWDFLMH Baterija je gotovo u potpunosti prazna Tek VDGD PR HWH SRQRYQR SR HWL SXQLWL EDWHULMX Punjenje baterije dok je jo napunjena recimo MH...

Страница 100: ...L HWH HPDWVNL SULND GLMHORYD NRML VH PRJX QDUX LWL D WLWD RNROL D D VH L EMHJQH R WH HQMH SULOLNRP WUDQVSRUWD XUH DM VH LVSRUX XMH X YUVWRP SDNLUDQMX napravljenom uglavnom od recikliranog materijala S...

Страница 101: ...RU 101 SD ZD S S 2 1 2 40 C 1L G...

Страница 102: ...RU 102...

Страница 103: ...RU 103...

Страница 104: ...RU 104 5 2...

Страница 105: ...RU 105...

Страница 106: ...UK 106 2 HUP HUP SD ZD 2 1...

Страница 107: ...UK 107 40 C 1L G...

Страница 108: ...UK 108...

Страница 109: ...UK 109 5 L L L L 40 C L L L L L L L L L L L L L L L L...

Страница 110: ...UK 110 L L L L L L L...

Страница 111: ...EL 111 HUP HUP 2 t t t y t t t t t t y 2 t y y t t t 2 t 1 T 18 V 230 V 50 Hz 1 0 Ah 3 5 10 Nm 0 550 0 8 10 mm 1 579kg Lpa 74 3 dB A Lwa 85 3 dB A...

Страница 112: ...EL 112 1 18 1 5 m s2 R R R R R R R R R R 1 R R R R R R R R R R R R R R R R R R R R R R R R R R R R R R R R R R R R R R R 1 2 1 1 1 1 U 1 1 2 3 4 5 2 40 C 130 C Ni Cd...

Страница 113: ...EL 113 1 2 3 4 5 6 7 8 9 10 11 5 C 40 C 12 13 14 15 H II...

Страница 114: ...EL 114 3 3 9 o C 5 A 4 10 4 D 16 2 1 5 16 5 L_ R_ 2 5 L_ A 1 1 5...

Страница 115: ...EL 115 5 40 C E 5 3 5 5...

Страница 116: ...BG 116 o NiCd HUP 3 9 a...

Страница 117: ...BG 117 PLQ NJ SD G ZD G 1 1L G...

Страница 118: ...BG 118...

Страница 119: ...BG 119...

Страница 120: ...BG 120 5...

Страница 121: ...BG 121...

Страница 122: ...122...

Страница 123: ...123...

Страница 124: ...124...

Страница 125: ...125...

Страница 126: ...ar at dette produkt er i overensstemmelse med f lgende standarder og bestemmelser er i overensstemmelse med direktiv 2011 65 EU fra Europa Parlamentet og R det af 8 juni 2011 om begr nsning af anvende...

Страница 127: ...LRQ CDA1074 Battery 18V 1 0Ah 405785 Switch set 4 6 14 405786 Charger base 43 405787 Charger adaptor 44 405788 Drill Chuck 0 8 10mm 39 405789 Chuck screw M5x22 left 40 405790 Gear box assembled 17 til...

Страница 128: ...128 Exploded view...

Страница 129: ......

Страница 130: ...2013 Ferm B V 1309 18...

Отзывы: