


24
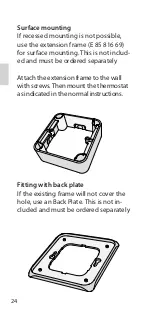
Surface mounting
If recessed mounting is not possible,
use the extension frame (E 85 816 69)
for surface mounting. This is not includ-
ed and must be ordered separately
Attach the extension frame to the wall
with screws. Then mount the thermostat
as indicated in the normal instructions.
Fitting with back plate
If the existing frame will not cover the
hole, use an Back Plate. This is not in-
cluded and must be ordered separately
Содержание Therm 105
Страница 1: ...N VOD K POU IT MANUAL HANDBUCH BRUKSANVISNING CZ EN DE NO RU Fenix Therm 105...
Страница 2: ......
Страница 3: ...CZ English Deutsch 2 18 34 50 66 EN NO DE RU Czech Norwegian...
Страница 5: ...CZ 3 4 5 6 9 15 16 Fenix Therm 105 Obsah balen Instalace Za n me e en probl m Technick daje...
Страница 68: ...66 www fenixgroup cz...
Страница 69: ...67 RU 68 69 70 74 79 80...
Страница 70: ...68 0 3...
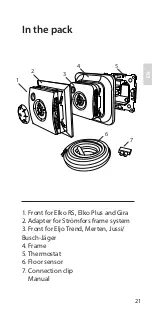
Страница 71: ...69 RU 1 1 Elko RS Elko Plus Gira 2 Str mfors 3 Eljo Trend Merten Jussi Busch J ger 4 5 6 7 2 3 4 5 6 7...
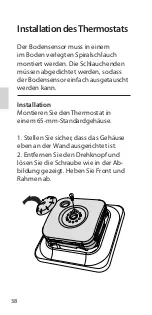
Страница 72: ...70 Fenix Therm Fenix Therm 65 1 2...
Страница 73: ...71 RU 3 230 4 5 Fenix Therm 6 7 LOAD LOAD N L SENSOR SENSOR DO NOT USE 230 V...
Страница 74: ...72 E 85 816 69 Fenix Therm 105 Back Fenix Therm 105...
Страница 75: ...73 RU 2 4...
Страница 76: ...74...
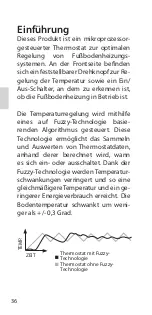
Страница 77: ...75 RU F R R F 25 C 45 C 35 C...
Страница 78: ...76 F R R F...
Страница 79: ...77 RU 10 C 45 C 2 3...
Страница 80: ...78 30...
Страница 81: ...79 RU 10o C 18 0 15o C 14 7 20o C 12 1 25o C 10 0 30o C 8 3...
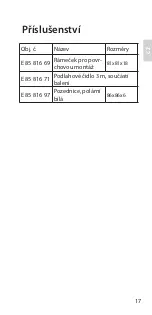
Страница 83: ...81 RU E 85 816 69 81x81x18 E 85 816 71 3 E 85 816 97 86x86x6...


