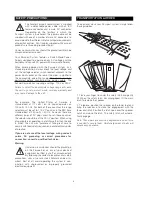
5
CHANNNELS 1 - 4
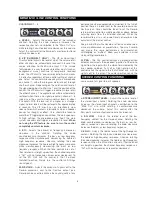
J. LEVEL
– Adjusts the volume level of the individual
channel. Rotating the knob clockwise increases the
respective channel’s contribution to the “Main Out” mix,
while rotating it counterclockwise decreases the volume.
Adjust this control after the Passport’s master output level
volume has been set.
K. VIP (CHANNEL 1 ONLY)
– The VIP or Vocal Input
Priority control adjusts the level at which the volume of all
other channels are automatically reduced in favor of the
source attached to the Mic/Line Input 1. This unique
feature permits a user to speak while other inputs (such as
background music) continue at temporarily reduced
levels. The VIP circuit is “pre-volume control” which means
it is effective regardless of level control setting of channel
one. Adjust this control while speaking into a microphone
on channel 1, with other program material input through
another channel. Depending on the duration and level of
the signal being input to Mic/Line 1 and the position of the
control, the VIP circuit will trigger a reduction in level of all
the other channels. The original levels will be automatically
restored when there is no signal present on channel 1. In
typical use, the circuit will return normal levels in about
4 seconds. With the level set at a higher or a stronger
signal, normal levels will be restored after approximately
6 seconds. The VIP circuit has an intentionally slow
release time which prevents interruptions when a speaker
pauses for thought or effect. Care should be taken to
avoid the VIP triggering on sound from the main speakers.
At high settings, the microphone may “hear” the main
system speakers and trigger a reduction in level.
When
not using the VIP feature, be sure to turn the control
completely counterclockwise.
L. EQ
– Adjusts the amount of frequency increase or
decrease in the channel. Rotating the knob
counterclockwise increases the bass or low frequency
response while simultaneously decreasing the treble or
high frequency response. Likewise, rotating the knob
clockwise increases the treble or high frequency response
while simultaneously decreasing the bass or low
frequency response. When the tone controls are set at
their notched or straight up position, the channel response
is “flat” with no frequencies increased or decreased. To
set the EQ, start with this control in the 12 o’clock
(notched) position. Simply turn the control until things
sound good!
M. REV/AUX
– Adjusts the amount of signal sent to the
Reverb processor, and to the Rev/Aux output jack.
Reverb can be used to enhance the sound quality of any
performance where appropriate and desired. In the full left
position there is no level sent to the reverb processor or
Rev/Aux jack. Care should be taken to set the Reverb
return master control to a middle position or above, before
adjusting levels from the individual channels. When the
reverb/auxiliary mix is set, overall levels of reverb can be
adjusted at the master control.
Keep in mind that while Reverb or effects can enhance a
musical performance or presentation. Too much reverb
can make the same performance or presentation
unintelligible or “muffled”. Keep your audience in mind
when setting reverb levels.
N. PAN
– The Pan control features a notched position
indicator and adjusts the perceived “position” of the mono
signal from the input within the stereo field created by the
two speaker cabinets. Full Left or Right rotation of this
control sends the signal to the that channel only, with no
signal sent to the other. The center position sends the
same amount of signal to both speakers.
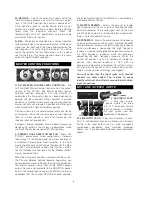
J. STEREO INPUT LEVEL
– Adjusts the volume level of
the stereo input channel. Rotating the knob clockwise
increases the stereo input channel’s contribution to the
“Main Out” mix, while rotating it counterclockwise
decreases the volume. Adjust this control after the
Passport’s master output level volume has been set.
L. EQ LOW
– Adjusts the relative level of the low
frequency content for the stereo channel. Rotating the
knob counterclockwise decreases the bass or low fre-
quency response. Likewise, rotating the knob clockwise
increases the bass or low frequency response.
L. EQ HI
– Adjusts the relative level of the high frequency
content. Rotating the knob counterclockwise decreases
the treble or high frequency response. Likewise, rotating
the knob clockwise increases the treble or high frequency
response. When the EQ controls are set at their notched
or straight up position, the channel frequency response is
“flat” with no frequencies increased or decreased.
MONO MIC / LINE CONTROL FUNCTIONS
STEREO CONTROL FUNCTIONS
Содержание Passport PD-250
Страница 8: ......


