background image

15

TOUCH WAH

WAH

COMPRESSOR

SIMPLE COMP

RANGER BOOST

back

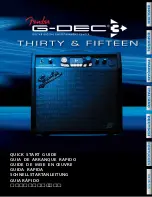
Select an effect by scrolling to it and pressing the ENCODER.

ROCK & ROLL

TWIN

REVERB

FUZZ

WAH

BABY

POST FX 1

The newly added effect, highlighted with a white arrow below it and label above it, appears in an green box 

indicating that it can be left in place or moved to a different position in the signal path by turning the ENCODER. 

ROCK & ROLL

TWIN

REVERB

FUZZ

WAH

PRE FX 2

BABY

After moving the newly added effect by turning the ENCODER, 

press the ENCODER to select its new position in the signal path. 

ROCK & ROLL

TWIN

REVERB

FUZZ

WAH

SAVE

POST FX 1

BABY

With the added effect in position (as indicated here by white arrow below it and label above it), continue edit-

ing other parameters or press the illuminated SAVE utility button to keep completed edits.

MODULATION

STOMPBOX

DELAY

REVERB

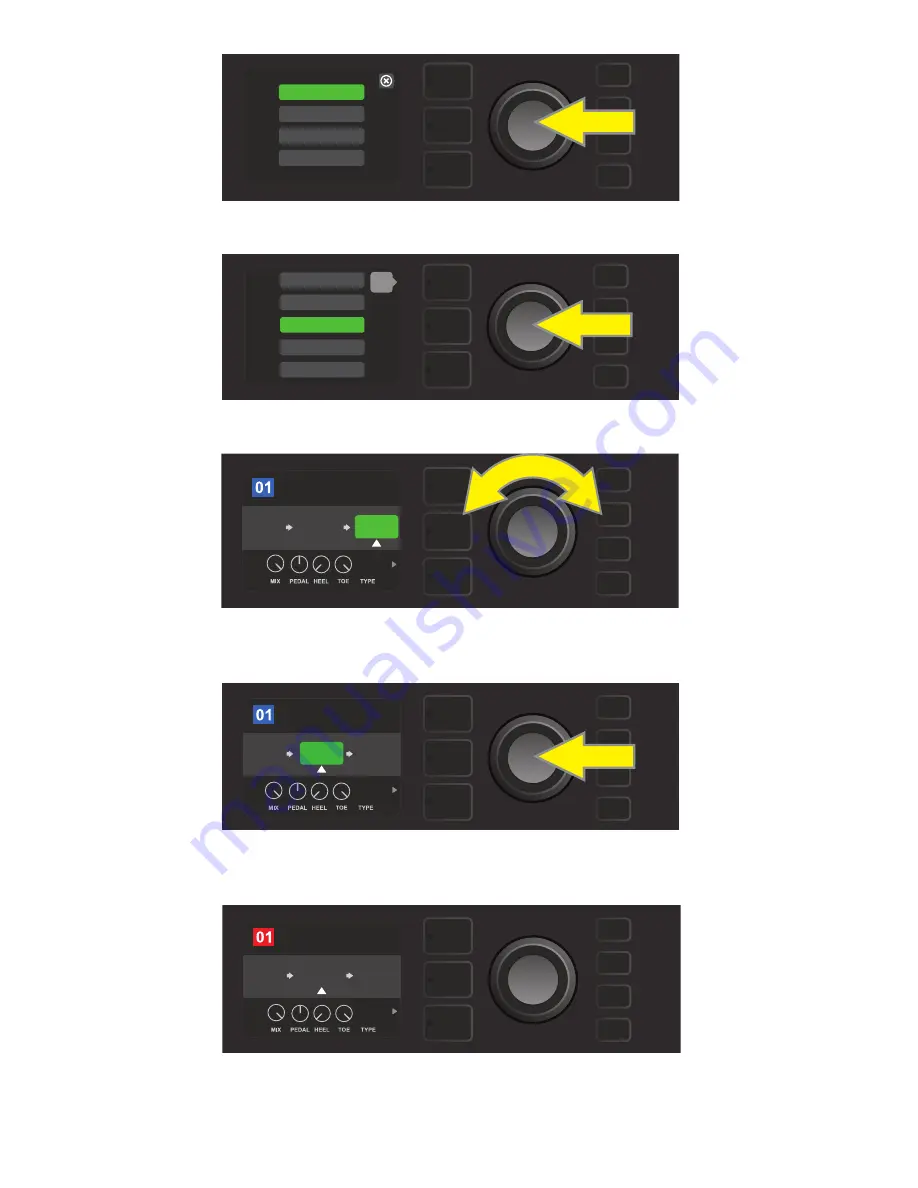
Select an effects category by scrolling to it and pressing the ENCODER.

Содержание Mustang GT100

Страница 1: ...MUSTANG GT40 MUSTANG GT100 MUSTANG GT200 EXPANDED OWNER S MANUAL REV A ...

Страница 2: ...cts 10 Editing Effects Settings 18 List of Effects Types 21 Menu Functions 25 Setlists 26 WiFi Use 28 Bluetooth Use 31 Built in Tuner 32 Auxiliary and Headphone Jacks 33 USB Connectivity 33 Line Out and FX Send Return 33 Footswitch Use MGT 4 Footswitch 34 Looper 38 EXP 1 Expression Pedal 41 Amp Settings 45 Global EQ 46 Cloud Presets 47 About This Amp 48 Firmware Updates and Factory Restore 49 Fend...

Страница 3: ... by step and fully illustrated instructions for using Mustang GT s Setlist WiFi Bluetooth USB onboard tuner EXP 1 Expression Pedal MGT 4 Footswitch and looping functions Mustang GT s tonal possibilities are virtually endless especially when paired with the Fender Tone app Be sure to check back regularly for firmware updates that improve and enhance the Mustang GT experience see page 49 While this ...

Страница 4: ...ontrol knob that affects reverb setting in each preset H MASTER VOLUME The only non programmable knob controls actual overall volume I DISPLAY WINDOW Shows preset in use and all its contents and parameters amplifier and effects menus and other functions i e tuner menu functions etc J LAYER BUTTONS PRESET LAYER Highlights preset layer where presets are chosen SIGNAL PATH LAYER Highlights signal pat...

Страница 5: ...r the original preset can be overridden with the adjusted control knob setting If the adjusted setting is not saved the preset will revert to its pre programmed control knob settings when returning to the preset after leaving it or when turning the amplifier off and back on again see further info under Editing and Saving Presets pages 5 6 TWIN REVERB REVERB FUZZ ROCK ROLL MASTER REVERB BASS MIDDLE...

Страница 6: ...eir order or no effects in some cases The amp model appears in the center of the SIGNAL PATH LAYER display Effects appear to either side of the amp model representing their position in the signal path pre to the left of the amp model placed before the amp or post to the right of the amp model as in an effects loop Select any of these items by turning the ENCODER the selected item in the SIGNAL PAT...

Страница 7: ...for personally individualized sounds see next section Editing and Saving Presets ROCK ROLL TWIN REVERB REVERB FUZZ AMPLIFIER Close up detail of the CONTROLS LAYER in which the gain control for the amp model within the preset is selected EDITING AND SAVING PRESETS Within each preset the amplifier control knob settings amp models and effects types and parameters can be tailored to individual prefere...

Страница 8: ... completed new name or press the top LAYER button corre sponding with onscreen prompt back to return to the previous screen Note that when choosing SAVE AS NEW the preset will be saved in the next available open position 101 in the illustration below SAVE SAVE RENAME SAVE AS NEW SAVE NEW PRESET NAME 101 back X EDITING PRESET AMPLIFIER CONTROL KNOB SETTINGS As noted in the Control Panel section abo...

Страница 9: ...rent speaker cabinet models are also included Scroll through select adjust and save these additional parameters in the same manner described directly above see illustrations below ROCK ROLL TWIN REVERB REVERB FUZZ AMPLIFIER ROCK ROLL TWIN REVERB REVERB FUZZ AMPLIFIER ROCK ROLL TWIN REVERB REVERB FUZZ AMPLIFIER Turn the ENCODER to scroll among amp model control knobs Press the ENCODER to select an ...

Страница 10: ...keep completed edits Note that pressing the PRESET LAYER button corresponding to the circled X in the DISPLAY WINDOW closes the amp menu ROCK ROLL REVERB FUZZ TWIN REVERB AMPLIFIER To replace preset amp model highlighted in the SIGNAL PATH LAYER as indicated here by the white arrow below it and the label amplifier above it with a different amp model first press ENCODER to access a menu of other am...

Страница 11: ...the Fender Deluxe this amp splits the difference between tweed and Blackface models 65 Princeton Mid 60s Fender studio favorite with the snappy tone of a single 10 speaker 65 Deluxe Reverb Highly popular mid 60s Fender with great tone whether clean or dirty cranked in countless clubs 65 Twin Reverb An indispensable mid 60s stage and studio favorite prized for producing the Fender clean tone Excels...

Страница 12: ... a placeholder symbol consisting of a plus sign in a circle appears at the right and left ends of the SIGNAL PATH LAYER see illustration below This symbol indicates an open slot into which an ef fect can be moved or added see Adding an Effect page 14 In many presets that include one or more effects the user must scroll to the far right or far left using the ENCODER in order to see this symbol ROCK...

Страница 13: ...that the effect has been bypassed the box containing the preset num ber will change from blue to red indicating that a preset edit has been made and the SAVE utility button will illuminate With the effect now bypassed further edits can then be made or the SAVE utility button can be pressed to keep completed edits see illustrations below ROCK ROLL TWIN REVERB REVERB FUZZ POST FX 1 LEVEL DECAY DWELL...

Страница 14: ...SAVE utility button can be pressed to keep completed edits see illustrations below and on next page Note that pressing the PRESET LAYER button corresponding to the circled X in the DISPLAY WINDOW closes the effects placement option and effects category menus pressing it when it corresponds to the label back as on the effects menu returns the user to the previous screen Turn the ENCODER to highligh...

Страница 15: ...edits can then be made or the SAVE utility button can be pressed to keep completed edits see illustrations below and on next page MOVING AN EFFECT ROCK ROLL TWIN REVERB REVERB FUZZ POST FX 1 To move a highlighted effect first press the ENCODER to access the menu of effects placement options 13 ADD FX BYPASS DELETE MOVE REPLACE Turn the ENCODER to highlight MOVE in effects placement options menu th...

Страница 16: ...lity button will illuminate With the effect now added further edits can then be made or the SAVE utility button can be pressed to keep completed edits see illustrations below and on next page Note that pressing the PRESET LAYER button corresponding to the circled X in the DISPLAY WINDOW closes the effects category and effect menus pressing it when it corresponds to the label back returns the user ...

Страница 17: ...gnal path by turning the ENCODER ROCK ROLL TWIN REVERB FUZZ WAH PRE FX 2 BABY After moving the newly added effect by turning the ENCODER press the ENCODER to select its new position in the signal path ROCK ROLL TWIN REVERB FUZZ WAH SAVE POST FX 1 BABY With the added effect in position as indicated here by white arrow below it and label above it continue edit ing other parameters or press the illum...

Страница 18: ...reset number will change from blue to red indicating that a preset edit has been made and the SAVE utility button will illuminate With the effect now added further ed its can then be made or the SAVE utility button can be pressed to keep completed edits see illustrations below and on next page 16 ROCK ROLL TWIN REVERB REVERB FUZZ POST FX 1 LEVEL DECAY DWELL DIFF TONE In another way to add an effec...

Страница 19: ...keep completed edits see illus trations below and on next page 17 ROCK ROLL TWIN REVERB FUZZ WAH PRE FX 2 BABY After moving the newly added effect by turning the ENCODER press the ENCODER to select its new position in the signal path ROCK ROLL TWIN REVERB FUZZ WAH SAVE POST FX 1 BABY With the added effect in position as indicated here by white arrow below it and label above it continue edit ing ot...

Страница 20: ...r will change from blue to red indicating that a preset edit has been made and the SAVE utility button will illumi nate With the effect now edited further effects control edits can then be made or the SAVE utility button can be pressed to keep completed preset edits see illustrations below and on next page 18 ROCK ROLL TWIN REVERB FUZZ SAVE AMPLIFIER The SIGNAL PATH LAYER will then show the effect...

Страница 21: ...EVERB POST FX 1 ROCK ROLL TWIN REVERB LEVEL FUZZ DECAY DWELL DIFF TONE REVERB POST FX 1 Turn the ENCODER to edit the selected effect control to preference ROCK ROLL FUZZ SAVE TWIN REVERB LEVEL DECAY DWELL DIFF TONE REVERB POST FX 1 Press the ENCODER to keep the edited effect control setting the effect control will return to blue ROCK ROLL FUZZ SAVE LEVEL DECAY DWELL DIFF TONE REVERB POST FX 1 TWIN...

Страница 22: ...y or modulation effect to be modified its controls will then appear in the CONTROLS LAYER Enter the CONTROLS LAYER by pressing its corresponding layer button and scroll to the time parameter to be changed using the ENCODER Press and turn the ENCODER to select and adjust the desired time value during which the window containing the time value will turn red press the ENCODER again to keep the new ti...

Страница 23: ...er Boost Distortion effect inspired by the 60s era Dallas Rangemaster Treble Booster Overdrive Versatile Fender overdrive specially designed for Mustang GT Greenbox Overdrive effect inspired by the original late 70s Ibanez TS808 Tube Screamer Blackbox Distortion effect inspired by the Pro Co RAT Yellowbox Distortion effect inspired by the 70s era MXR Distortion Plus Orangebox Distortion effect ins...

Страница 24: ...ly choppy modulation effect that dices notes into distinctly alternating steps Phaser Long indispensable jetliner whoosh heard on countless recordings Phaser 90 Phase shifter effect inspired by the classic 70s MXR Phase 90 Pitch Shifter Simple pitch shifter that adds another note above or below the dry signal pitch Diatonic Pitch Pitch shifter that produces a chosen musical interval to create harm...

Страница 25: ...ying and fill in gaps when not playing 23 REVERB EFFECTS Small Hall Simulates the kind of bright reverb often heard in for example a hall the size of a movie theater Large Hall Strong bright reverb simulating the size of for example a major performance hall and other large cavernous spaces Small Room Warmer less echo y reverb typical of smaller spaces and classic echo chambers Large Room Warm soun...

Страница 26: ...notably smaller spaces even smaller than Small Room reverb above Shimmer Sonically radiant combination of reverb and two octave pitch shift GA 15 Reverb Based on the 60s era Gibson GA 15 amp reverb unique in its ability to go full wet no dry signal REVERB EFFECTS CONTINUED All non FMIC product names and trademarks appearing in this manual are the property of their respective owners and are used so...

Страница 27: ...ork and adding a password see pages 28 30 BLUETOOTH For accessing and using Mustang GT s Bluetooth functionality see page 31 TUNER Enables use of Mustang GT s built in chromatic tuner see page 32 QUICK ACCESS Enables selection of three presets using the MGT 4 footswitch in Quick Access QA mode see page 35 36 EXP 1 SETUP Enables configuration of EXP 1 Expression Pedal globally and for specific pres...

Страница 28: ...t press the MENU utility button and use the ENCODER to scroll to and select SETLISTS A green plus sign box will appear press the ENCODER on it to create a new Setlist A blue box labeled SETLIST 1 will appear press the ENCODER on SETLIST 1 to begin adding presets to it The green plus sign box will then reappear press the ENCODER on it to see a list of presets to select from Use the ENCODER to scrol...

Страница 29: ...st use the ENCODER to scroll to the Setlist to be cleared then press the CON TROLS LAYER button corresponding with the gear icon CLEAR SETLIST will appear in a blue box press the ENCODER on it to clear all the presets in that Setlist Al ternately press the top LAYER button corresponding to back in the DISPLAY WINDOW to not clear a Setlist To delete a single preset within a Setlist highlight the pr...

Страница 30: ...own network is not displayed it can be entered manually by selecting the ADD HIDDEN NETWORK option at the end of the list of available networks and using the ENCODER to enter the characters as shown on page 6 Once a network is chosen select CON NECT from the menu shown by pressing the ENCODER on it other options in this menu are covered on page 30 After choosing CONNECT the amp will then prompt th...

Страница 31: ... 2 back When WiFi is on as labeled in green box use the ENCODER to scroll through available networks select a network by pressing the ENCODER on it MENU ADD HIDDEN NETWORK NETWORK 3 NETWORK 2 NETWORK 1 back A network can be accessed manually by scrolling to and selecting ADD HIDDEN NETWORK and entering characters by turning and pressing the ENCODER MENU CONNECT FORGET INFO MODIFY back After choosi...

Страница 32: ... s memory To re establish a connection with a forgotten network follow the steps for ADD HIDDEN NETWORK page 29 MODIFY For modifications to the current network s displayed SSID PROTOCOL and PASSWORD param ters Use the ENCODER to scroll to and select one of these parameters then turn and press the ENCODER to enter individual characters until modifications are complete INFO Displays the current netw...

Страница 33: ... gear icon in the DISPLAY WINDOW and using the ENCODER to enter each character in a new name as shown on page 6 Pressing the PRESET LAYER button enables closing out of a menu indicated by an x in a circle or returning to the previous step indicated by the label back Note that the volume level of the external device is set using the external device s own volume control and that Bluetooth audio stre...

Страница 34: ...rations below Note that tuner use mutes speaker output The MGT 4 Footswitch also has a tuning function see page 40 MENU TUNER GLOBAL EQ USER SETLISTS BLUETOOTH TAP To access the tuner press the MENU utility button yellow arrow for a list of op tions including the tuner or press and hold the TAP utility button green arrow MENU TUNER GLOBAL EQ USER SETLISTS BLUETOOTH Select TUNER from the list by tu...

Страница 35: ...s based computer the user must download the ASIO driver setup with Fender Mustang device available at www fender com support articles fender universal asio drive Note that USB audio and Bluetooth audio streaming page 31 can not be used simultaneously LINE OUT AND FX SEND RETURN Mustang GT amplifiers feature rear panel balanced line output jacks right and left for connection to exter nal recording ...

Страница 36: ...uttons Four MODE LEDs are at far left one directly above the MODE button and three below and left of it with three other FUNCTION LEDs along the top one above each FUNCTION button and one more FUNCTION LED in the center just below the DISPLAY WINDOW A MODE BUTTON Used to select among four modes QUICK ACCESS QA PRESETS EFFECTS and LOOPER B FUNCTION BUTTONS These three numbered buttons enable foot c...

Страница 37: ...of presets shown and press the ENCODER on the desired preset for that QUICK ACCESS slot Repeat these steps to fill the other two slots Once three presets are assigned in QUICK ACCESS mode they are accessible using the MGT 4 footswitch Step on the MODE button until QA MODE is activated as indicated by the illuminated red MODE LED at upper far left The three QUICK ACCESS presets are now assigned to ...

Страница 38: ...ED will illuminate and the DISPLAY WINDOW will show the preset in use see illustrations on following page Note that when activating PRESETS mode the MGT 4 Footswitch will automatically set itself to whatever MUSTANG GT preset is already set on the amp This preset will be assigned to the footswitch FUNCTION button corre sponding to the preset s position within its bank 1 2 or 3 For example if the a...

Страница 39: ...S MODE LED illuminates A bank of three presets containing whichever preset is already set on the amp is assigned to FUNCTION buttons 1 2 and 3 yellow arrows each with its own red FUNCTION LED to indicate use The DISPLAY WINDOW also shows the preset in use preset 1 in this illustration In PRESETS mode move upward through succeeding banks of presets BANK UP by stepping on FUNCTION buttons 2 and 3 si...

Страница 40: ...ds see illustration below When finished playing the first musical passage stop recording and automatically begin playback of the first passage by stepping on FUNCTION button 2 yellow arrow in illustration below labeled PLAY STOP The red FUNCTION LED above FUNCTION button 1 will stop flashing the red FUNCTION LED above FUNCTION button 2 will illuminate and the DISPLAY WINDOW will indicate playback ...

Страница 41: ...n illustration below to start and stop playback of all recorded parts see illustration below While recording playing back or stopped on the first musical passage the user can undo the recording if desired by stepping on FUNCTION button 3 yellow arrow in illustration below labeled UNDO When doing so recording will stop and the DISPLAY WINDOW will show three dashes indicating that whatever had been ...

Страница 42: ...3 UNDO BANK DOWN QA MODE HOLD TUNER BANK UP MGT 4 ASSY P N 7710238000 To activate the MGT 4 Footswitch tuning function step on and briefly hold FUNCTION button 3 yellow arrow In the example shown here an A note is displayed as being particularly flat as indicated by the red FUNCTION LED at upper far left green arrow 1 FX 1 REC DUB PRESETS EFFECTS LOOPER 2 FX 2 PLAY STOP 3 FX 3 UNDO BANK DOWN QA MO...

Страница 43: ...SETTINGS is used to assign the EXP 1 to a specific amp or effect within a particular preset in which a wide variety of parameters can be modified depending on the amp or preset in use GLOBAL SETTINGS is used to configure parameters that will affect all presets Both are described in more detail below PRESET SETTINGS As noted above PRESET SETTINGS is used to assign the EXP 1 to a specific amp or eff...

Страница 44: ...rameter adjustment is complete press the SAVE utility button to keep parameter changes see illustration below 42 MENU EXP 1 PRESET OFF LEVEL EXP PARAM HEEL TOE GREEN BOX VOLUME back VOLUME To assign the EXP 1 to a specific effect within a preset press the CONTROLS LAYER button yellow arrow to access items including the parameter settings PARAM for the effect In the example shown here the EXP 1 wil...

Страница 45: ...ON the configured parameter is restored to the value stored in the preset when switching from Expression mode to Volume mode using the toe switch DEFAULT MODE Configures initial EXP 1 mode Volume or Expression for the preset in use DEFAULT MODE is overridden when the GLOBAL SETTINGS function MODE SOURCE is set to PEDAL see GLOBAL SET TINGS on following page 43 MENU EXP 1 PRESET OFF GAIN EXP PARAM ...

Страница 46: ...essing the ENCODER AGAIN after which the label box will return to blue with the current selection in place HEEL VOLUME and TOE VOLUME are used together to set a volume range covered by the pedal the default range of which is set at 1 10 with the heel all the way down being 1 no volume and the toe all the way down being 10 full volume This range can be adjusted to preference by using the HEEL VOLUM...

Страница 47: ...elow The RESTORE ALL function is also accessible as a start up option detailed in the Factory Restore and Firm ware Updates section see page 50 Note that pressing the PRESET LAYER button corresponding to the circled X in the DISPLAY WINDOW en ables closing out of each menu 45 MENU WIFI USER EXP 1 AMP SETTINGS ABOUT THIS AMP To access the Amp Settings function first press the MENU utility button Us...

Страница 48: ...ility button and using the ENCODER to scroll to and select GLOBAL EQ Scroll to and select any of the four options presented FLAT EQ a good default choice that actually provides no additional equalization BRIGHT BOOST EQ for accentuating the top end BRIGHT CUT EQ for de accentuating top end or LOW CUT EQ for trimming bass response see illustrations below MENU TUNER GLOBAL EQ EXP 1 SETUP AMP SETTING...

Страница 49: ... obtains online by going to tone fender com and clicking on Set Up Amp see illustration below The code only needs to be entered once the user remains logged in once the code is en tered Use the ENCODER to enter each code character as shown on page 6 Once logged in use the ENCODER to browse cloud preset categories see illustration below Once a cloud preset category is selected by pressing the ENCOD...

Страница 50: ...ote that if the user scrolls to the next or previous preset while on a cloud preset the cloud preset will disappear since it is not saved to amp see illustration below 48 MENU SAVE FENDER PRESETS BRITISH STEEL MEANER STREETS SCO S FIELD BASIC TREMOLO BRITISH INVASION 80 s BRITISH LARGE PLATE MSTR OVER DRIVE BRITISH STEEL MENU SAVE ABOUT THIS AMP About This Amp is a MENU utility button function see...

Страница 51: ...ning the amplifier on The DISPLAY WINDOW will then indicate that Mustang GT is searching for the latest firmware update fol lowed by indication that the firware update is downloading see illustrations below When the download is complete the DISPLAY WINDOW will then indicate that Mustang GT is applying the firmware update followed by indication that the firware update is complete and the amp should...

Страница 52: ...tton function see page 45 WIFI UPDATE RESTORE ALL To combine a firmware update and the start up option directly above RESTORE ALL simultaneously press and hold the ENCODER and the PRESET LAYER button for five seconds while turn ing the amplifier on blue arrow in illustration below FORCE UPDATE To update Mustang GT if there is a problem with the previously described firmware update process a Force ...

Страница 53: ...n Creation and sharing of new presets Preset signal path editing re ordering additions and deletions Amp and effects model parameter adjustments Browse search and download official Fender presets artist signature presets player presets genre pre sets and more Tone tips for signal path basics amp models effects types and more Creation selection and management of Setlists personalized preset groupin...

Страница 54: ...ptional PN 2301050000 FITTED AMP COVER Optional PN 7711780000 DIMENSIONS AND WEIGHT Width 20 5 52 1 cm Height 17 5 44 5 cm Depth 10 25 4 cm Weight 22 lbs 9 97 kg PART NUMBERS 2310200000 120V US 2310205000 220V ARG 2310208000 220 CN 2310201000 110V TW 2310206000 230V EU 2310209000 220V ROK 2310203000 240V AU 2310207000 100V JP 2310213000 240V MA 2310204000 230V UK Mustang GT200 TYPE PR 4400 POWER R...

Страница 55: ...nder and Mustang are trademarks of FMIC Other trademarks are property of their respective owners Copyright 2017 FMIC All rights reserved PN 7712493000 rev a 部件名称 本表格依据 SJ T 11364 的规定编制 O 表示该有毒有害物质在该部件所有均质材料中的含量均在 GB T 26572 规定的限量要求以下 X 表示该有毒有害物质至少在该部件的某一均质材料中的含量超出 GB T 26572 规定的限量要求 注 含有有害物质的部件由于全球技术发展水平限制而无法实现有害物质的替代 产品含有喇叭单元时有效 箱体 喇叭单元 电子部分 接线端子 电线 附件 有害物质 产品中有害物质的名称及含量 铅 Pb O O X X X O O O O O ...

Отзывы: