background image


3.


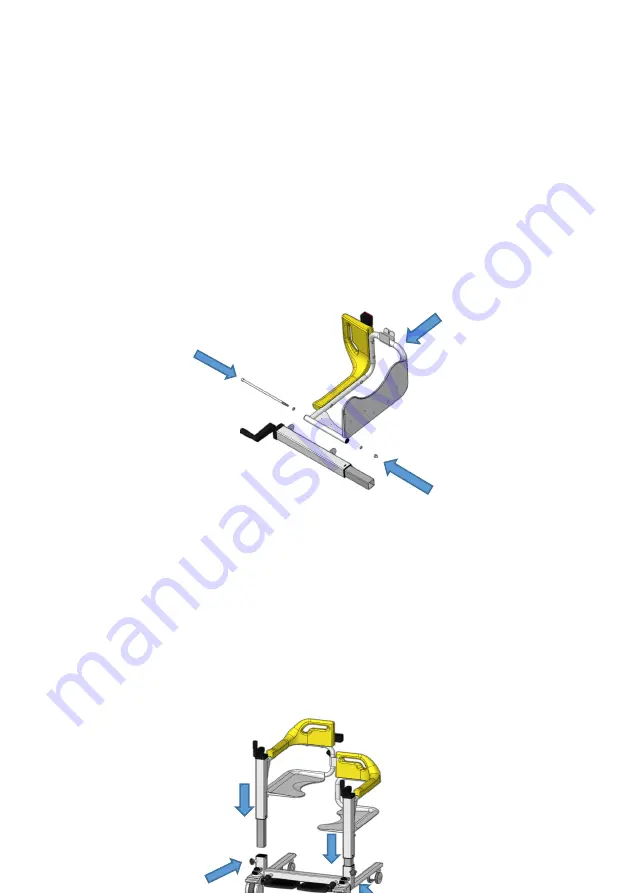
The right seat frame cooperates with the upright post, put the 

M8 screw and the flat meson through the upright post, insert the 
flat meson and fix it with M8 cap nut, so that the seat frame is not 
loose and can rotate flexibly, as shown below: (left seat Rack in 
the same way) 


4.


Insert the left and right seat frames on both sides of the base, 

ensure that the small square tube of the column is inserted to the 
end,  and  fix  it  with  the  M8  five-star  knob,  as  shown  in  the 
following figure: 


more than the 140mm 

Содержание FMC022

Страница 1: ...User manual of multifunctional transferred wheelchair Model FMC022 version number V0 Revised in June 2020...

Страница 2: ...safe use 2 4 Product specifications component names 4 5 Performance characteristics 7 6 Driving restrictions 8 7 Installation Notes 8 8 Instructions for use 12 9 Maintenance and maintenance methods 16...

Страница 3: ...formation on safety precautions function descriptions and maintenance of various models The graphics in this manual are for user s reference only please refer to the actual product in actual use 2 Sco...

Страница 4: ...le may be injured and even life threatening may be involved The operator should understand the usage of the manual before using it Please do not allow young children and people who cannot understand t...

Страница 5: ...are locked 5 When the user sits in or leaves the transferred wheelchair the wheels must be locked 6 When the user is sitting in the transferred wheelchair and is going to take things other than the tr...

Страница 6: ...is greater than 5 degrees the operator should face the transferred wheelchair backwards while carefully confirming it downhill in a backward manner If you are facing forward when descending you may c...

Страница 7: ...C022 20 length 710mm 710mm width 720mm 770mm height 815 1015mm 815 1015mm Front wheel size 5 inches 5 inches Rear wheel size 3 inches 3 inches Seat width 460mm 510mm Seat depth 400mm 400mm Seat height...

Страница 8: ...commode upright 5 inch front wheel 3 inch rear wheel foot pedal etc The material is welded with high strength steel pipe 1 5 inch front wheel 2 Foot pedal 3 Base 4 3 inch rear wheels 5 Upright 6 Left...

Страница 9: ...nt the operator s waist from being damaged l The maximum load is 120kg suitable for people of all shapes l Adjustable seat height suitable for furniture and facilities of different heights l Medical m...

Страница 10: ...stic backrest on the right seat frame and fix it with 4 M5 screws and arc shaped mesons as shown in the following figure The left seat frame is installed in the same way 2 Pull out the handle shake th...

Страница 11: ...with M8 cap nut so that the seat frame is not loose and can rotate flexibly as shown below left seat Rack in the same way 4 Insert the left and right seat frames on both sides of the base ensure that...

Страница 12: ...eats to the lowest height and the safety lock will automatically lock after closing 6 If you need to use the toilet first install the toilet wire frame into the mounting holes of the two uprights and...

Страница 13: ...11 8 Instructions Taking the operator transferring the user from the seat to...

Страница 14: ...air seat frame so that the bottom surface of the seat frame is slightly higher than the seat plane 2 Open the seat frame on both sides and move it to the front of the user Adjust the position of the t...

Страница 15: ...the corresponding side frame to let the user sit in the left and right frame of the transfer chair in sequence 5 When the user sits on the seat frame completely the left and right seat frames are comp...

Страница 16: ...oves the transfer chair away from the seat 8 The operator pushes the transfer chair from behind to move to the edge of the bed 9 Check the height of the transfer chair seat frame at the edge of the be...

Страница 17: ...ame slightly touched the mattress 11 Open the seat belt and safety lock behind the back of the transfer chair in turn slowly open the left and right seat frames so that the user s hips sit on the matt...

Страница 18: ...pe with a damp cloth and then wipe with a dry cloth l Do not contact with strong acid and alkali to prevent corrosion l Regularly check for loose nuts and screws damaged or broken parts and replace da...

Страница 19: ...1 8 Bucket wire rack Pc 1 9 Seat cushion Zhang 1 10 tool kit set 1 11 Screw accessories set 1 12 Instructions this 1 11 Storage conditions and methods The packaged products should be stored in a room...

Страница 20: ...18 12 Production date use period Production date See Product Certificate Term of use The product has a normal service life of 5 years from the date of delivery see product logo...

Отзывы: