Feider Machines FPGAI750 Скачать руководство пользователя страница 9


HOW TO HOLD A DRYWALL SANDER 

The Drywall Sander should be  held  with both hands on the main tube. The hands may be placed 

anywhere along the main tube for best application. 

CAUTION:

 Keep the hands on the main tube. Do not place the hands in the area around the sanding 

head. The sanding head swivels in multiple directions and could jam your hand. 


CONNECTION TO THE DUST COLLECTING BAG 

In  order  to  protect  the  operator  and  reduce  dust  suction  and  site  cleaning  during  the  operations, 

please connect the machine to the dust bag while working process. Connect the dust collecting bag 

as shown in the figure. 

CAUTION:

 Do not use a nominal value dust bag for plaster dust as this increases the level of dust 

particles in the air of the working area. Continued and prolonged exposure to high concentrations of 

dust in the air may affect the respiratory system function. 
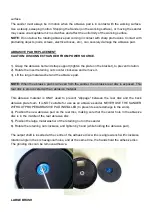


INSTALLATION 

Before  repairing  or  replacing  any  electrical  parts  or  accessories,  be  sure  of  unplugging  the 

appliance.


Insert the support arm in the plastic clamp, insert and tighten screws to the right and left of the 

support arm with hex spanner). 


Содержание FPGAI750

Страница 1: ...NS Drywall Sander FPGAI750 Feider France ZI 32 rue Aristide Berg s 31270 Cugnaux France Fabriqu en RPC 2018 ATTENTION Merci de bien vouloir lire toutes les instructions de s curit afin de r duire le r...

Страница 2: ...ody is earthed or grounded c Do not expose power tools to rain or wet conditions Water entering a power tool will increase the risk of electric shock d Do not abuse the cord Never use the cord for car...

Страница 3: ...olled with the switch is dangerous and must be repaired c Disconnect the plug from the power source before making any adjustments changing accessories or storing power tools Such preventive safety mea...

Страница 4: ...asive wheels for chips and cracks backing pad for cracks tear or excess wear wire brush for loose or cracked wires If power tool or accessory is dropped inspect for damage or install an undamaged acce...

Страница 5: ...ntering into the pinch point can dig into the surface of the material causing jumps or expulsion of the grinding wheel The wheel can jump towards the operator or by moving away as the direction of mov...

Страница 6: ...paper extending beyond the sanding pad presents a laceration hazard and may cause snagging tearing of the disc or kickback 5 Warning symbol WARNING To reduce the risk of injury user must read instruct...

Страница 7: ...K 1 5 m s The declared vibration total value has been measured in accordance with a standard test method and may be used for comparing one tool with another The declared vibration total value may als...

Страница 8: ...er finish CHOOSING THE SANDPAPER According to the material and grinding effect choose the appropriate sandpaper Material Usage Sandpaper Pigment Removal of pigment layer 40 Paint Removal of paint 60 F...

Страница 9: ...eaning during the operations please connect the machine to the dust bag while working process Connect the dust collecting bag as shown in the figure CAUTION Do not use a nominal value dust bag for pla...

Страница 10: ...with a lock block Depress the switch not loosen your hand this machine will be ON if press the lock block machine will be on even your hand leave the switch Re press the switch the switch will be stop...

Страница 11: ...a wall or ceiling joint without changing its position 1 Turn the vacuum cleaner switch to the ON position CAUTION Wear an approved respirator for mist and dust 2 Turn the wall sander switch to the ON...

Страница 12: ...d NOTE When the abrasive pad is removed from the sander the abrasive rear disc is exposed This rear disc is also covered with an abrasive material This abrasive material is ONLY used to prevent slippa...

Страница 13: ...act with the working surface preventing the abrasive from causing scratches 2 It also helps contain the drywall dust until the vacuum cleaner pulls it away CAUTION DISCONNECT SANDER FROM POWER CIRCUIT...

Страница 14: ...ne Use a screwdriver counter clock wise to unscrew the brush cover remove the original carbon brush place a new carbon brush and screw the brush cover 5 MISE EN REBUT CAUTION This product has been mar...

Страница 15: ...Developed designed and manufactured in accordance with the requirements of directives Machinery Directive 2006 42 EC EMC Directive 2014 30 EC ROHS Directive 2011 65 EU Also meets the following standa...

Отзывы: