Feider Machines FM20V115-A Скачать руководство пользователя страница 11


5. PACKAGE CONTENT LIST 


  Remove all packaging materials. 

  Remove remaining packaging and packing inserts (if included). 

  Check that the package contents are complete. 

  Check the appliance, the power cord, the power plug of charger and all accessories for transportation 

damage or not. 

  Keep the packaging materials as far as possible until the end of the warranty period. Then take it to your 

local waste disposal system. 


WARNING! Packaging materials are not toys! Children must not play with plastic bags! There 

is a danger of suffocation! 

1 x angle grinder 

1 x auxiliary handle 

1 x pin spanner 

1 x instruction manual 

Note: If any parts are missing or damaged, please contact your dealer. 


6. OPERATION 


6.1 CHARGING THE BATTERY PACK 


NOTE:  The  battery  and  charger  not  delivered  in  package,  you  can  buy  Buider  battery  platform  1 

which used for full range. 

1). Take the battery pack out of the equipment. Do this by pressing the side pushlock buttons. 

2).  Check  that  your  mains  voltage  is the same as that marked on the rating plate  of the  battery charger. 

Insert the power plug of the charger  into the socket outlet. The RED LED will then begin to light. 

3). Insert the battery pack  into the battery charger .then the red LED on charger will begin to Green flash 

light. 

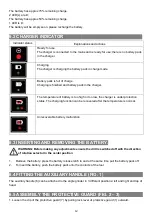
4). You will find a label with 

“Charger indicator” of the LED indicator on the charger. 

The battery pack can become a little warm during the charging. This is normal. 

If the battery pack fails to charge, check: 

  Voltage at the power socket 

  Whether there is good contact at the charging contacts. 

  Whether the battery pack is warm or not, The battery protection system will not allow the battery to be 

charged if the battery temperature is over 40

℃ 

after use, allow the battery pack to cool to room 

temperature before commencing with the charging. 

If the battery pack still fails to charge, send the charging unit and the battery pack to our customer service 

center. 

To ensure that the battery pack provides long service, you should take care to recharge it promptly. You must 

recharge the battery pack when you notice that the power of the cordless vacuum drops. Never allow the 

battery pack to become fully discharged. This will cause it to develop a defect. 

Battery capacity indicator 

Press the switch for the battery capacity indicator . The battery capacity indicator shows the charge status of 

the battery using 4 LEDs  as following: 

All 4 LEDs are lit: 

The battery is fully charged. 

3 LED(s) are lit: 

11

Содержание FM20V115-A

Страница 1: ...ORIGINAL INSTRUCTIONS EN CORDLESS ANGLE GRINDER FM20V115 A USER GUIDE CAUTION READ THE INSTRUCTIONS BEFORE USING THE MACHINE...

Страница 2: ...8 4 YOUR PRODUCT 9 5 PACKAGE CONTENT LIST 11 6 OPERATIONS 11 7 CLEANING AND MAINTENANCE 14 8 TECHNICAL DATA 15 9 SERVICE DEPARTMENT 15 10 STORAGE 15 11 DISPOSAL 16 12 DELARATION OF CONFORMITY 16 13 WA...

Страница 3: ...ions can cause you to lose control 2 Electrical safety a Power tool plugs must match the outlet Never modify the plug in any way Do not use any adapter plugs with earthed grounded power tools Unmodifi...

Страница 4: ...h of children and do not allow persons unfamiliar with the power tool or these instructions to operate the power tool Power tools are dangerous in the hands of untrained users e Maintain power tools a...

Страница 5: ...ccessory and run the power tool at maximum no load speed for one minute After inspecting and installing an accessory position yourself and bystanders away from the plane wires If power tool or accesso...

Страница 6: ...l and position your body and arm to allow you to resist kickback forces Always use auxiliary handle if provided for maximum control over kickback or torque reaction during start up The operator can co...

Страница 7: ...ent temperatures between 4 C and 40 C 39 2 F and 104 F Charge only using the charger provided with the tool Store your batteries in a cool dry place 5 C 20 C 41 F 68 F Never store batteries in dischar...

Страница 8: ...e battery Charger Only use the model of charger recommended See the technical data 3 SYMBOLS Conforms to relevant safety standards To reduce the risk of injury the user must read and understand this m...

Страница 9: ...ock lever for protection guard 2 Spindle lock button 3 Main handle 4 On Off switch 5 Air vents 6 Auxiliary handle 7 Guard 8 Grinding disc not included 9 Speed adjuster 10 Release button 11 Battery pac...

Страница 10: ...10...

Страница 11: ...egin to light 3 Insert the battery pack into the battery charger then the red LED on charger will begin to Green flash light 4 You will find a label with Charger indicator of the LED indicator on the...

Страница 12: ...protection status The charging function can be recovered after the temperature is normal Unrecoverable battery malfunction 6 3 INSERTING AND REMOVING THE BATTERY WARNING Before making any adjustments...

Страница 13: ...st keep the spindle lock pressed while you change the wheel For grinding wheels up to approx 3 mm thick screw on the flange nut with the flat side facing the grinding wheel 6 7 SWITCHING ON OFF FIG 6...

Страница 14: ...ng use This is normal and does not mean the grinder is defective Switch off the grinder after use FLANGE ARRANGEMENTS WHEN USING GRINDING WHEELS Flange arrangements when using a depressed centre or st...

Страница 15: ...ng that the vibration emission during actual use of the power tool can differ from the declared total value depending on the ways in which the tool is used and of the need to identify safety measures...

Страница 16: ...on available recycling or disposal options 12 DELARATION OF CONFORMITY BUILDER SAS 32 rue Aristide Berg s ZI 31270 Cugnaux France declares that Product Angle Grinder 20V Trademark Feider Model FM20V1...

Страница 17: ...scribed in the user manual Due to our policy of continuous product improvement we reserve the right to alter or change specifcations without notice Consequently the product may be diferent from the in...

Страница 18: ...pair station to make sure it is available before dropping of the machine Go to the repair station with the complete machine packed accompanied by the purchase invoice and the station support sheet dow...

Страница 19: ...t during the time necessary for repairs and more generally the costs related to the immobilization of the product The costs of a second opinion established by a third party following an estimate by a...

Страница 20: ...BUILDER SAS 32 rue Aristide Berg s ZI 31270 Cugnaux France MADE IN PRC...

Отзывы: