background image

15

2. YOUR PRODUCT

a. Description

1. ON/OFF trigger lock-out button

2. Battery port

3. ON/OFF trigger

4. Assist handle locking lever

5. Edger adjustment button

6. Edging guide wheel

7. Single line cutting spool

8. Line cutting blade adjustment dial

9. Guide

10. Shaft length adjuster lock

11. Shaft angle adjuster lock

12. Auxiliary assist handle

Содержание FCBN20V

Страница 1: ...NAL INSTRUCTIONS CORDLESS GRASS TRIMMER FCBN20V INSTRUCTIONS MANUAL WARNING READ THE FOLLOWING INSTRUCTIONS BEFORE USE THIS MACHINE BUILDER SAS 32 rue Aristide Berg s ZI 31270 Cugnaux France MADE IN P...

Страница 2: ...a safety a Keep work area clean and well lit Cluttered or dark areas invite accidents b Do not operate power tools in explosive atmospheres such as in the presence of flammable liquids gases or dust P...

Страница 3: ...for carrying pulling or unplugging the power tool Keep cord away from heat oil sharp edges or moving parts Damaged or entangled cords increase the risk of electric shock e When operating a power tool...

Страница 4: ...ies c Prevent unintentional starting Ensure the switch is in the off position connecting to power source and or battery pack picking up or carrying the tool Carrying power tools with your finger on th...

Страница 5: ...r tool for your application The correct power tool will do the job better and safer at the rate for which it was designed b Do not use the power tool if the switch does not turn it on and off Any powe...

Страница 6: ...maintained power tools f Keep cutting tools sharp and clean Properly maintained cutting tools with sharp cutting edges are less likely to bind and are easier to control g Use the power tool accessori...

Страница 7: ...hat can make a connection from one terminal to another Shorting the battery terminals together may cause burns or a fire d Under abusive conditions liquid may be ejected from the battery avoid contact...

Страница 8: ...ring it to a qualified service for inspections and reparations Read the instruction carefully Be familiar with the controls and proper use of the equipment Local regulation may restrict the age of the...

Страница 9: ...facturer s recommended placement parts and accessories Switch off and remove the battery when leaving the trimmer unattended Switch off and remove the battery before carrying out maintenance or cleani...

Страница 10: ...explosive substances such as liquid gases and powders Always stop the trimmer and remove the battery when cutting is delayed or when walking from one cutting location to another Do not cross roads or...

Страница 11: ...ing means Do not overreach and to keep the balance at all times Always be sure of the footing on slopes Walk never run Warning Do not touch moving hazardous parts before the machine is disconnected fr...

Страница 12: ...mmended replacement parts and accessories Inspect and maintain the machine regularly Have the machine repaired only by an authorized repairer When not in use store the machine out of the reach of chil...

Страница 13: ...paces vomiting nausea Hearing loss in the absence of proper hearing protection WARNING This machine generates an electromagnetic field during its operation This field may under certain circumstances d...

Страница 14: ...not expose to rain or humidity Risk of projections Keep bystanders away Remove the battery when the tool is damaged and before maintenance and servicing Read the instruction manual Guarantee sound po...

Страница 15: ...Battery port 3 ON OFF trigger 4 Assist handle locking lever 5 Edger adjustment button 6 Edging guide wheel 7 Single line cutting spool 8 Line cutting blade adjustment dial 9 Guide 10 Shaft length adj...

Страница 16: ...e tool with another The declared vibration total value may also be used in a preliminary assessment of exposure Warning That the vibration emission during actual use of the power tool can differ from...

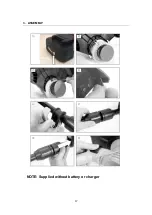
Страница 17: ...17 3 ASSEMBLY NOTE Supplied without battery or charger...

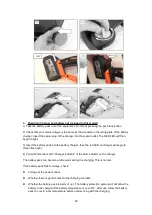
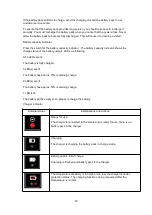
Страница 18: ...r then the red LED on charger will begin to Green flash light 4 You will find a label with Charger indicator of the LED indicator on the charger The battery pack can become a little warm during the ch...

Страница 19: ...4 LEDs as following All 4 LEDs are lit The battery is fully charged 3 LED s are lit The battery has approx 75 remaining charge 2 LED s are lit The battery has approx 50 remaining charge 1 LED is lit...

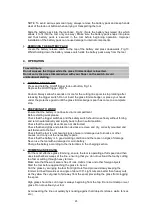
Страница 20: ...he shaft is at a comfortable length retighten the collar e ROTATING THE SHAFT The shaft can be rotated to the 0 or 180 position for trimming and edging operations Pull the upper part of the centre col...

Страница 21: ...e starting work please Check that the trigger switches and the safety switch should move freely without forcing and return automatically and rapidly back to their neutral position Check that the cooli...

Страница 22: ...air or a vacuum Keep the air vents free of obstructions sawdust and wood chips Do not sprays wash or immerse the air vents in water Wipe off the housing and the plastic components using a moist soft c...

Страница 23: ...ase by sending us the original receipt We insure over the entire warranty period Free repair of possible malfunctions Free replacement of damaged parts Including the free service of our specialized pe...

Страница 24: ...Machine Directive 2006 42 EC EMC Directive 2014 30 EU RoHS Directive 2011 65 EU 2015 863 EU Noise directive 2000 14 EC Annex VI 2005 88 EC Measured sound power level 89 dB A K 3dB A Guarantee sound P...

Отзывы: