background image

Preparation

Warning!

1.

Do not allow children to operate this equipment.

2.

Do not operate this equipment in the vicinity of bystanders.

3.

Wear ear protection and safety glasses at all times while operating this machine.

4.

Avoid wearing clothing that is loose fitting or that has hanging cords or ties.

5.

Only operate the machine in an open space (e.g. not close to a wall or to any other fixed

object) and on a firm, level surface.

6.

Do not operate the machine on a paved or gravel surface where ejected material could

cause injuries.

7.

Before starting the machine, check that all screws, nuts, bolts, and other fasteners are

properly secured and that guards and screens are in place. Replace damaged or

unreadable labels.

Assembling

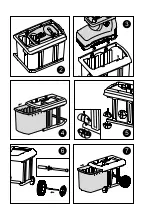
(Fig. 2)

Scope of delivery

1x Instruction manual

1x Spanner

1x Silent shredder

1x Collection box

1x Base frame

2x Wheel set

2x front wheel set

1x Small parts bag

1x Adjuster

1.

Take all parts out of the package. Be sure four protruding supports in the bottom of the

motor unit pass through four notches in the upper face of the base frame. (Fig. 3)

2.

Slide the collection box out of the base frame. (Fig. 4)

3.

Fit the front wheel sets to the base frame with the aid of two screws. (Fig. 5)

4.

Use the spanner to mount wheels to the base fame using two wheel shafts, two grommets,

two spring grommets and two screws. Assemble cap by pushing in on by hand. (Fig. 6)

5.

Slide the collection box back to the base frame. Ensure that the collection box runs above

the guide rails. (Fig. 7)

6.

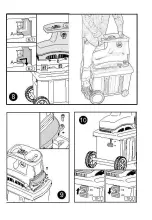
Stand and put hands in position as shown in Fig. 8. Lay the motor unit on the base frame

by placing four protruding supports (Fig. 8/Item B) of the motor unit on the slots (Fig. 8-

1/Item A) of the base frame.

7.

Fix the location plate to the base frame with two screws. (Fig. 9)

8.

Lock the collection box with safety switch in position by pushing upwards. (Fig. 10-1)

Proper usage

This shredder has been designed for cutting fibrous and woody garden waste for the purpose of

compositing.

Содержание FBVE3000

Страница 1: ...ORIGINAL INSTRUCTIONS INSTRUCTION MANUAL SILENT SHREDDER FBVE3000 READ THIS INSTRUCTIONS MANUAL BEFORE USE THE TOOL FEIDER 32 rue Aristide Berg s ZI 31270 Cugnaux France Made in PRC...

Страница 2: ......

Страница 3: ......

Страница 4: ......

Страница 5: ......

Страница 6: ...ons Keep bystanders away Danger Rotation blades Keep hands and feet out of openings while machine is running Wear eye and ear protection Caution Remove plug from the mains immediately if cable is dama...

Страница 7: ...temporary repairs Have the cable replaced by a qualified technician 7 Before inserting the plug into the mains socket make sure that the socket ratings are correct and correspond to those indicated o...

Страница 8: ...fter switching off 20 Always switch off the shredder unplug the connection cable and wait until the chopping knife comes to stop before carrying out any maintenance or cleaning work 21 Be careful when...

Страница 9: ...the shredder until such defects have been rectified 33 Replace any worn out or damaged parts for your safety Use original spare parts only Parts not produced by the manufacturer may fit poorly and ca...

Страница 10: ...1 Overload protector 2 On off switch 3 Reversing switch 4 Feeding tunnel 5 Electric plug 6 Adjuster 7 Collection box 8 Base frame 9 Front wheel 10 wheel 11 Safety switch Technical data Mains voltage f...

Страница 11: ...bag 1x Adjuster 1 Take all parts out of the package Be sure four protruding supports in the bottom of the motor unit pass through four notches in the upper face of the base frame Fig 3 2 Slide the co...

Страница 12: ...tion A Fig 1 A The reversing switch has been set to position A The chopping knife will pull in the material and chop it The switch is set to position A after the manufacturer s test Position B Fig 1 B...

Страница 13: ...r supply before clearing any debris Keep the motor ventilation slots clear of debris and other accumulations to prevent damage to the motor or possible fire 10 Keep all guards and deflectors in place...

Страница 14: ...opping knife is in contact with the counter knife especially when shredding soft materials or wet woody branches When you use strong and dry materials the counter knife should have a corresponding dis...

Страница 15: ...tenance and Storage Take care of your machine and clean it regularly to obtain long lasting efficiency and performance Keep the air vents clean and free from dust Use only a warm damp cloth and a soft...

Страница 16: ...l facility Carton packaging and electric equipment can be taken to a corresponding recycling materials receiving depot or be conveniently disposed of through the manufacturer for instance With your co...

Страница 17: ......

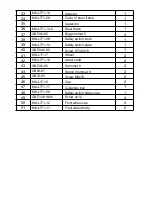
Страница 18: ...L771 04 Location plate 1 14 MK L771 02 Lower shell 1 15 GB T894 1 1986 Circlip for shaft 8 2 16 GB845 85 Screw ST4 2X20 F 8 17 GB95 85 Flat grommet 6 2 18 GB93 87 Spring grommet 6 2 19 GB70 85 Screw M...

Страница 19: ...L771 14 Safety switch plate 1 40 GB T846 85 Screw ST4 2X16 1 41 MK L17 17 Wheel 2 42 MK L771 16 wheel shaft 2 43 GB T96 85 Grommet 8 2 44 GB93 87 Spring grommet 8 2 45 GB70 85 Screw M8x70 2 46 MK L17...

Страница 20: ...ansposing it Also complies with the following European directives EMC Directive 2014 30 EU ROHS Directive 2011 65 EU EU 2015 863 Noise directive 2004 14 EC and 2005 88 EC Sound power level measured 86...

Страница 21: ...the user manual Due to our policy of continuous product improvement we reserve the right to alter or change specifications without notice Consequently the product may be different from the information...

Страница 22: ...before dropping off the machine Go to the repair station with the complete machine packed accompanied by the purchase invoice and the station support sheet downloadable after the service request is c...

Страница 23: ...ecessary for repairs and more generally the costs related to the immobilization of the product The costs of a second opinion established by a third party following an estimate by a SWAP Europe repair...

Отзывы: