background image

Series ’90 Refrigerated Bakery


Page 16


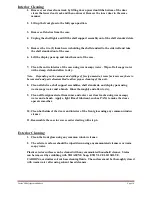
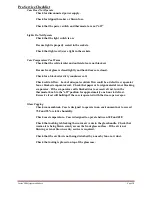
Interior Cleaning 

1.


Remove rear doors from track by lifting door upward until the bottom of the door 
clears the lower door track and then outward.  Remove the inner door in the same 
manner. 
 

2.


Lift up the front glass to the fully open position. 


3.


Remove all shelves from the case. 
 

4.


Unplug the shelf lights and lift the shelf support assembly out of the shelf standard slots. 


5.


Remove the two (2) thumb screws holding the shelf standard to the side wall and take 
the shelf standard out of the case. 
 

6.


Lift the display pans up and take them out of the case. 


7.


Clean the entire interior of the case using warm soapy water.  Wipe off all soapy water 
with a damp cloth and allow to dry. 
 

Note:  Depending on the amount and spillage of foreign material, some fasteners may have to 
be removed and parts disassembled to allow proper cleaning of the unit. 
 
8.


Clean all shelves, shelf support assemblies, shelf standards, and display pans using 
warm soapy water and a brush.  Rinse thoroughly and allow to dry. 
 

9.


Clean all foreign material from inner and outer rear door tracks using warm soapy 
water and a brush.  Apply a light film of lubricant, such as PAM, to make the doors 
operate smoother. 


10.


Clean both sides of the doors and interior of the front glass using any common window 
cleaner. 
 

11.


Reassemble the case in reverse order starting with step 6. 


Exterior Cleaning


1.


Clean the front glass using any common window cleaner. 
 

2.


The exterior surfaces should be wiped down using any ammoniated cleansers or warm 
soapy water. 

 
Plastic exterior surfaces can be cleaned with any ammoniated household cleaner.  Stains 
can be removed by scrubbing with TRIALENE Soap, ETHYL CELLOSOLVE, 
CARBONA, or similar solvent base cleaning fluids.  The surfaces must be thoroughly rinsed 
with warm water after using solvent based cleaners. 


Содержание SNR482C-2

Страница 1: ...tained Remote Models INSTALLATION OPERATION INSTRUCTIONS KEEP THIS MANUAL FOR FUTURE REFERENCE Engineering and technical date are subject to change without notice FEDERAL INDUSTRIES PO BOX 290 215 FED...

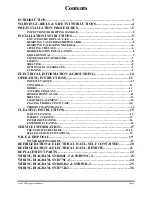
Страница 2: ...OPERATING INSTRUCTIONS 11 INITIAL START UP 11 CONTROLS 11 DOORS 11 ANTI FOGGING FANS 11 HINGED FRONT GLASS 12 SHELVES 13 LIGHT REPLACEMENT 14 PLACING PRODUCT INTO CASE 14 PERIODIC MAINTENANCE 14 CLEA...

Страница 3: ...l regional or national standards Warranty Technical Service Dept Toll Free 800 356 4206 WI Phone 608 424 3331 geninfo federalind com INTRODUCTION Thank you for purchasing a Federal Industries display...

Страница 4: ...The following signal words are used in the warnings and safety messages DANGER Severe injury or death will occur if you ignore the message WARNING Severe injury or death can occur if you ignore the m...

Страница 5: ...te inspection of your concealed damage item Crating material must be retained to show the inspector from the truck line INSTALLATION INSTRUCTIONS Locating the Display Case The case should be located w...

Страница 6: ...turn in and the case can be placed with the base frame on the floor The leveled case must be sealed to the floor using and NSF listed Sealant Refrigeration Installation Self Contained Models The self...

Страница 7: ...binet and all connecting tubing Cabinet and condensing unit tubing should be checked to insure no leaks occurred during shipping or from rough handling Make certain all refrigeration valves are opened...

Страница 8: ...t up the front glass to the fully open position Put the shelf support assembly in the desired shelf standard slots Plug the shelf light cords in the appropriate light socket Make certain that the ligh...

Страница 9: ...shelf light housing as shown The shelf retainer should sit over the rear shelf support If the shelf is not in the proper position it may disrupt the air flow in the case and could cause product loss...

Страница 10: ...l standards A separate circuit for each display case is recommended to prevent other appliances on the same circuit from overloading the circuit and causing malfunction The electrical service must be...

Страница 11: ...ensing unit It has an off position and numbered positions 1 through 9 The coldest setting is 9 Set this control at the smallest number while maintaining desired case temperature Thermometer This is a...

Страница 12: ...g of the case interior Pneumatic cylinders assist in lifting the glass The glass will hold in any position beyond approximately the first 20 of travel In the first 20 of travel the glass will gently c...

Страница 13: ...shelf support at each end 5 Tip the front of the shelf support up until it can be removed from the shelf standard 6 Reposition the shelf as desired The shelves can be installed horizontally or slanted...

Страница 14: ...display pans Overhanging the shelves will block the refrigerated air flow and could cause product loss Do not block the slots along the front or rear of the case display floor CASE SHOULD BE STOCKED W...

Страница 15: ...me Note For major spills or foreign material buildup use complete weekly cleaning instruction 1 Clean all foreign materials from the door opening 2 Wipe complete interior of case using a damp cloth 3...

Страница 16: ...d and parts disassembled to allow proper cleaning of the unit 8 Clean all shelves shelf support assemblies shelf standards and display pans using warm soapy water and a brush Rinse thoroughly and allo...

Страница 17: ...re any service work is performed on the case make sure all power is disconnected to the case Service problems or request for repair parts from authorized service agents trained service personnel or ow...

Страница 18: ...an or blocked evaporator coil Check that paper or foreign material is not blocking evaporator If the evaporator coil is blocked due to excessive frost turn the thermostat knob to the off position for...

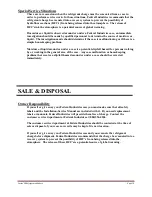
Страница 19: ...persons walking by or working in the general area of the case Any case malfunction or housekeeping problem that creates a slip fall hazard around or under a case should be corrected immediately SALE D...

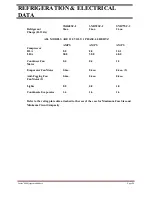
Страница 20: ...PHASE 60 HERTZ AMPS AMPS AMPS Compressor RLA 8 8 8 8 10 1 LRA 58 8 58 8 68 0 Condenser Fan 0 4 0 4 1 2 Motor Evaporator Fan Motor 0 4ea 0 4ea 0 4ea 2 Anti Fogging Fan 0 4ea 0 4ea 0 4ea Fan Motor 2 Li...

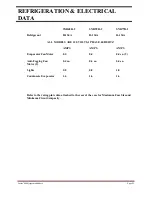
Страница 21: ...4A R 134A ALL MODELS ARE 120 VOLTS 1 PHASE 60 HERTZ AMPS AMPS AMPS Evaporator Fan Motor 0 4 0 4 0 4 ea 2 Anti Fogging Fan 0 4 ea 0 4 ea 0 4 ea Motor 2 Lights 0 8 0 8 1 0 Condensate Evaporator 1 6 1 6...

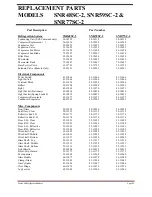
Страница 22: ...834 42 10834 42 10834 Light Socket Spring Loaded 42 10833 42 10833 42 10833 Compressor Receptacle 45 11677 45 11677 45 11677 Condenser Evaporator 40 32903 40 32903 40 32903 Misc Components Front Glass...

Страница 23: ...Series 90 Refrigerated Bakery Page 23 WIRING DIAGRAM SNR48SC 2 SNR59SC 2...

Страница 24: ...Series 90 Refrigerated Bakery Page 24 WIRING DIAGRAM SNR77SC 2...

Страница 25: ...Series 90 Refrigerated Bakery Page 25 WIRING DIAGRAM SNR48R 2 SNR59R 2...

Страница 26: ...NR77R 2 California Residents Only WARNING This product can expose you to chemicals including chromium which is known to the State of California to cause cancer and birth defects or other reproductive...

Отзывы: