Содержание HighLighter

Страница 1: ...2562495C REV C 811 Printed in U S A Installation and Programming HighLighter LED Mini Lightbars ...

Страница 2: ...HighLighter is a trademark of Federal Signal Corporation FASTON is a registered trademark of Tyco Electronics AMP Corp 2011 Federal Signal Corporation ...

Страница 3: ...Completing the Wiring 12 Completing the Installation Directly to the Vehicle 13 Using Magnetic or Magnetic Suction Mounting 14 Selecting a Flash Pattern 14 Selecting a Pattern Using the Jumper Pins 16 Selecting a Pattern Using a Magnet Over the Hall Effect Sensor 17 Cleaning the Plastic Dome 17 Ordering Replacement Parts 18 Getting Technical Support and Service 18 Returning a Product to Federal Si...

Страница 4: ...ghtbars Figures Figure 1 Mounting holes for Patterns A and B 11 Figure 2 Upper assembly removed from lightbar base 12 Figure 3 Fuses connectors and programming jumper pins PROG 13 Figure 4 Hole for Hall effect sensor on PCB 17 ...

Страница 5: ...ion Federal Signal power supplies and light heads are designed to work together as a system Combining light heads and a power supply from different manufacturers may reduce the warning effectiveness of the lighting system and may damage the components You should verify or test your combination to ensure the system works together and meets federal state and local standards or guidelines Electrical ...

Страница 6: ...st If the wiring is shorted to the vehicle body or frame high current conductors can cause hazardous sparks resulting in electrical fires or flying molten metal DO NOT install equipment or route wiring or the plug in cord in the deployment path of an airbag Before mounting any components check the manual to be sure that the component you are installing is suitable for use in that area of the vehic...

Страница 7: ...on You should frequently inspect the light system to ensure that it is operating properly and that it is securely attached to the vehicle After installation and testing are complete provide a copy of these instructions to instructional staff and all operating personnel File these instructions in a safe place and refer to them when maintaining and or re installing the product Failure to follow all ...

Страница 8: ...ift you should ensure that the entire warning light system and the siren system is securely attached and operating properly Suction cup mounting is for temporary applications only The unit should be removed from the window and stored securely when not in use Temperature changes and sunlight can cause suction cups to lose holding power Periodically check the unit to be sure the suction cups have a ...

Страница 9: ...r stating the extent of damage Carefully check all envelopes shipping labels and tags before removing or destroying them Ensure that the parts listed in the KIT CONTENTS LIST are contained in the packing carton Table 1 Mounting hardware Qty Description Part Number 4 Screw Thd Form 1 4 7011A158 12 1 Grommet 8108A002 1 Foam Mounting Pad 8560102 Product Specifications Dimensions Current Draw Length 1...

Страница 10: ...smoothed All wires going through drilled holes should be protected by a grommet or convolute split loom tubing The lightbar is completely wired at the factory and does not require any additional internal wiring User supplied 18 AWG or larger wire may be added if required Optional 15 foot cable kits are available from your dealer or Federal Signal See Ordering Replacement Parts on page 18 Before be...

Страница 11: ...nch hole at the scribed mark for routing the wires Install the grommet in the wire routing hole NOTE If the wire needs to be routed through the mounting pad carefully cut an opening in the pad and route the lightbar wires through it 3 To complete the installation see Wiring the HighLighter LED on page 11 and Completing the Installation Directly to the Vehicle on page 13 Wiring the HighLighter LED ...

Страница 12: ...hrough the wire channel in the mounting base to the back of the lightbar 3 Install a user supplied controller or switch at a location that enables the driver to operate all controls safely under all driving conditions The current capacity of the controller or switch should be at least 15 A The positive 12 Vdc connection must be made to the fuse block if it is only to be operational when the vehicl...

Страница 13: ...sh patterns see Table 2 on page 15 and Table 3 on page 16 Figure 3 Fuses connectors and programming jumper pins PROG 290A6097B MINUS PLUS 7 5 F1 7 5A F2 7 5A SYNC IN PROG SYNC OUT1 ALT OUT2 WLC 8 Within the dome are one exit and an optional knockout for wires Figure 1 on page 11 Each wire exit can accommodate three 16 AWG to 18 AWG wires Guide the wires through the holes and secure the upper assem...

Страница 14: ... not be used on vehicles with vinyl tops To prevent sliding of the lightbar on the mounting surface quick acceleration and hard stops should be avoided 1 Place the lightbar assembly on the vehicle roof at a location that provides maximum signaling effectiveness for your application 2 For models with suction cups release trapped air by applying downward pressure to the top of the dome while pulling...

Страница 15: ...lash 90 Alternating Triple Flashes per minute 8 Alternating Sides Quad Flash 60 Alternating Quad Flashes per minute 9 Continuous Flash 125 ms On 125 ms Off 240 FPM 10 NFPA Flash 400 ms On 400 ms Off 75 FPM 1 11 Continuous Flash 250 ms On 250 ms Off 120 FPM 1 12 Rotate Left Followed by Full Quad 67 Full FPM 13 Double Flash Followed by Alternating Side Quad Flash 40 FPM 14 Rotate Heads Inside Out 34...

Страница 16: ...sh 62 17 Double Quad 80 18 FedPulse 118 19 Front and Rear Sides Double Flash 91 20 Test n a Selecting a Pattern Using the Jumper Pins 1 To access the two pins labeled PROG in the wiring compartment remove the wire access cover as described in Accessing the Wiring on page 11 2 While power is applied to the power PLUS and ground MINUS tabs jumper the two pins with a conductive object such as a small...

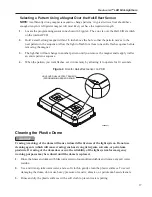
Страница 17: ... 4 When the pattern you want flashes set it in memory by allowing it to operate for 10 seconds Figure 4 Hole for Hall effect sensor on PCB 290A6621 HOLE OVER HALL EFFECT SENSOR PROGRAMMING SENSOR ZONE Cleaning the Plastic Dome Crazing cracking of the dome will cause reduced effectiveness of the light system Do not use cleaning agents which will cause crazing such as strong detergents solvents or p...

Страница 18: ...turning a Product to Federal Signal Before returning a product to Federal Signal call 800 264 3578 800 433 9132 or 800 824 0254 to obtain a Returned Merchandise Authorization number RMA number To expedite the process please be prepared with the following information Your Federal Signal customer or account number The purchase order number under which the items were purchased The shipping method The...

Страница 19: ...r LED Mini Lightbars 19 Federal Signal Corporation Public Safety Systems 2645 Federal Signal Drive University Park IL 60484 3167 Attn Service Department RMA __________ 800 433 9132 800 343 9706 fax www fedsig com ...

Страница 20: ...2645 Federal Signal Drive University Park IL 60466 3195 Tel 800 264 3578 Fax 800 682 8022 www fedsig com ...

Отзывы: