1.
Select the Save Icon from the playback controls. This will bring up a dialog that allows selection of the following:
•
Start and Stop points of the clip (these points can also be changed using Cut In/Out buttons on the playback controls).
•
Destination—where the movie clip is to be saved. Choices include the built-in SSD, (an option), an SD card or a USB drive.
•
The file Format desired—Partition Capture (CAP), AVI, BMP Stack, JPEG Stack or TIFF Stack. (CAP files may only be saved to an SSD. They
are raw, uncompressed images. CAP files are the only format that may be re-loaded and played back on the camera.)
•
File name prefix, which may optionally include the camera name or user-defined tag..
•
Use the default file name tag or change it.
•
Write a comment that will be displayed in the metadata for the clip.
•
Save XML Metadata. Select this if you would like an XML containing setup information, timestamps, and marker data.
2.
When the movie clip is set up as desired, press the Save button.
Note: Autosave and
Fas
F
ire are automatically disabled if recording is canceled.
In most recording modes, the camera enters Playback after exiting recording. When Autosave is enabled, the camera will immediately begin saving
imagery to storage media upon completion of a recording. The Autosave feature is always used when Standard Fas
F
ire mode, but may also be
used from Standard Basic Mode.
1. From Record/Mode/Setup... Select Standard Basic or Fas
F
ire.
2.
If you use Standard Basic, you will need to select the Autosave Checkbox, then select the options from the Save dialog box.
3. If you use Fas
F
ire, Autosave will be selected automatically, Change the options in the Save dialog box as needed.
There a several methods available to permanently save images:
•
Load Fas
M
otion software on a computer (PC or MAC). Fas
M
otion has utilities for saving images from camera memory to any camera media or
to any media connected to the PC. This is the fastest method of operation.
•
Download images from the image memory to an SD card installed in the SD port in the camera. View or transfer the images using an SD card
reader or by inserting the SD card into a built-in SD port in the desired PC.
•
Download images to a USB thumb drive installed in the USB port in the camera. View or transfer the images by installing the USB thumb drive
in the USB port of the desired PC.
Fastec Imaging Corporation
17150 Via Del Campo, Ste.301, San Diego, CA 92127
+1-858-592-2342
3
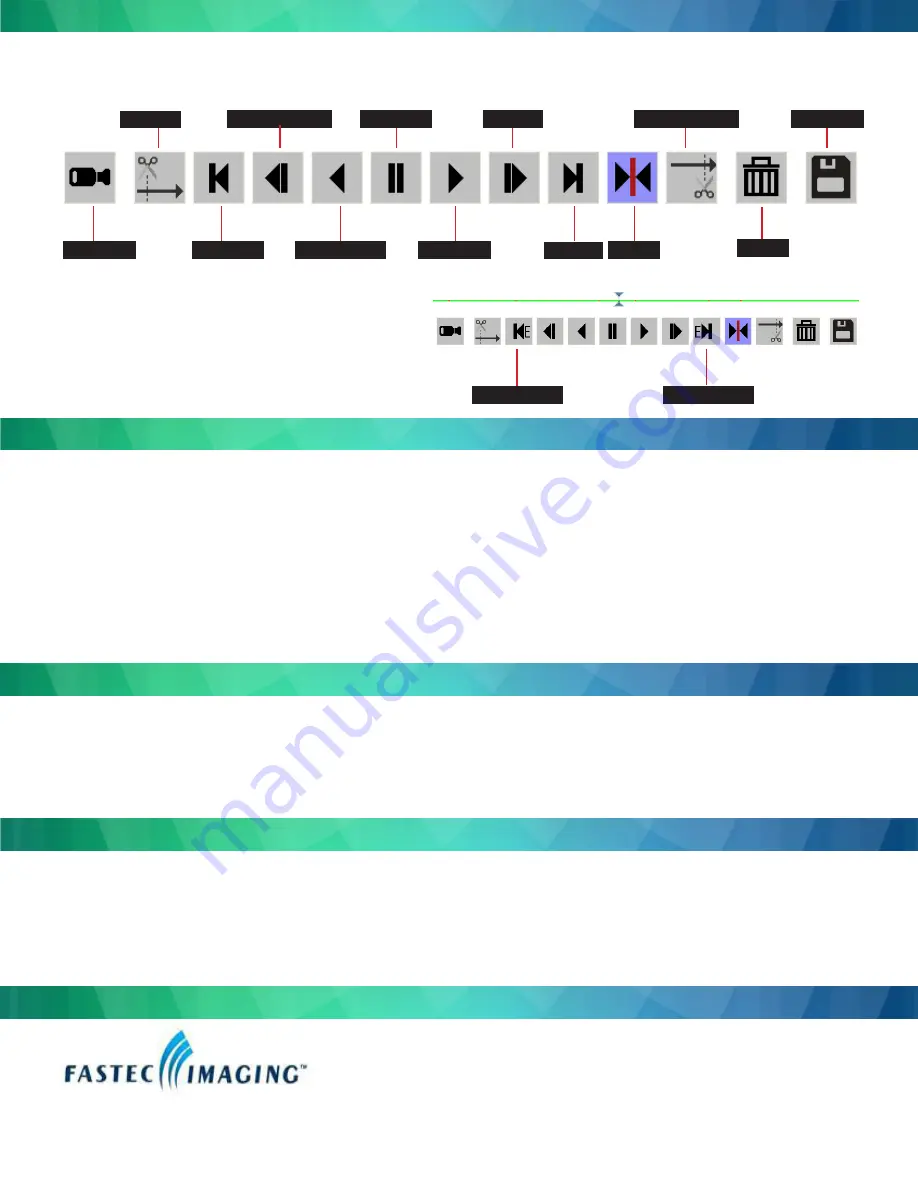
Use the playback icons to play forward, backward, or jump to points of interest in the movie. Use the Cut In and Cut Out icons to select a portion of
the movie to review or save
.
Skip Back
Pause
Skip Fwd
Cut In
Cut Out
Save
Beginning
Play Bkwd
Play
End
Trigger
Live
Event Markers, such as “Record Start” may be enabled from the
Review menu. When markers are present, the Beginning and End
playback icons change to Skip to Next and Previous Marker. This is
particularly handy when using the LR ROC or BROC feature:
1.
Select Events in the Review Menu.
2.
Select the Enable markers check box.
3.
Click on the Record Start button and change the value to “1.”
4.
Click on “OK.”
Previous Marker
Next Marker
Delete
Review a Video in Image Memory
Saving Video from Image Memory
Autosave Video
Save Images to a Host PC
Contact Information


