GROWSPAN
™
GOTHIC PRO GREENHOUSES AND SYSTEMS
32
Revision date: 06.20.18
INSTALL ANTI-BILLOW ROPES (CONTINUED)
SHELTER CARE AND MAINTENANCE
Proper care and maintenance of the shelter is important.
Check the following items periodically to properly maintain
the shelter:
• Regularly check the cover or covers to see that these
are tight and in proper repair. Tighten and adjust the
tension as needed to prevent damage and wear.
• Check connections and all fasteners to verify that they
remain tight and in good condition.
• Check the polycarbonate panels to verify that these
are secure and in good repair. Verify that nothing is
touching the panels that may cause damage.
• Do not climb or stand on the greenhouse at anytime.
• Remove debris and objects that can accumulate on the
greenhouse. Use tools that will not damage the cover
when removing debris.
• Remove snow to prevent excess accumulation. Use
tools that will not damage the cover when removing
snow.
• Check the contents of the shelter to verify that nothing
is touching the cover that could cause damage.
• If the shelter is dismantled and moved, inspect all parts
and connections before using.
• Depending on the contents, construction of the shelter,
shelter materials, and shelter location, the potential for
condensation exists. GrowSpan™ offers several items
that can be used to alleviate a condensation condition.
Please contact a GrowSpan™ representative for
additional information.
• For replacement or missing parts, call 1-800-245-9881
for assistance.
ATTENTION:
If no wood baseboard is present as
required, additional steps must be take to anchor the
lower portion of the anti-billow ropes.
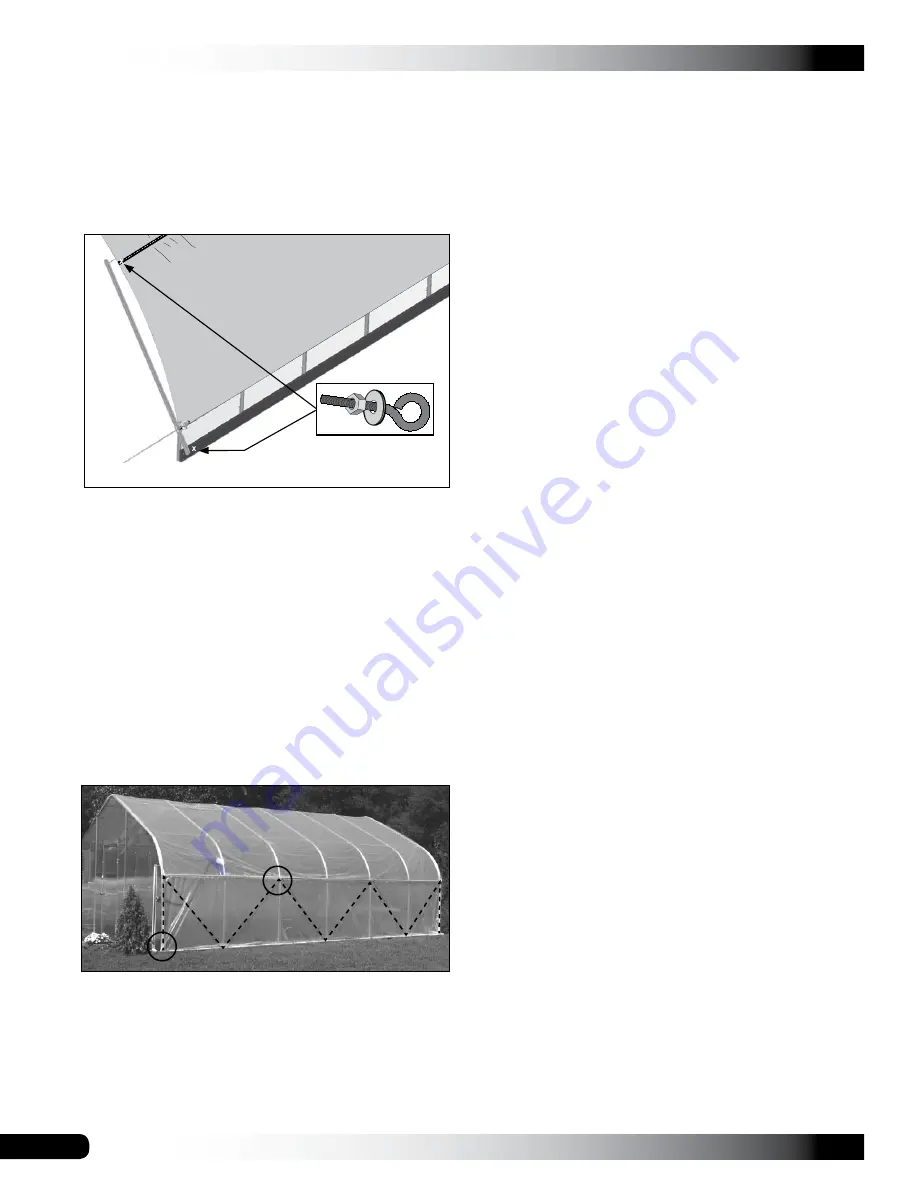
3. Move up the same end rafter and install the second
eyebolt through the poly latch U-channel and rafter leg.
NOTE:
If the poly latch U-channel was attached to
a ribbon board (as suggested), the eyebolt can be
mounted through the poly latch channel and ribbon
board.
4. Attach the remaining eyebolts using the diagram below
as a pattern guide.
5. Once all eyebolts are installed in the proper locations,
install the anti-billow rope
in short lengths along each
side
. Thread the free end of the rope through the end
rafter eyebolts and the eyebolts at two to three interior
rafters.
6. Cut the rope and tie one end to the eyebolt.
1. Using the Twist-of-the-Wrist assembly, roll up the
sidewall so that it is a few inches above the ground.
2. Drill a 3/8" hole through the baseboard at the base of
the end rafter where the Twist -of-the-Wrist assembly is
located, insert an eyebolt through the hole, and secure
the eyebolt with a nut and washer.
7. Pull the rope tight and tie the remaining end to secure.
8. Repeat the steps to install another section of anti-billow
rope. Continue this pattern until all ropes are tied along
one side and repeat the steps to install the anti-billow
ropes for the remaining side.
NOTE:
The number of individual ropes along any
one side depends on the length of the building, rafter
spacing, and the length of the rope sections.
9. Check the roll-up side operation.
10. Read the shelter care and maintenance information
that follows.
Diagram may show a different frame used for illustration
purposes only.
Example: Circles identify the ends of Rope #1.
Rope
#1
Rope
#2
Rope
#3


