background image


If the sign is below the minimum, fill up oil till restore the correct level. 
The oil change must be performed: 


after the first 50 working hours; 


each 200 working hours. 

To make the oil change: 


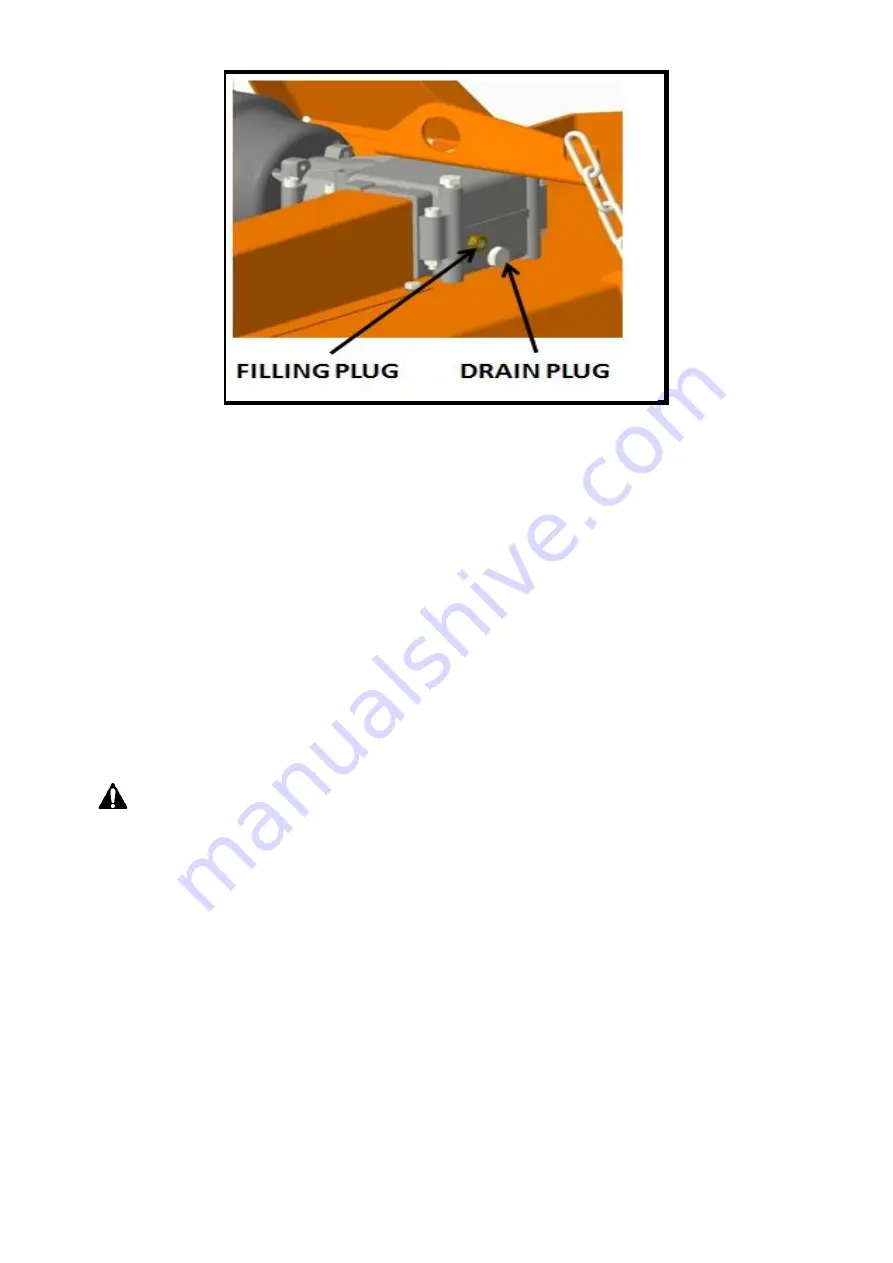
place a tank under the oil drain plug (bottom of gearbox); 


unscrew the oil drain plug and drain oil completely into the tank; 


retighten the drain plug; 


unscrew the oil filling plug; 


fill up oil till restoring the correct level (between the two reference dipstick marks); 


retighten the filling plug; 


dispose the discharged oil into containers for used oil. 

  CAUTION 

Before touching the gearbox wait until it has cooled sufficiently. 
IMPORTANT 
Frequently check possible oil leaks from tiller through visual inspection, and in case of leakage provide 

immediately proper maintenance. 
Avoid oil leaks on the ground when restoring oil level or making oil change. 


6.3.


SIDE CASE LUBRICATION 

Lubricant: SAE EP 140 gear oil 

Содержание FTC Series

Страница 1: ...FARM MAXX FTC SERIES 36 40 48 COMPACT TRACTOR ROTARY TILLERS OPERATOR S PART S MANUAL Unifarm Machinery Corporation PO Box 38 Wilson NC 27893 ...

Страница 2: ......

Страница 3: ...conjunction with following Signal Words according to the degree of possible injuries that may result operating the implement DANGER Indicates an imminently hazardous situation that if not avoided will result in death or serious injury WARNING Indicates a potentially hazardous situation that if not avoided could result in death or serious injury and includes hazards that are exposed when guards are...

Страница 4: ...ully You have purchased a dependable and sturdy tiller but only by proper care and operation can you expect to get the service and long life designed and built into it RIGHT HAND AND LEFT HAND sides are determined from viewpoint of tractor seat Sometime in the future your tiller may need new parts to replace those are worn or broken If so go to nearest FARM MAXXdealer and provide him the model and...

Страница 5: ...STRUCTIONS 7 3 5 MAINTENANCE SAFETY INSTRUCTIONS 8 3 6 STORAGE SAFETY INSTRUCTIONS 8 3 7 SAFETY LABELS 8 4 SET UP 13 4 1 CONNECTING TO THE TRACTOR 13 4 2 DRIVELINE INSTALLATION 13 4 3 TRACTOR TILLER STABILITY 15 5 OPERATING 16 5 1 START UP 16 5 2 OPERATING INSTRUCTIONS 18 5 3 ADJUSTMENTS 18 REAR BOARDADJUSTMENT 20 5 4 STOPPING AND DISCONNECTION 21 5 5 TRASPORTING 22 6 MAINTENANCE 22 6 1 BLADES REP...

Страница 6: ...7 STORAGE 27 8 SCRAPPING 28 9 TROUBLESHOOTING 28 10 TORQUE VALUES TABLE 29 11 WARRANTY 30 12 SPARE PARTS 32 13 EC DECLARATION OF CONFORMITY Error Bookmark not defined ...

Страница 7: ...s manual cannot be disclosed or transmitted in whole or in part to third parties without the written permission of the Manufacturer All rights are reserved 2 INTRODUCTION 2 1 TILLER IDENTIFICATION Each tiller has a plate for unique identification Any request for assistance or information regarding the machine must be directed to the Manufacturer or Dealer always referring to the model and serial n...

Страница 8: ...lting from non intended use 2 3 MAIN PARTSDESCRIPTION 1 Tiller deck 2 Clevis lower hitch 3 Lower hitch pin 4 Upper hitch pin 5 Topmast 6 Implement input connection tiller PTO 7 Gearbox 8 Side transmission case 9 Rear board 10 Rotor shaft 11 Tine 12 Parking stand 13 Skid 14 Cardan driveshaft 15 PTO Guard 16 Driveshaft Support NOTE Unless otherwise indicated images shown in this manual refer to the ...

Страница 9: ...ed curved Transmission type Chain Chain Chain Max Working depth cm 12 12 12 Rotor tube diameter mm 52 52 52 Rotor Swing Diameter mm 386 386 386 Driveline safety device Shear Bolt Shear Bolt Shear Bolt Weight driveline excluded lbs 253 275 297 Kg 115 125 135 3 SAFETY Proper use of equipment a strict observance of the safety messages listed below and application of all reasonable practices to avoid ...

Страница 10: ...make sure that all safety devices are installed and in good working conditions In case of damages of shields replace them immediately DANGER Is absolutely forbidden to remove or alter safety devices DANGER Before starting and during operation of the tiller make sure there are no people or animals in the operation area the machine can project material from the back with risks of serious injury or d...

Страница 11: ...clean from debris and foreign objects which may damage functioning or cause injury WARNING Do not use the machine if the category of the connecting pins of the tiller does not match that of the tractor hitch system WARNING Do not use the machine with missing bolts screws pins or safety pins WARNING Never use the machine to transport or lift people animals or objects WARNING Make certain by adding ...

Страница 12: ...off to avoid damage to the machine DANGER In presence of steep slopes greater than 15 degrees the tilling action may cause instability of the tractor with risk of tipping and consequent serious injury or death hazard Consult the manual for the tractor to determine the maximum slope that the tractor is able to deal with DANGER Always disengage the PTO before raising the tiller and never engage the ...

Страница 13: ...ler lowered to the ground or on security stands the ignition key off and the parking brake set 3 4 TRANSPORTING SAFETY INSTRUCTIONS WARNING Before transporting determine the stopping characteristics of the tractor and implement WARNING Transport only at speeds where you can maintain control of the equipment WARNING When driving on roads the implement must be in transport position adequately raised...

Страница 14: ... contact the Manufacturer or your dealer DANGER Do not swallow fuels or lubricants In case of accidental contact with eyes rinse well with water and consult a doctor 3 6 STORAGE SAFETY INSTRUCTIONS WARNING Never leave the tractor unattended with the tiller in lifted position Accidental operation of lifting lever or a hydraulic failure may cause sudden drop of unit with injury or death by crushing ...

Страница 15: ...s are worn they must be replaced with others obtained from the manufacturer and placed in the position indicated by this manual Make sure the safety labels are legible If necessary wipe them by a cloth with soap and water Safety Labels position and description ...

Страница 16: ...Sr NO SPARE CODE DESCRIPTION DECALS 1 D1090 WARNING ALWAYS READ THE OPERATOR MANUAL 2 D1038 MAINTENANCE TURN OFF TRACTOR REMOVE KEY ...

Страница 17: ...ING OBJECTS HAZARD 4 D1096 ROTATING KNIVES LOWER LIMBS HAZARD 5 D1078 HAND HAZARD 6 D1079 ROTATING GEARS 7 D1097 CRUSHING HAZARD BY LINK LIFTING 8 D1098 IMPLEMENT INPUT DRIVELINE 9 D1099 TRACTOR PTO RPM ROTATION DIRECTION ...

Страница 18: ...122 FINGERS HANDS CRUSHING HAZARD 11 D1082 SAFETY EQUIPMENT 12 D1007 OIL FILLING PLUG NEW 13 D1008 GREASE NEW 14 D1009 OIL DRAIN PLUG 15 D1006 MAINTAIN OIL LEVEL 16 D1083 LIFTING HOOK JOINT 17 D1108 CE LOGO ...

Страница 19: ... split pins raise the tiller until PTOs of tractor and machine are at the same height then adjust the 3 point top link so that the front of the machine is leveled to the back the axis of the tiller PTO must be parallel to the ground in order to limit stress transmitted to the tiller through the cardan shaft make sure that left side of the tiller is leveled with the right by adjusting the tractor l...

Страница 20: ...o prevent shielding rotation during functioning of the machine Driveline Length Check Before operating the tiller ensure that the size of driveshaft is adequate The driveshaft supplied with the machine has a standard length therefore it may need an adaptation of the length depending of the tractor which the tiller is combined The length of the driveshaft must be such to avoid bottom out of the tra...

Страница 21: ... first time and after long periods of inactivity make sure that the driveline clutch has run a short run in in accordance with what indicated in the instruction manual of the manufacturer removing the possible oxidation of the components that may compromise the correct slipping during the usage see also section Maintenance always engage the tractor PTO at low rpm to minimize the effect of the peak...

Страница 22: ... the tractor and if necessary applying the front ballast To determine the appropriate characteristics of the ballast refer to the manual of the tractor 5 OPERATING Before operate the tiller make sure you have read and understood the operating manuals of the tiller tractor and PTO shaft and followed what is described in the section Set Up DANGER During operation adjustment maintenance repairing or ...

Страница 23: ...ch use make the following checks on the operating area identified for tillage check that area is clear of foreign objects rocks branches or debris Remove any obstacle and visibly highlight obstacles that cannot be eliminated e g by means flags make sure in the working area exposed there are no people or animals make sure the soil to be worked is not too grassy muddy sandy or rocky WARNING Before c...

Страница 24: ...prolonged intervention of the clutch due to an object wedged into the rotor stop operating immediately idle the engine speed and disengage the PTO Wait for stopping of all rotating parts then raise the implement and proceed to removing the object after stopped the tractor set the parking brake stopped engine and removed the ignition key Repair any damages immediately and make sure rotor and blades...

Страница 25: ...re that the height of all the compressed springs is equal to prevent clutch malfunctioning SKIDS ADJUSTMENT The working depth of the tiller is determined by the position of the side skids it may be increased by raising the skids and decreased by lowered them It s important that both skids are adjusted at the same height To adjust the working depth perform the following steps lift the machine put i...

Страница 26: ...pped with a rear board with chain The position of the rear board is adjustable by varying the number of chain links included between distance XY which remain tensioned under the weight of the board i e links between the rear board hole 1 and the slot of the frame 2 to raise the rear board reduce the number of chain links in tension This operation together with the increase of the tractor ground sp...

Страница 27: ...implement adjust the skids to their lowest position see Section Adjustments adjust the parking stand to the lowest position through the use of relative retaining pin park the tractor on a dry and level surface reduce the engine speed then disengage PTO wait for stopping of all rotating parts lower the implement to the ground set the parking brake shut down the engine and remove the key before exit...

Страница 28: ...the machine and consequently invalidate the warranty The frequency of maintenance indicated refers to normal conditions of use it must be intensified in severe operating conditions frequent stops and starts prolonged winter season etc Repairs maintenance and modifications other than those mentioned in this paragraph should NOT be performed without consulting the manufacturer or your dealer Manufac...

Страница 29: ...de then tighten the bolts referring to the tightening table of this manual for proper torque values Be sure to install the blade with cutting edge in front of the direction of rotation repeat the same procedure for all the other blades At the end of the replacement make sure the blades have the right helical arrangement as shown in the figure Periodically check the tightness of screws and nuts and...

Страница 30: ...w the oil filling plug fill up oil till restoring the correct level between the two reference dipstick marks retighten the filling plug dispose the discharged oil into containers for used oil CAUTION Before touching the gearbox wait until it has cooled sufficiently IMPORTANT Frequently check possible oil leaks from tiller through visual inspection and in case of leakage provide immediately proper ...

Страница 31: ...nk under the oil level plug unscrew the oil level plug and drain completely the oil into the tank retighten the level plug unscrew the oil filling plug top of transmission cover fill up oil till restoring the correct level until level plug retighten the filling plug replace the side skid dispose the discharged oil into containers for used oil 6 4 BEARING HOUSING LUBRICATION Lubricant SAE multi pur...

Страница 32: ...un Do not let excess grease collect on or around parts particularly when operating in sandy areas 6 5 DRIVESHAFT MAINTENANCE Lubricant SAE multi purpose lithium type grease Grease crosses sliding parts of protective shielding and driveshaft transmission tubes IMPORTANT ...

Страница 33: ... manufacturer 7 STORAGE Before leaving the tiller unused for a long time it s necessary to perform following tasks to preserve the appearance and functionality of the machine and to make easier the restart at later use park the tiller on a flat surface in a place dry and protected from exposition to the elements possibly with storage temperature between 0 and 50 C see Section Stopping and disconne...

Страница 34: ...back Rotor damaged Hard soil Replace blades Replace bearings Adjust 3 point top link of tractor making tiller PTO parallel to the ground Repair replace rotor Reduce ground speed Driveline vibration Worn driveshaft Machine lifted too high Debris wrapped on rotor Replace driveshaft Lower machine and readjust tractor lift stop Remove debris Rotor stops turning Slip clutch slipping Broken chain in cha...

Страница 35: ...er choking up with soil Blades worn or bent Blades incorrectly installed Rear board too low Soil too wet Replace blades Install tines correctly Raise rear board Wait until soil dries Tiller skipping on ground or leaving crop residue Blades incorrectly installed wrong helical arrangement cutting edge in wrong direction Debris entangled in blades and or rotor Ground speed too fast Soil too hard Inst...

Страница 36: ...in the instruction manual provided by the company along with the FARM MAXX equipment at the time of delivery Changes if any resulting in improper usage will not be covered by the warranty This warranty will automatically terminate on the expiry of warranty period of 12 months even the FARM MAXX equipment may not be in use for any time during the warranty period for any reason whatsoever including ...

Страница 37: ...he FARM MAXX equipment or any parts thereof is subjected to neglect fire floods or other acts of God or if in the company s opinion any damage has caused to the FARM MAXX equipment during transportation b The original serial number is removed obliterated or altered from the unit c Any attempt is made to have the repairs executed by a person or persons other than the company or its authorized repre...

Страница 38: ...teners 8 Fabrication 9 Chains sprockets 10 PTO Clutch or Shear Bolt 12 SPARE PARTS All repairs and replacements on the machine must be performed only by using original spare parts which must be obtained provided from the manufacturer or your dealer This section contains the information needed to identify the parts of FTC Series tillers that may be ordered to manufacturer When request spare parts t...

Страница 39: ...PARTS MANUAL FTC SERIES ...

Страница 40: ... FRAME ASSEMBLY SPARE PARTS TABLE ...

Страница 41: ... FRAME ASSEMBLY SPARE PARTS LIST FRAME ASSEMBLY FTC SERIES 085 105 125 ...

Страница 42: ...5 36028 DRIVING SHAFT 125 ULTRA 1 36058 DRIVING SHAFT 105 ULTRA 36062 DRIVING SHAFT 85 ULTRA 16 36044 HEX BOLT M12X1 75X90 DIN933 8 8 ZP 2 17 24117 HEX BOLT M8X1 25X20 IS1364 2 8 8 ZP 6 18 36013 DRIVING SHAFT COVER 125 ULTRA 1 36054 DRIVING SHAFT COVER 105 ULTRA 36063 DRIVING SHAFT COVER 85 ULTRA 19 36048 RIVSERT RIVET NUT M8X1 25 4 20 36047 WASHER SCHNNOR M8 6 21 36052 CRUTCH WELDMENT ULTRA 1 22 ...

Страница 43: ... SIDE ASSEMBLY SPARE PARTS LIST SIDE DRIVE ASSEMBLY FTC SERIES 085 105 125 ...

Страница 44: ...11 36014 SPROCKET Z 17 ULTRA 1 12 36015 SPROCKET Z 26 ULTRA 1 13 33006 GUK SELF LOCKING NUT M25X1 5 2 14 36031 TENSIONER RING ULTRA 1 15 36044 HEX BOLT M12X1 75X90 DIN933 8 8 ZP 1 16 36049 LOCK NUT WITH O RING M12X1 75 1 17 17273 HEX NUT M12X1 75 DIN 934 8 ZP 3 18 36011 TENSIONER STOP ULTRA 1 19 36041 CHAIN 0 75 PITCH 52 LINK 1 20 36040 GASKET CHAIN COVER ULTRA 1 21 36001 CHAIN COVER COMP ULTRA 1 ...

Страница 45: ... GEARBOX ASSEMBLY SPARE PARTS TABLE GREABOX ASSEMBLY SPARE PARTS LIST ...

Страница 46: ... TEETH ULTRA 1 8 36066 PARALLEL KEY 10 X 8 X 30 1 9 36026 SIMS DIA 48 X 35 5 X 1 00 3 10 36004 SIMS DIA 48 X 35 5 X 0 50 1 11 10143 BEARING 6207 1 12 36024 PINION SHAFT 13 TEETH ULTRA 1 13 14075 OIL SEAL 62 X 7 1 14 36035 OIL SEAL 35 X 62 X 7 2 15 6024 CIRCLIP EXTERNAL 35MM 1 16 36068 HALF GEAR BOX TOP WL ULTRA 1 17 18048 ALLEN BOLT M8 X 1 25 X 60 8 18 8181 HEX NUT M8X1 25 IS 1363 8 ZP 8 19 3323 1...

Страница 47: ... ROTOR ASSEMBLY SPARE PARTS LIST ROTOR ASSEMBLY FTC SERIES 085 105 125 ...

Страница 48: ... 36072 BLADE C TYPE RH 60X6 WL ULTRA 12 FOR 125 10 FOR 105 8 FOR 85 6 17275 HEX BOLT M12X1 75X30 DIN933 8 8 ZP 48 FOR 125 40 FOR 105 32 FOR 85 7 14362 SPRING WASHER M12 00 IS 3063 ZP 48 FOR 125 40 FOR 105 32 FOR 85 8 17273 HEX NUT M12X1 75 DIN 934 8 ZP 48 FOR 125 40 FOR 105 32 FOR 85 9 6024 CIRCLIP EXTERNAL 35MM 3 10 36046 HEX BOLT M14X2 00X50 DIN933 8 8 ZP 4 11 1574 NYLOCK NUT M14X2 00 DIN 982 4 ...

Страница 49: ...NOTES ...

Страница 50: ...aghi di Avigliana 117 Plot No B NH 27 Nr Bharudi Toll Plaza 12022 Busca CN ITALY Bhunava Village Taluka Gondal Tel 39 0171 946654 Dist Rajkot 360311 Fax 39 0171 946723 State Gujarat INDIA www cosmosrl com Phone 91 2827 661637 270537 Fax 91 2827 270457 e mail info shaktimanagro com www shaktimanagro com ...

Отзывы: