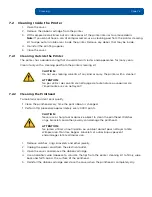
background image

Troubleshooting

 Page 6-4

PLT-01277, Version: 1.2

June 2014

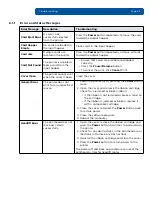
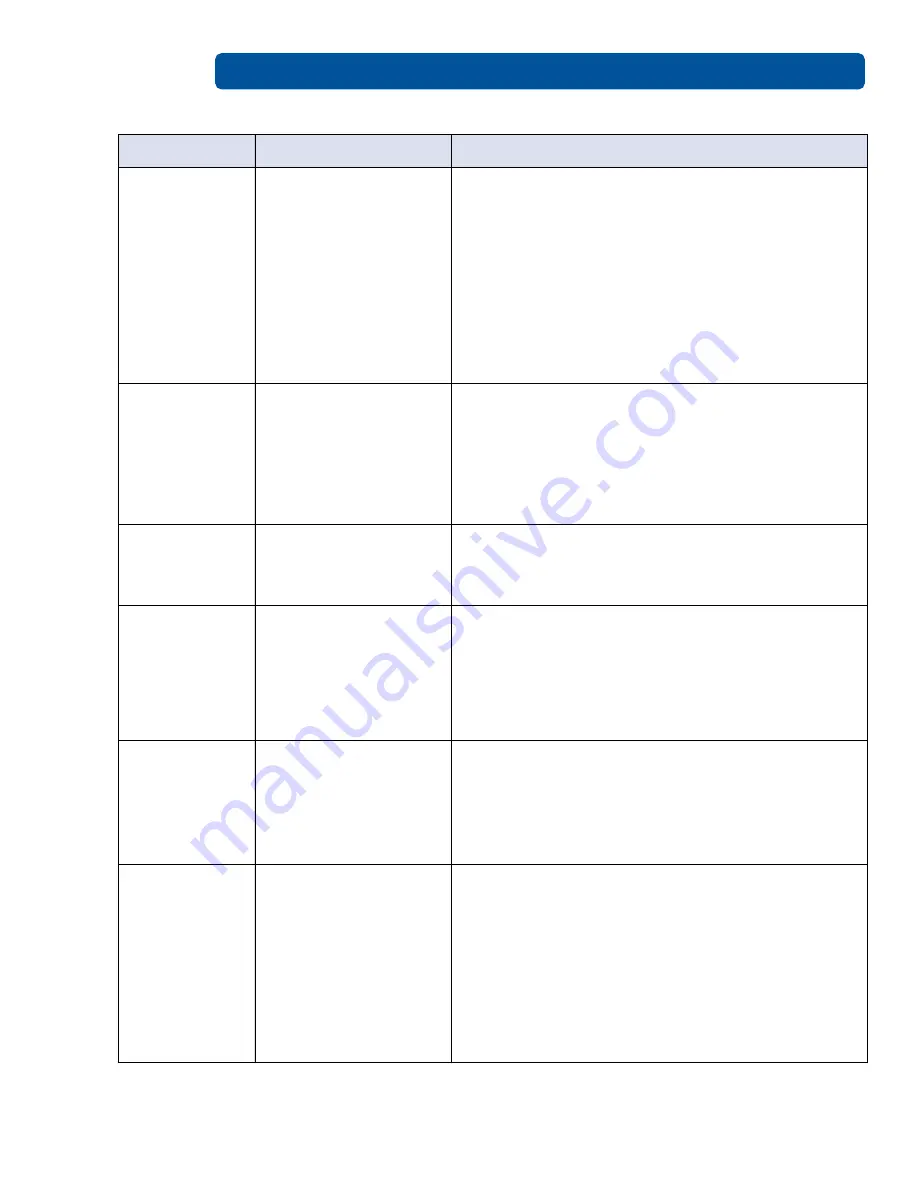
Ribbon Miscue

The ribbon is not able to 
find the next panel 
correctly.

• Open the cover and remove the ribbon cartridge.

 Verify the ribbon is not broken or upside down in 
the cartridge.

• If the ribbon is not broken, reinstall the cartridge, 

close the cover and press the 

Pause/Resume 

button. 

• If the ribbon is broken, tape the ends of the 

ribbon together and wind any excess onto the 
take-up spool. Reinstall the cartridge, close the 
cover and press the 

Pause/Resume

 button.

• To cancel the print, click the 

Cancel Print 

button.

Ribbon Out

The print ribbon is used 
to its maximum 
capacity.

• Install a qualified ribbon into the ribbon cartridge 

and press the 

Pause/Resume

 button.

• Verify the ribbon is not broken or upside down in 

the cartridge and press the 

Pause/Resume


button.

• Verify the 

Ribbon Type

 on the 

Device Options


tab is set correctly.

Ribbon RFID 
Error

The printer is 
incompatible with the 
ribbon you have 
installed.

• Install a ribbon cartridge that is compatible with 

your printer.

• Press the 

Pause/Resume

 button.

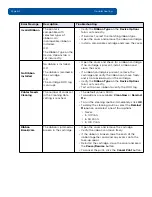
Ribbon Sensor 
Error

The ribbon temperature 
sensor is out of range. 

Calibrate the ribbon sensor:

1. Click on 

Cancel Print

2. Open the cover and remove the ribbon cartridge.
3. Close the cover.
4. Select 

Card > ToolBox > Calibrate Ribbon > 

Calibrate.

The Supply 
information is 
unavailable at 
this time.

The printer driver does 
not automatically detect 
the ribbon type. 

1. Click 

OK

.

2. Click 

Device Options

.

3. Clear the 

Automatically detect the installed 

Ribbon for every print job

 check box.

4. Select the 

Ribbon Type 

drop-down button and 

select the installed ribbon type.

Wrong Ribbon 
Installed

The printer is 
compatible with 
selected types of 
ribbons. An 
incompatible ribbon is 
installed.
OR
The Ribbon Type on the 
Device Options tab is 
set incorrectly.

Verify the 

Ribbon Type

 on the 

Device Options

 tab is 

set correctly. If incorrect, select the matching ribbon 
type.

1. Open the cover and remove the ribbon cartridge. 
2. Install a compatible cartridge and close the cover.

Error Message

Description

Troubleshooting

Содержание C50

Страница 1: ......

Страница 2: ...com corporate offices Date Description Version June 2014 Updated liability and trademark acknowledgments and copyright statements Updated Japan cert Updated to current format Updated global customer s...

Страница 3: ...ional Specifications 1 9 1 6 Printer Components Print Ribbons 1 9 1 6 1 Ribbon Type Count Table 1 9 1 7 Printer Components Blank Cards 1 10 Chapter 2 Setup and Installation Procedures 2 1 2 1 Inspecti...

Страница 4: ...6 2 3 For Overlay Only 4 14 4 6 2 4 For Print Only No Overlay 4 14 4 6 3 Security Options 4 14 4 6 3 1 Visual Security Solutions 4 14 4 6 3 2 Verimark 4 15 4 6 3 3 HoloMark 4 15 4 7 K Panel Resin Tab...

Страница 5: ...cations Errors 6 1 6 1 1 Error and Status Messages 6 2 Chapter 7 Cleaning 7 1 7 1 Using the Required Supplies 7 1 7 2 Cleaning Inside the Printer 7 2 7 2 1 Cleaning Outside the Printer 7 2 7 2 2 Clean...

Страница 6: ...Page vi PLT 01277 Version 1 2 June 2014 This page intentionally left blank...

Страница 7: ...Printer complies with the requirements in Part 15 of the FCC rules for a Class A digital device CE The Card Printer has been tested and complies with EN300 330 1 EN300 330 2 EN301 489 1 EN301 489 3 EN...

Страница 8: ...n a residential area is likely to cause harmful interference in which case you are required to correct the interference at your expense IMPORTANT Changes or modifications to an intentional or unintent...

Страница 9: ...th Reference the following safety messages before performing an operation Always remove the power cord prior to performing repair procedures unless otherwise specified Ensure only qualified personnel...

Страница 10: ...itif est sensible l lectricit statique Il peut souffrir des dommages s il est expos des d charges lectrostatiques Pour viter des dommages Rapportez vous aux messages suivants avant de proc der une op...

Страница 11: ...June 2014 PLT 01277 Version 1 2 Page 1 5 Specifications 1 3 3 Safety Messages Taiwan...

Страница 12: ...PLT 01277 Version 1 2 June 2014 1 3 4 Safety Messages China 6 P Use only at altitudes not more than 2000m above sea level 5R 6 Environmental Protection Use Period is based on the product being used i...

Страница 13: ...cts from the printer Print speeds do not include encoding time or the time needed for the PC to process the image Process time is dependent on the size of the file the CPU amount of RAM and the amount...

Страница 14: ...limited pass with UltraCard Options Printer Clearing Kit Software FARGO Workbench Diagnosis Utility Display Status indicated by button color red or blue flashing always on or always off Printer Memory...

Страница 15: ...ation resin versions To make it easier to remember which print ribbons are which a letter code has been developed to indicate the type of ribbon panels found on each ribbon This letter code is as foll...

Страница 16: ...inhibits consistent color transfer Some types of smart card chips are raised slightly above the card s surface which also results in poor color transfer UltraCard Brand Cards The UltraCard product li...

Страница 17: ...e that no damage has occurred during transportation Make sure that all supplied accessories are included with your unit See the Installation Guide for information on how to load the ribbon cartridge a...

Страница 18: ...Setup and Installation Procedures Page 2 2 PLT 01277 Version 1 2 June 2014 This page intentionally left blank...

Страница 19: ...tart up the printer press the Power button once The buttons illuminate with a steady blue light To deactivate the printer press the Power button twice The lighted buttons extinguish and become dark Th...

Страница 20: ...uccessful completion of a setting or activity A single beep generally indicates a successful change Two beeps signals the successful completion of the clean printer routine Three beeps signals the res...

Страница 21: ...een tabs will displayed their default condition On all screens OK button Closes the dialog box and saves the driver configuration changes since the dialog box has been open Cancel button Closes the di...

Страница 22: ...diagnostics and calibration Important Never run cards with a contaminated dull or uneven surface through the printer Printing onto such cards will ultimately lead to poor print quality Always store th...

Страница 23: ...n enables the printer to overprint images so they appear edge to edge when transferred to the card For this reason when designing a card format always set the card size or page size within the card de...

Страница 24: ...oolBox window and options 4 1 5 3 Test Print After installation of a compatible ribbon cartridge in the printer 1 Open the printer driver settings 2 From your computer s start menu select Devices And...

Страница 25: ...2 1 Supplies If the Automatically detect the installed Ribbon for every print job checkbox is selected The printer driver automatically detects the installed ribbon To manually select the ribbon type...

Страница 26: ...loaded in the printer 4 2 3 Options The only available options for the C50 are those displayed as active in the graphic Rotate Front 180 Degrees Select this option to rotate the image on the front of...

Страница 27: ...June 2014 PLT 01277 Version 1 2 Page 4 7 Printer Preferences 4 3 Image Color Tab Use this tab to adjust color properties...

Страница 28: ...3 Heat Dye Sub Intensity YMC Control the overall darkness and lightness of the dye sub printed image by adjusting the Dye Sub Intensity YMC slide Move the slide to the left to use less heat in the pri...

Страница 29: ...lt button 4 3 5 Advanced Image Color Adjust the sliders as needed to improve image quality Move the slide to the left for less sharpness contrast gamma color Move the slide to the right for more sharp...

Страница 30: ...Printer Preferences Page 4 10 PLT 01277 Version 1 2 June 2014 4 4 Image Calibrate Tab Use this tab to adjust the image position on the card...

Страница 31: ...outline around the illustration remains constant in the landscape orientation 4 4 1 1 Vertical Use the vertical adjustment to move the image toward the top or bottom of the card A positive number mov...

Страница 32: ...is disabled 4 6 Overlay Print Area Tab Use the overlay print area tab to control and customize where the overlay O panel and or the print area appear on the card By default this option is set to print...

Страница 33: ...ea Select this option to overlay and or print only in the space outside the standard location of a smart chip Omit Mag Strip Area Select this option to overlay and or print only in the space outside t...

Страница 34: ...2 For Print and Overlay This option applies the defined area to both the print and overlay processes 4 6 2 3 For Overlay Only The defined are applies only to the overlay process The entire card print...

Страница 35: ...become selectable This field presents options based on the orientation of the card in the template 4 6 3 2 Verimark This option is reserved for future use 4 6 3 3 HoloMark Use this option for hologra...

Страница 36: ...r ribbon is printed If a ribbon without a resin black panel is installed in your printer these options are grayed out and unavailable The orientation of the card display area is determined by the orie...

Страница 37: ...ted and define area s 4 7 4 Undefined Area s Select this option to overlay and or print in the space outside the selected and defined area 4 7 5 Print YMC under K Select Print YMC under K to print all...

Страница 38: ...references Page 4 18 PLT 01277 Version 1 2 June 2014 4 8 Printer Info Tab The Printer Info tab reports ribbon use and the number of cards printed Note Graphic for information ONLY DO NOT use to order...

Страница 39: ...abs will displayed their default condition On all screens OK button Closes the dialog box and saves the driver configuration changes since the dialog box has been open Cancel button Closes the dialog...

Страница 40: ...on selects events that result in notification or displays prompt for the user The default setting is to monitor four conditions 5 1 1 1 Low Ribbon Notifies the user that the amount of ribbon remaining...

Страница 41: ...mpt Requires the user to enter a security password before the printer driver accepts a print job 5 1 2 Set Language This section enables the selection of the language used for printer driver messages...

Страница 42: ...ToolBox Page 5 4 PLT 01277 Version 1 2 June 2014 5 2 Calibrate Ribbon Tab This tab enables the user to start the ribbon calibration Follow the directions on the screen to perform this procedure...

Страница 43: ...e 2014 PLT 01277 Version 1 2 Page 5 5 ToolBox 5 3 Clean Printer Tab To clean the printer follow the instructions outlined on this tab You can perform additional cleaning as needed See Chapter 7 Cleani...

Страница 44: ...d knowledge prior to making these adjustments Setting This column displays the type of setting Default This column displays the default setting value Current This column displays the current setting v...

Страница 45: ...eserved Image Darkness Adjusts the overall darkness of the printed image by increasing or decreasing the amount of heat used by the printhead when printing Lighten the printed image by clicking or ent...

Страница 46: ...ease the setting to delay the sleep mode Disable sleep mode with a 0 value The counter for this setting starts after standby time has elapsed OLED Contrast Reserved Reserved Ribbon Calibrate Blue Rese...

Страница 47: ...4 bit Vista 32 bit and 64 bit Pentium class 500 MHz computer with 256 MB of RAM or higher 500 MB free hard disk space or more USB Port 2 Confirm the correct installation of the printer driver Note Thi...

Страница 48: ...s open Close the cover General Error The printer does not print for an unspecified reason 1 Power the printer off by pressing the Power button twice 2 Open the cover and remove the ribbon cartridge Ch...

Страница 49: ...the ribbon can move freely and is not upside down in the cartridge Verify the Ribbon Type on the Device Options tab is set correctly Test with a new ribbon to verify the RFID tag Printer Needs Cleani...

Страница 50: ...atible with the ribbon you have installed Install a ribbon cartridge that is compatible with your printer Press the Pause Resume button Ribbon Sensor Error The ribbon temperature sensor is out of rang...

Страница 51: ...re available and loaded correctly 2 Press the Pause Resume button To cancel the print click Cancel Print Unable to Read Settings from the Printer The printer driver does not detect the printer 1 Click...

Страница 52: ...Troubleshooting Page 6 6 PLT 01277 Version 1 2 June 2014 This page intentionally left blank...

Страница 53: ...ds pre moistened with 99 99 isopropyl alcohol for cleaning the printer s interior and exterior Alcohol cards pre moistened with 99 99 isopropyl alcohol for cleaning the printer s platen rollers card f...

Страница 54: ...n is changed Perform this procedure approximately every 3000 prints 1 Remove watches rings bracelets and other jewelry 2 Unplug the power cord from the electrical outlet 3 Open the cover and remove th...

Страница 55: ...on 3 or greater a Select the Update Manager Workbench Utility b Select the printer s to update c Click the Select Firmware file option to locate or enter this latest firmware file FRW 00373_DTC100_v2...

Страница 56: ...Firmware Updates Page 8 2 PLT 01277 Version 1 2 June 2014 This page intentionally left blank...

Страница 57: ...PLT 01277 Version 1 2 April 2014 This page intentionally left blank...

Страница 58: ......

Отзывы: