
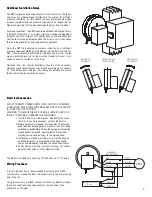

Step 2. Mount Switch
Insert the DB10 conduit connector through a knock-out
in the electrical box and secure with the nut as shown.
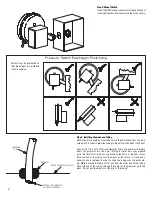
Switch must be positioned so
that diaphragm is maintained
in vertical plane.
Step 3. Installing Grommet and Tubing
Note: Grommet should be mounted no more than 30 inches from the pres-
sure switch in order to allow the tubing to reach from the switch to the duct.
First, drill a 1/4 inch to 5/16 inch diameter hole in the duct wall. Carefully
insert the grommet into the hole. (Drilling a metal duct may produce
burrs. Be careful not to be cut or pricked by the burrs or the duct.) Next,
force one end of the tubing over the nipple on the switch. It may be nec-
essary to use a lubricant in order to slide the tubing over the entire nip-
ple. Make a mark a distance of 1/2 inch from the other end of the tubing.
Slide this end of the tubing through the center of the grommet up to the
mark. Do not use a lubricant on this end of the tubing.
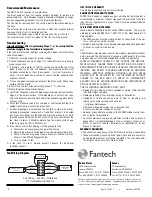
GROMMET
PRESSURE
TUBE
DRYER EXHAUST DUCT WALL
PRESSURE TUBE INSERTED
1/4" INTO DRYER DUCT
I
Pressure Switch Diaphragm Positioning
2


