fantasticfurniture.com.au
Version 1.
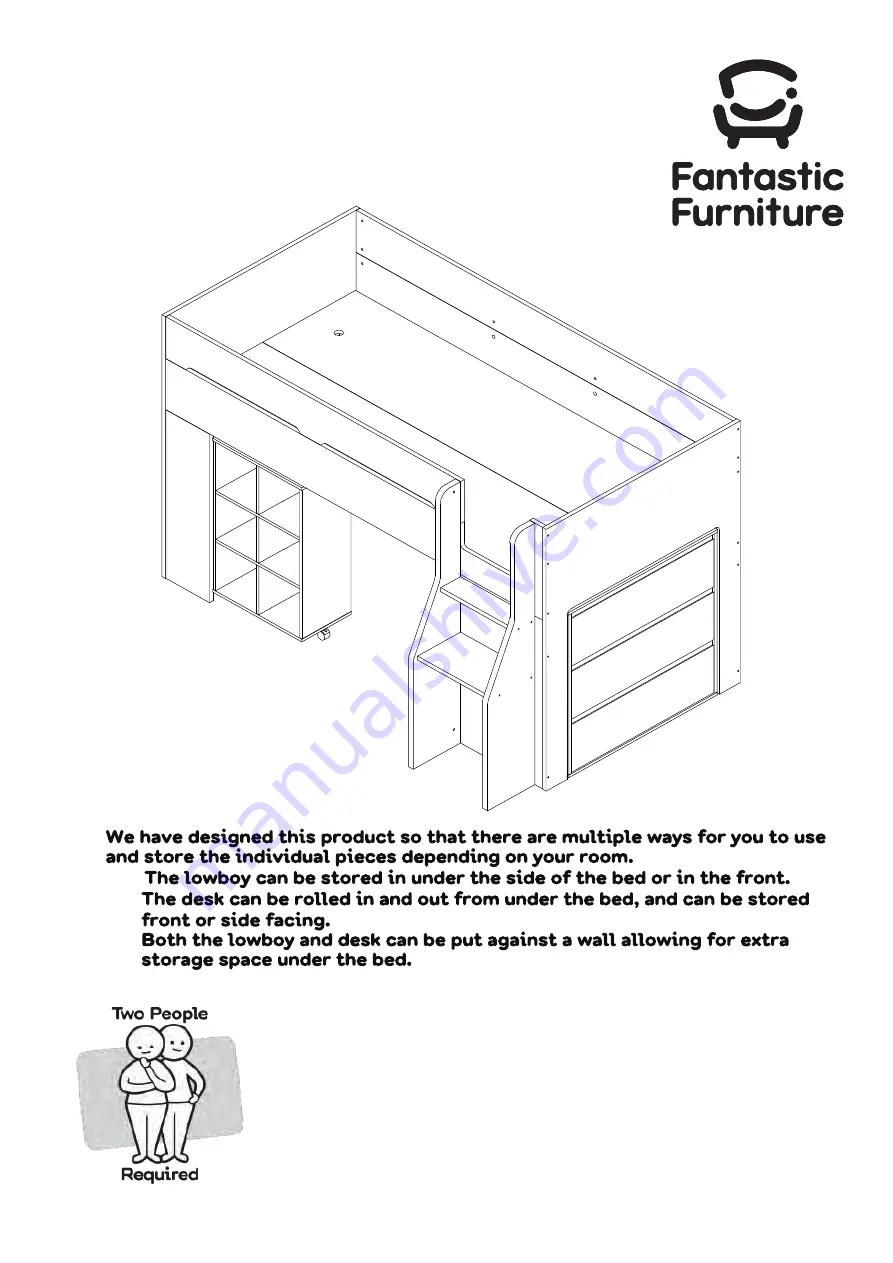
1
Nova
Mid Sleeper Desk Lowboy White
1.
2.
3.
Страница 1: ...fantasticfurniture com au Version 1 1 Nova Mid Sleeper Desk Lowboy White 1 2 3...
Страница 2: ...be checked periodically to ensure that the guardrail ladder and other components are secure and in the correct position and all connectors are tight We recommend that children under the age of nine 9...
Страница 3: ...hardware or getting components back to front Always use a so t surface such as carpet or cardboard when assembling your product to avoid scratching or damaging the surface of the product Bulky items...
Страница 4: ...P20 P21 P24 P23 P23 P26 P28 P27 P30 P47 P18 P29 P25 P25 P35 Desk Top Panel P31 P33 P32 P34 P46 P36 P37 P39 P38 P40 P41 P42 P43 P44 P45 P30 P1 P8 Box 2 Rear Side Rail P4 Rear Side Bottom Rail P5 Box 3...
Страница 5: ...s H18 14 x Feet H12 Runner H6d 24 x Screws Track H6c Track H6a Runner H6b 4 x CL Runner H13 H14 8 x Screws 52 x Screws 4 x DL 4 x CR Runner 4 x DR 38 x Screws H8 6 x Screws H9 H10 18 x Screws 3 x Wash...
Страница 6: ...7 P35 H2 H2 H2 H2 H2 H2 H2 H2 H2 H2 H2 H2 H2 H2 4 x Cam Nuts H1 H5 4 x Small Dowels Attach 14 x Cam Bolts H2 to the Shelf Front Panel P37 and Shelf Rear Panel P35 by tightening with a Phillips Head Sc...
Страница 7: ...This side has raw edge 2 x Small Dowels Slot in the Shelf Middle Panel P36 into the grooves of the 2 x Shelf Panels P38 as shown Insert 3 x Cam Nuts H1 and 2 x Small Dowels H5 into the Shelf Back Pane...
Страница 8: ...3 8 x Screws 6 x Small Dowels Insert 3 x Cam Nuts H1 and 2 x Small Dowels H5 into the Shelf Back Panel P39 Rotate the cam nuts so the arrows face the incoming bolts Insert 4 x Cam Nuts H1 and 4 x Smal...
Страница 9: ...k H6a to the Shelf Back Panel with 3 x Screws H14 by tightening with a Phillips Head Screwdriver Insert 2 x Cam Bolts H2 into the Shelf Back Panel P39 tightening with a Phillips Head Screwdriver Attac...
Страница 10: ...into Desk Back Panel P33 Rotate the nuts so the opening faces the incoming screws First insert 4 x Cam Nuts H1 into the Desk Back Panel P33 and Support Panel P34 Rotate the cam nuts so the arrows face...
Страница 11: ...rake H23 1 x Caster With H22 1 x Caster 1 x Wrench H4 H22 H23 H23 H4 Attach Castor H22 and Castor with Brake H23 onto Desk Side Panel P32 by tightening with the Wrench H4 as shown Insert 14 x Cam Bolt...
Страница 12: ...tens over the bolt P32 P34 P46 P33 P39 P36 P37 P31 P34 P32 P33 P39 P35 P36 P37 Attach the Desk Top Panel P31 to Panels P32 P33 P34 P35 P36 P37 P39 by aligning all the holes and tightening the Cam Nuts...
Страница 13: ...m Bolts P43 P42 P30 You will need Phillips Head Screwdriver H1 H1 H1 Insert 5 x Cam Bolts H2 into the Drawer Front Panel P41 tightening with the Phillips Head Screwdriver Insert 5 x Cam Nuts into the...
Страница 14: ...5 H12 H12 Secure the Drawer Back Panel P44 to the Drawer Side Panels P42 P43 and the Drawer Support Panel P30 with 6 x Screws H12 tightening with the Phillips Head Screwdriver Ensure that the Drawer B...
Страница 15: ...4 Attach 1 x Left Drawer Runner H6b to the Left Drawer Side Panel P42 and 1 x Right Drawer Runner H6d to the Right Drawer Side Panel P43 using 6 x Screws H14 tightening with the Phillips Head Screwdri...
Страница 16: ...H14 tightening with a Phillips Head Screwdriver Attach 3 x CR Runner Tracks H6c to the Side Panel P20 with 9 x Screws H14 with a Phillips Head Screwdriver Insert 4 x Cam Nuts H1 into Side Panels P19 P...
Страница 17: ...e bolt P22 P23 P20 H5 8 x Small Dowels H2 H2 P17 H2 H2 H2 H2 H2 H2 H2 P21 P21 Insert 8 x Small Dowels H5 into Panels P21 P22 P23 Attach Panels P21 P22 P23 to Side Panel P19 by aligning the holes and t...
Страница 18: ...l need H15 28 x Nails Hammer P24 P20 P18 P17 P19 P24 H15 H15 H15 H15 H15 H15 H15 H15 H15 H15 H15 H15 H19 H19 H19 H19 H19 H19 H15 H15 H15 H15 Slot in the Support Bar P47 into the grooves of the Side Pa...
Страница 19: ...lt H1 H1 P27 P30 P26 P25 H1 H1 H2 H2 x 3 x 3 Insert 5 x Cam Nuts into the Drawer Side Panels P26 P27 and Drawer Support Panel P30 Rotate the cam nuts so the arrows point towards the incoming cam bolts...
Страница 20: ...ack Panel P28 to the Drawer Side Panels P26 P27 and the Drawer Support Panel P30 with 6 x Screws H12 tightening with the Phillips Head Screwdriver Ensure that the Drawer Base Panel P29 slots in the gr...
Страница 21: ...x DR Runner P26 P17 Attach 1 x Left Drawer Runner H6b to the Left Drawer Side Panel P26 and 1 x Right Drawer Runner H6d to the Right Drawer Side Panel P27 using 6 x Screws H14 tightening with the Phi...
Страница 22: ...ammer Hammer H18 H2 Insert 6 x Cam Bolts H2 into the Front H18 H18 Support Panel P9 and Headboard P1 tightening with a Phillips Head Screwdriver Attach 2 x Bed Bottom Panels P3 to the Headboard P1 and...
Страница 23: ...o it tightens over the bolt H1 H2 H8 Insert 6 x Large Dowels H6 into Panels P9 P10 Insert 6 x Cam Nuts H1 into 2 x Panels P10 Rotate the cam nuts so the arrows face the incoming bolts Attach the 2 x P...
Страница 24: ...H6 H6 H6 H6 P5 Attach Panel P5 to the Headboard P1 Insert 8 x Large Dowels H6 into Panel P5 Insert 2 x Nuts H11 into Panel P5 Rotate the nuts so the opening faces the incoming screws Insert 2 x Screws...
Страница 25: ...o the Panel P5 Insert 2 x Large Dowels H6 into Panel P4 Tighten the nut in Rear Side Rail P4 with a Phillips Head Screwdriver as shown Attach Panel P4 the Headboard P1 Insert 4 x Nuts H11 into Panel P...
Страница 26: ...the Footboard P2 Insert 6 x Nuts H11 into Panels P4 P5 Rotate the nut so the opening faces the incoming screws Insert 6 x Screws H8 through Footboard P2 into Panels P4 P5 tightening with the Allen Key...
Страница 27: ...with 16 x Screws H10 tightening with Allen Key H21 Attach Bracket H16 to secure Panel P6 P9 with 2 x Screws H10 tightening with the Allen Key H21 Attach 4 x Feet Glides H18 to the Ladder Side Panels P...
Страница 28: ...ase Panels P8 on top of the Bed Support Bars P7 Place 5 x Cover Stickers H3 over the exposed holes into the ladder Insert 5 x Nuts H11 into the Ladder Side P11 Panels P12 P13 Attach the Ladder to Pane...
Страница 29: ...nment please dispose of all packaging thoughtfully Seek advice from a qualified trades person on how to attach this safety strap to your specific wall Seek advice from a qualified trades person on how...
Страница 30: ...Page30 fantasticfurniture com au Step 48 1 2 3...