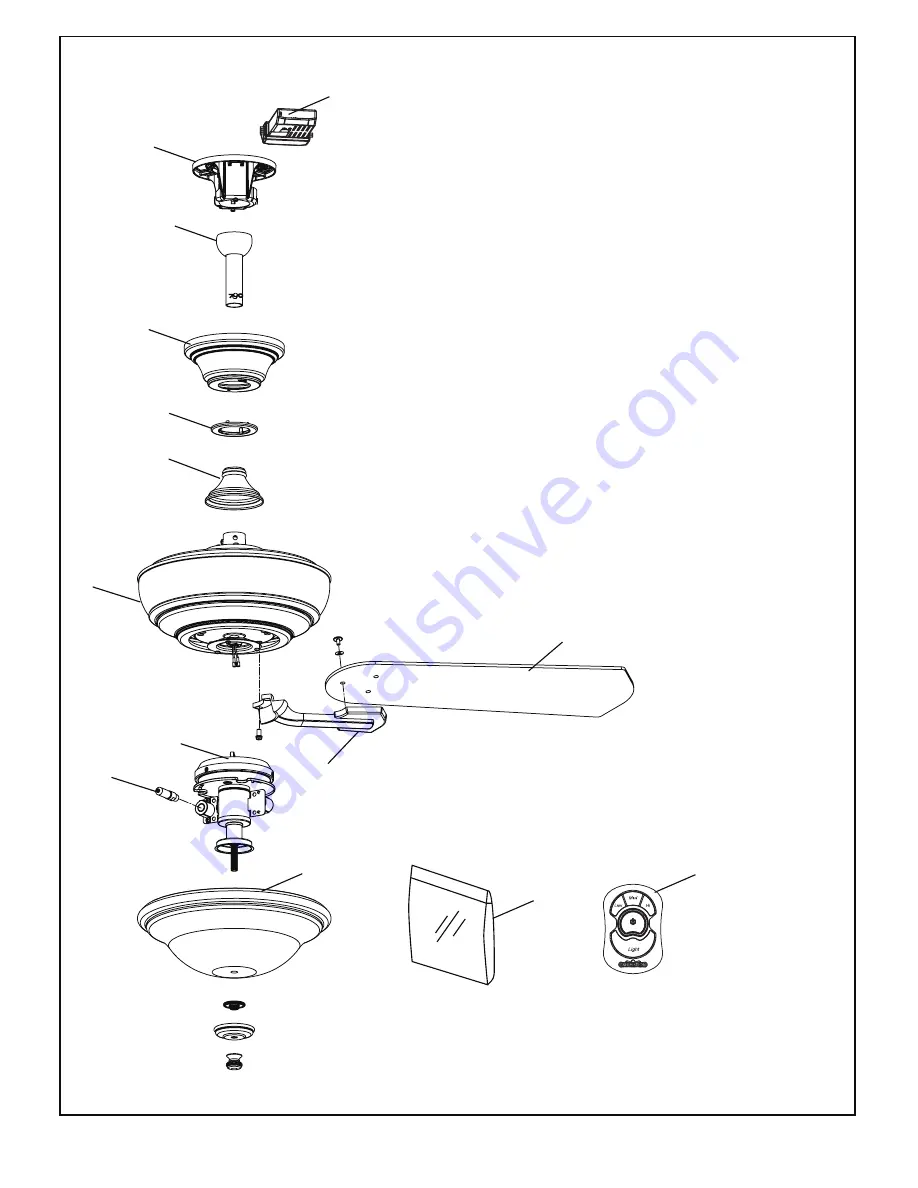
17
NOTE: The illustration shown is not to scale or its actual parts confi guration may vary
FP8095**
Exploded-View
Figure 1
3
4
5
6
10
9
8
7
1
12
14
13
11
2
The
Camhaven -
™
Страница 1: ...OWNER S MANUAL READ AND SAVE THESE INSTRUCTIONS The Camhaven Ceiling Fan Net Weight 11 10 kg 24 45lbs Model Nos FP8095...
Страница 2: ...r from being switched on accidentally When the service disconnecting means cannot be locked securely fasten a warning device such as a tag to the service panel 3 Be careful of the fan and blades when...
Страница 3: ...ur Ceiling Fan How to Hang Your Ceiling Fan How to Wire Your Ceiling Fan Installing the Canopy Housing 5 6 8 9 10 Assembling and Mounting the Fan Blades 11 Assembling Fan With the Light Kit 12 How to...
Страница 4: ...ied WARNING Do not install or use fan if any part is damaged or missing This product is designed to use only those parts supplied with this product and or any accessories designated specifically for u...
Страница 5: ...llar savings could be realized with this simple step Electrical and Structural Requirements If your fan is to replace an existing light fixture turn electricity off at the main fuse box at this time a...
Страница 6: ...or reinstallation in Step 4 Figure 2 hanger ball assembly by loosening the set screw in the hanger ball until the ball falls freely down the downrod Remove the pin from the downrod then remove the han...
Страница 7: ...e pin through the two holes in the downrod and align the hanger ball so the pin is captured in the groove in the top of the hanger ball Pull the hanger ball up tight against the pin Securely tighten t...
Страница 8: ...hers supplied with the outlet box Figure 9 NOTE Outlet box screws pass through slotted holes of the hanger bracket Figure 9 2 Pull the electric wires in the outlet box down through the opening in the...
Страница 9: ...fan has 16 different code combinations To prevent possible interference from or to other remote units simply change the combination code in your transmitter and receiver 1 To set the transmitter code...
Страница 10: ...Connect black wire from receiver unit marked AC IN L to black supply wire using wire connector supplied Connect white wire from receiver unit marked AC IN N to white supply wire using wire connector s...
Страница 11: ...ng the screws Figure 19 x 15 x 15 FIBER WASHER 3 16 24x8 mm WASHER HEAD SCREWS HARDWARE USED Blade Holder Arm Motor Motor Stops Assembly Blade Figure 18 Figure 19 Assembling and Mounting the Fan Blade...
Страница 12: ...r switch cup assembly Figure 23 Figure 23 Figure 21 Figure 22 2 Remove one of the three screws in the support bracket at the bottom of the motor assembly Slightly loosen the remaining two screws Assem...
Страница 13: ...ut Next install trim cover followed by the nial Do not over tighten Figure 26 CAUTION To reduce the risk of fire use 75 watt max type T4 minican JD E11 tungsten halogen bulb Turn off the wall switch a...
Страница 14: ...he two key slots in the socket plate Replace the third screw and securely tighten all three screws Figure 22 Switch cup support plate Cover Switch cup Figure 21 Switch cup support plate Adapter Switch...
Страница 15: ...operational install two 3 volt batteries in hand held remote transmitter if not using for long periods of time remove battery to prevent damage to Reverse Switch If airflow is desired in the opposite...
Страница 16: ...Cover Assembly 5 Fan Motor Assembly 6 Blade Holders Set 5 7 Blade Set 5 8 9 10 75W E11 Minican Light Bulb 2 Adapter Switch Cup Assembly 11 Glass Bowl 12 13 Hand Held Remote Receiver ADR1 45 PG809501...
Страница 17: ...17 NOTE The illustration shown is not to scale or its actual parts configuration may vary FP8095 Exploded View Figure 1 3 4 5 6 10 9 8 7 1 12 14 13 11 2 The Camhaven...
Страница 18: ...5 Some fan motors are sensitive to signals from solid state variable speed controls Solid state controls are not recommended choose an alternative control method 6 Tighten screws securely 3 FAN WOBBL...
Страница 19: ...Copyright 2012 Fanimation 2012 02 V 01 10983 Bennett Parkway Zionsville IN 46077 888 567 2055 FAX 866 482 5215 Outside U S call 317 733 4113 Visit Our Website www fanimation com...
Страница 20: ...Peso neto 11 10 kg 24 45lbs Modelo N FP8095 MANUAL DEL PROPIETARIO LEA Y GUARDE ESTAS INSTRUCCIONES The Camhaven Ventilador de techo...
Страница 21: ...in las aspas Todos los procedimientos de conexi n el ctrica e instalaci n deben cumplir con los C digos el ctricos nacionales ANSI NFPA 2 70 1999 y C digos locales El ventilador de techo debe estar co...
Страница 22: ...vados del uso o el rendimiento del producto o en conjunci n con ste excepto en los casos en los que la ley as lo disponga Esta garant a le otorga derechos legales especiales y es posible que tambi n g...
Страница 23: ...i n del despiece Figura 1 p gina 36 1 Veri que que haya recibido las siguientes piezas ADVERTENCIA No instale ni utilice el ventilador si falta alguna pieza o si hay piezas da adas Este producto est d...
Страница 24: ...ventilador de techo a velocidad baja y en el sentido de las agujas del reloj Esto produce una suave corriente ascendente que obliga al aire c lido que se acumula cerca del techo a bajar al espacio oc...
Страница 25: ...para colgar 3 Afloje los dos tornillos de fijaci n del soporte del barral Introduzca los cables de color negro azul y blanco a trav s de la varilla Figura 3 4 Coloque el soporte de la varilla y aline...
Страница 26: ...rnillo de fijaci n en la semiesfera Si el tornillo de fijaci n est flojo podr a provocar oscilaci n del ventilador Figura 6 5 Pase los cables a trav s de la cubierta de uni n del motor la cubierta par...
Страница 27: ...la caja de distribuci n el ctrica Pesta a Unidad del barral de la semiesfera ADVERTENCIA Si la pesta a no est en la ranura podr an producirse da os en los cables el ctricos y posibles descargas el ct...
Страница 28: ...izando el conector de cables suministrado Conecte el cable blanco desde la unidad del receptor marcado AC IN N al cable blanco de suministro de electricidad utilizando el conector de cables suministra...
Страница 29: ...colgante Blanco x 6 Conectores de cable Instalaci n de la cubierta del capuch n 2 Coloque y ajuste firmemente la cubierta para el tornillo de la base sobre los tornillos de reborde de la abrazadera p...
Страница 30: ...TORNILLOS DE CABEZA PHILLIPS 3 16 24 x 8 mm Aditamentos utilizados Para reducir el riesgo de lesiones personales no doble los soportes de aspas al instalarlos balancear las aspas o limpiar el ventilad...
Страница 31: ...de soporte extrayendo los tres tornillos Figura 21 2 Extraiga uno de los tres tornillos del soporte ubicado en la parte inferior de la unidad del motor Afloje levemente los otros dos tornillos Instale...
Страница 32: ...e la bombilla se enfr e durante 10 minutos antes de cambiar la bombilla La bombilla est presurizada y puede hacerse a icos NO TOQUE LA BOMBILA CON LAS MANOS SIN PROTECCI N Las huellas dactilares puede...
Страница 33: ...kit de iluminaci n 1 Desmonte la unidad del adaptador cubierta del interruptor desde el cubierta del interruptor placa de soporte extrayendo los tres tornillos Figura 21 2 Extraiga uno de los tres tor...
Страница 34: ...3V CR2032 bater a de dos piezas 4 Si se desea que el flujo del aire vaya en la direcci n opuesta apague el ventilador y espere a que se detengan las palas Deslice la carcasa de la cubierta para visual...
Страница 35: ...1 8 27 x 9 5 mm Bolsa de accesorios para el montaje de aspas Modelos N FP8095 Lista de piezas N de Ref Descripci n Pieza N Bolsa de accesorios para el montaje de los soportes de aspas Tornillos con c...
Страница 36: ...36 FP8095 Figura 1 3 4 5 6 10 9 8 7 1 12 14 13 11 2 Despiece NOTA la ilustraci n que se muestra no est hecha a escala y su con guraci n real puede variar The Camhaven...
Страница 37: ...stro principal de electricidad est desconectado 5 Algunos motores de ventilador son sensibles a las se ales de los controles de velocidad de estado s lido variables Los controles de estado s lido no s...
Страница 38: ...12 Fanimation 2012 02 V 01 10983 Bennett Parkway Zionsville IN 46077 Llame sin cargo al 888 567 2055 FAX 866 482 5215 Desde fuera de los EE UU llame al 317 733 4113 Visite nuestro sitio Web en www fan...