


9
How to Hang and Wire Your Ceiling Fan
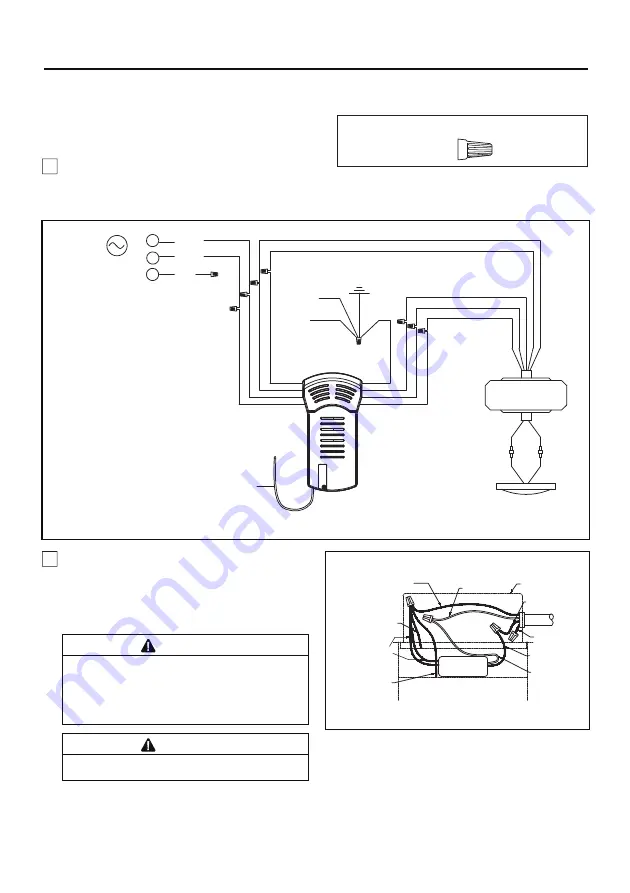
(Continued)
Figure 9
7.
Connect wires using connectors as shown in
Figure 8.
X 9
Wire
Connectors
RECEIVER HARDWARE USED:
CAUTION:
INCORRECT WIRE CONNECTION
COULD DAMAGE THIS RECEIVER.
WARNING
Check to see that all connections are tight,
including ground, and that no bare wire is
visible at the wire connectors. Do not operate
fan until the blades are in place. Noise and
motor damage could result.
Figure 8
BLACK
WHITE
L
N
RED
L1
AC POWER
BLUE
LIGHT KIT
DC MOTOR
RF ANTENNA
RECEIVER
BROWN
WHITE
BLACK
WHITE
BLUE
BLUE
BROWN
YELLOW /
GREEN (2)
CEILING
BRACKET
MOTOR
RED
GRAY
YELLOW
RED
GRAY
YELLOW
GROUND
NOTE:
If you feel that you do not have enough electrical
wiring knowledge or experience, have your fan installed
by a licensed electrician.
WARNING
The blades must be installed first before programming
is performed.
Listed Outlet Box
White Wire
from Supply
Green Wire
from Supply
(Ground)
Household
Supply
Black Wire
from Supply
Black Wire
from Receiver
White Wire
from Receiver
Green Wire
from Ceiling Bracket
(Ground)
Green Wire
from Motor
(Ground)
Yellow/Green Wire
from Receiver (2)
(Ground)
Receiver
Red Wire
from Supply
9.
After splicing and making the wire connections,
the wires should be spread apart and turned upward
with the grounded conductor, the equipment-grounding
conductor on one side of the ceiling bracket and the
ungrounded conductor on the other side of the ceiling
bracket.
(Figure 9)