background image

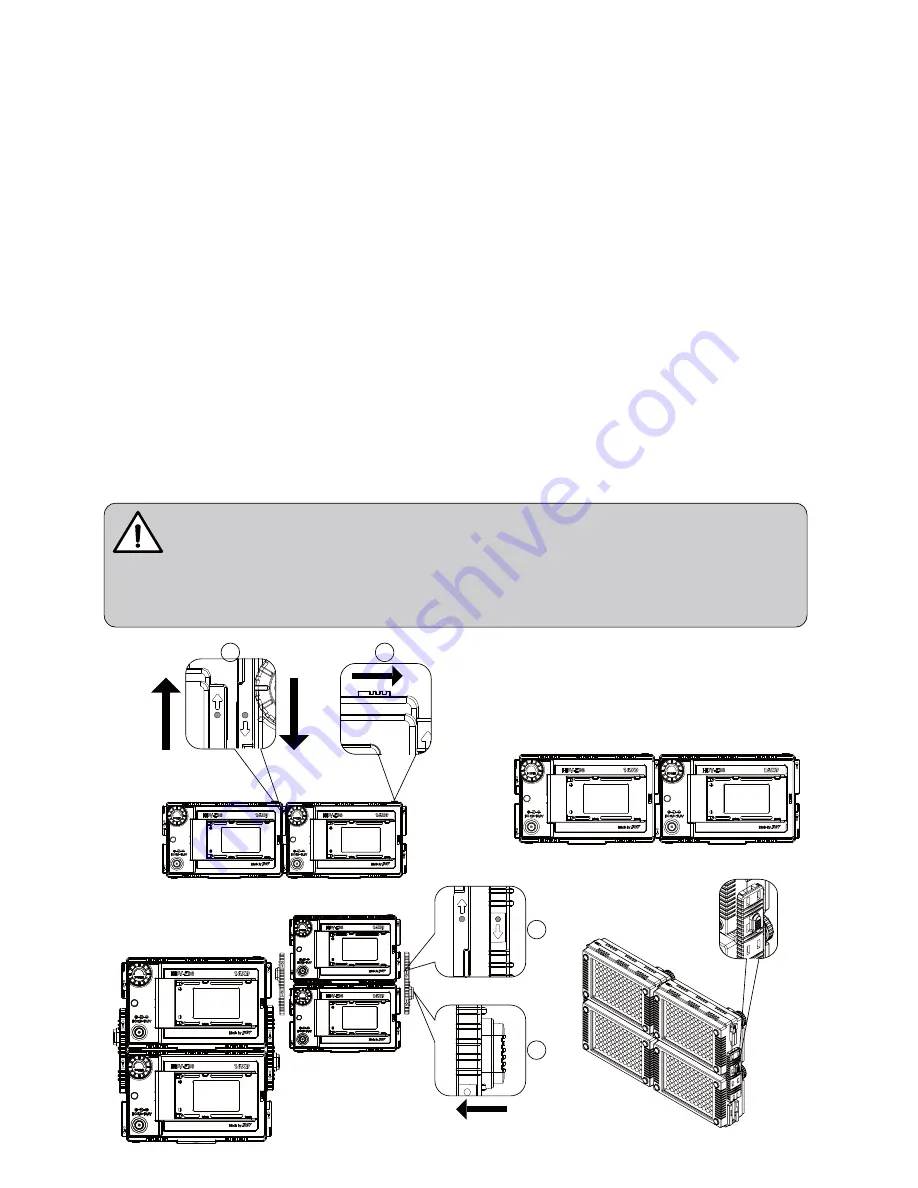
Multi-light combine

1. Horizontal extend: As the picture, point the Right combined joint of one light to 

    the Left combined joint of the other light. Push the right gently according to the 

    arrow, when hear the click sound that it is installed. Splice more lights, the same 

    method.

2. Unfolding horizontal light, just push lock following the cutter direction and remove 

    the light in the opposite direction in which splicing light.

3. Vertical extend: As the picture, point the joint of Combined Socket Accessory to 

    the combined joint of the light. Push Combined Socket Accessory gently 

    according to the arrow, when hear the click sound that it is installed. Such is the 

    case about the installation of a copy.

4. Unfolding vertical light, please press on (don’t drop) the lock button of the Combi

    ned Socket Accessory and push in the opposite direction in which splicing light.

The horizontal or vertical extend is limited to three, 3 * 3 square is the most, over 

light may affect stability. 

Note

Combine

Vertical extend

Vertical extend

-13-

Содержание HDV-Z96

Страница 1: ...ct or injury to yourself or to others Read the following safety precautions in their entirety before using this equipment Keep these safety instructions where all those who use the product will read t...

Страница 2: ...ipment to prevent contact switch causing no long term use of temporary nursing equipment caused a fire 6 Keep out of reach of children Failure to observe this precaution could result in injury 7 Obser...

Страница 3: ...s when using the battery charger Please do not directly face the light bulb when the photographic light ON Never block the ventilation grille by covering it with paper or clothes Do not place the phot...

Страница 4: ...mbined joint 5 Combined lock 6 Combined lock Parts diagram 7 Dimmer knob 9 Battery compartment cover lock 10 Battery compartment cover 11 AA Battery storage 12 Lithium battery storage 13 Shoe Head 14...

Страница 5: ...r photographic light 1 As the picture push the Battery Compartment Cover Lock in accordance with the arrow direction open the Battery Compartment Cover 2 According to the positive and negative icon to...

Страница 6: ...rescent screen may make some shine Light may improve the use of photographic color film of the ambiguity in order to better screen quality Use an external power supply 1 Turn off the light remove the...

Страница 7: ...6 C B A...

Страница 8: ...plicing light 3 Vertical extend As the picture point the joint of Combined Socket Accessory to the combined joint of the light Push Combined Socket Accessory gently according to the arrow when hear th...

Страница 9: ...C...

Отзывы: