4.
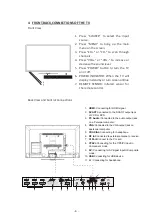
Front View
FRONT,BACK,CONNECTIONS OF THE TV
1.
Press ”SOURCE” to select the input
source.
2.
Press ”MENU” to bring up the main
menu on the screen.
3.
Press ”CH+” or ”CH-” to scan through
channels.
4.
Press ”VOL+” or ”VOL-” to increase or
decrease the sound level.
5.
Press ”POWER” bu
tt
on to turn the TV
on or o
ff
.
6.
POWER INDICATOR: When the TV will
display in standby or turn Green or Blue
7.
REMOTE SENSOR: infrared sensor for
the remote control.
Back View and Control Connec
ti
ons
- 6 -
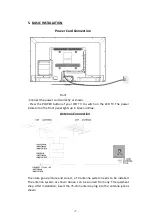
COAX
1
2
3
4
5
6
7
8 9
10
11
1.
HDMI :
Connecting for HDMI signal.
2.
SCART:
Connected to the SCART output jack
of VCR or DVD.
3.
PC Audio :
Connected to the audio output jack
on a Personal computer.
4.
VGA:
Connected to the VGA output jack on
apersonal computer.
5.
COAXIAL:
Connecting for headphone.
6.
RF In:
Connected to external antenna to receive.
7.
CI Port:
Connect to the CI card.
8.
YPbPr:
Connecting for the Y/Pb/Pr Input in
Component mode.
9.
AV :
Connecting for AV signal input inComposite
mode.
10.
USB:
Connecting for USB device.
11.
:
Connecting for headphone.
Содержание FL40100
Страница 6: ...3 ΠΕΡΙΕΧΟΜΕΝΑ ΧΑΡΤΟΚΙΒΩΤΙΟΥ Tηλεόραση LED Tηλεχειριστήριο Μπαταρίες AAA Εγχειρίδιο χρήσης 5 ...
Страница 48: ...USER S MANUAL 40 LED Television MODEL FL40100 Read this manual carefully and retain future reference ...
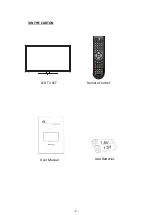
Страница 53: ...3 IN THE CARTON LED TV SET Remote Control AAA Batteries User Manual 5 ...

